1
2
3
4
Oil spray nozzle
57
Removing oil spray nozzle
D
Drain engine oil
D
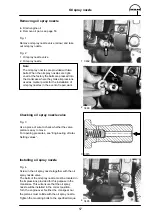
Fig. 1
Remove oil spray nozzle valve (arrow) and take
out oil spray nozzle.
Fig. 2
1 Oil spray nozzle valve
2 Oil spray nozzle
Note:
The oil spray nozzles are provided with two
balls. When the oil spray nozzles are tight-
ened at the factory the balls are pressed into
the crankcase where they make impressions
used as marker points for the installation of
oil spray nozzles in the event of repair work.
Checking oil spray nozzle valve
Fig. 3
Use a piece of wire to check whether the valve
piston is easy to move.
For opening pressures, see ”Engineering
S
Data
S
Setting values”.
Installing oil spray nozzle
Fig. 4
Screw in the oil spray nozzle together with the oil
spray nozzle valve.
The balls of the oil spray nozzle must be located in
the impressions provided for this purpose in the
crankcase. This will ensure that the oil spray
nozzle will be installed in the correct position.
Turn the engine over. Neither the crankgear nor
the pistons must collide with the oil spray nozzle.
Tighten the mounting bolts to the specified torque.
3462
3463
2
1
3673
3465
Summary of Contents for D 2866 LE 401
Page 1: ......
Page 17: ...Engine views D 2866 LE401 16...
Page 18: ...Engine views D 2866 LE401 17...
Page 19: ...Cross section of engine 18...
Page 20: ...Longitudinal section 19...
Page 124: ...123 Special tools...
Page 125: ...Special tools 124 2 3 4 5 6 7 9 1 8 6 1 6 2 6 3...
Page 129: ...Special tools 128 21 22 23 25 25 2 24 25 1 26 27 1 27 2 27 20 1 19 2 19 1 20 2 19 20...
Page 131: ...Special tools 130 29 28 30...
Page 138: ......

