background image

GROUNDING INSTRUCTIONS: 
This tool should be grounded while in use to protect 
the operator from electric shock. The tool is 
equipped with a three-conductor cord and three-
prong grounding type plug to fit the proper 
grounding type receptacle. The green (or green and 
yellow) conductor in the cord is the grounding wire. 
Never connect the green (or green and yellow) wire 
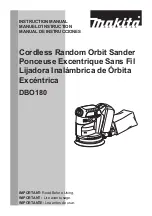
to a live terminal. Your unit is for use on 120 volts 
and has a plug that looks like Fig. "A".


Cover of Grounded 

Outlet Box

Grounding 

Blade

Fig. A


000088 

USB047-4 

SPECIFIC SAFETY RULES 

DO NOT let comfort or familiarity with product 
(gained from repeated use) replace strict adherence 
to polisher safety rules. If you use this tool unsafely 
or incorrectly, you can suffer serious personal 
injury. 

1. 

Accessories must be rated for at least the 
speed recommended on the tool warning label.


Wheels and other accessories running over rated 
speed can fly apart and cause injury. Maximum 
operating speed of accessories should be higher 
than the highest no load speed marked on the 
tool’s nameplate. 

2. 

Hold tool by insulated gripping surfaces when 
performing an operation where the cutting 
tool may contact hidden wiring or its own 
cord.

 Contact with a "live" wire will make 

exposed metal parts of the tool "live" and shock 
the operator. 

3. 

Check the backing pad carefully for cracks, 
damage or deformity before operation. 
Replace cracked, damaged or deformed pad 
immediately. 

4. 

NEVER use tool with wood cutting blades or 
other sawblades. Such blades when used on a 
polisher frequently kick and cause loss of 
control leading to personal injury. 

5. 

Hold the tool firmly. 

6. 

Keep hands away from rotating parts. 

7. 

Make sure the abrasive disc or wool bonnet is 
not contacting the workpiece before the 
switch is turned on. 

8. 

When sanding metal surfaces, watch out for 
flying sparks. Hold the tool so that sparks fly 
away from you and other persons or 
flammable materials. 

9. 

Do not leave the tool running. Operate the tool 
only when hand-held. 

10. 

Do not touch the workpiece immediately after 
operation; it may be extremely hot and could 
burn your skin. 

11. 

Check that the workpiece is properly 
supported. 

12. 

Pay attention that the wheel continues to 
rotate after the tool is switched off. 

13. 

This tool has not been waterproofed, so do 
not use water on the workpiece surface. 

14. 

Ventilate your work area adequately when you 
perform sanding operations. 

15. 

Use of this tool to sand some products, paints 
and wood could expose user to dust 
containing hazardous substances. Use 
appropriate respiratory protection. 

SAVE THESE INSTRUCTIONS. 


WARNING: 

MISUSE or failure to follow the safety rules stated in 
this instruction manual may cause serious personal 
injury. 

USD101-2 

Symbols 

The followings show the symbols used for tool. 

 volts 


 amperes 


 hertz 


 alternating 

current 


 no 

load 

speed 


  revolutions or reciprocation per minute 


Summary of Contents for 9227CY

Page 1: ...UEL D INSTRUCTION MANUAL DE INSTRUCCIONES IMPORTANT Read Before Using IMPORTANT Lire avant usage IMPORTANTE Leer antes de usar Electronic Sander Polisher Ponceuse polisseuse lectronique Lijadora Pulid...

Page 2: ...diators ranges and refrigerators There is an increased risk of electric shock if your body is grounded 6 Do not expose power tools to rain or wet conditions Water entering a power tool will increase t...

Page 3: ...sories that are recommended by the manufacturer for your model Accessories that may be suitable for one tool may become hazardous when used on another tool Service 23 Tool service must be performed on...

Page 4: ...for cracks damage or deformity before operation Replace cracked damaged or deformed pad immediately 4 NEVER use tool with wood cutting blades or other sawblades Such blades when used on a polisher fre...

Page 5: ...y then release it Speed adjusting dial 1 003440 The tool speed can be changed by turning the speed adjusting dial to a given number setting from 1 to 6 At the time when the switch trigger is fully pul...

Page 6: ...e backing pad onto the spindle Insert the sleeve 18 into the center hole of the backing pad Using the sleeve 18 as a positioning guide install the wool bonnet on the backing pad with the sleeve 18 ins...

Page 7: ...ut 15 degrees to the workpiece surface Apply slight pressure only Excessive pressure will result in poor performance and premature wear to abrasive disc MAINTENANCE CAUTION Always be sure that the too...

Page 8: ...ool freight prepaid to one of Makita s Factory or Authorized Service Centers If inspection shows the trouble is caused by defective workmanship or material Makita will repair or at our option replace...

Page 9: ...ue fa on que ce soit par exemple en enlevant la broche de mise la terre N utilisez pas d adaptateur de fiche Si vous n tes pas certain que la prise de courant est correctement mise la terre adressez v...

Page 10: ...t personnes qui en ignorent le fonctionnement Les outils repr sentent un danger entre les mains de personnes qui n en connaissent pas le mode d utilisation 20 Prenez soin de bien entretenir les outils...

Page 11: ...e fonctionnement des accessoires doit tre sup rieure la vitesse maximale vide indiqu e sur la plaque signal tique de l outil 2 Tenez l outil par ses surfaces de prise isol es pendant toute op ration o...

Page 12: ...ctionnement Blocage de l arbre 1 003432 ATTENTION N activez jamais le blocage de l arbre alors que l arbre bouge Vous pourriez endommager l outil Appuyez sur le blocage de l arbre pour emp cher l arbr...

Page 13: ...st hors tension et d branch Installez toujours la poign e arceau ou la poign e lat rale Installation de la poign e arceau accessoire en option ATTENTION Avant l utilisation assurez vous toujours que l...

Page 14: ...sur le plateau de caoutchouc et vissez le contre crou sur l arbre Pour serrer le contre crou appuyez fermement sur le blocage de l arbre pour emp cher l arbre de tourner puis utilisez la cl contre cro...

Page 15: ...en m me temps N utilisez que des charbons identiques Utilisez un tournevis pour retirer les bouchons de porte charbon Enlevez les charbons us s ins rez en de nouveaux et revissez solidement les bouch...

Page 16: ...ODUIT CET AVIS DE NON RESPONSABILIT S APPLIQUE LA FOIS PENDANT ET APR S LA P RIODE COUVERTE PAR CETTE GARANTIE MAKITA D CLINE TOUTE RESPONSABILIT QUANT TOUTE GARANTIE TACITE INCLUANT LES GARANTIES TAC...

Page 17: ...e y conectado a tierra seg n todos los c digos y ordenanzas Nunca retire la conexi n a tierra o modifique la clavija de ninguna manera No use clavijas con adaptadores Verifique con un electricista cal...

Page 18: ...l alcance de los ni os o de personas que no est n capacitadas para manejarlas Las herramientas son peligrosas si est n en manos de usuarios inexpertos 20 Mantenga las herramientas de corte afiladas y...

Page 19: ...do a una velocidad superior a la especificada pueden desintegrarse y ocasionar lesiones La m xima velocidad de operaci n de los accesorios deber ser superior a la velocidad m s alta sin carga marcada...

Page 20: ...N DEL FUNCIONAMIENTO PRECAUCI N Aseg rese siempre de que la herramienta est apagada y desconectada antes de ajustar o comprobar cualquier funci n en la misma Bloqueo del eje 1 003432 PRECAUCI N No ac...

Page 21: ...inarse ENSAMBLE PRECAUCI N Aseg rese siempre de que la herramienta est apagada y desconectada antes de realizar cualquier trabajo en la misma Instale siempre el empu adura redondo o la empu adura late...

Page 22: ...ilice accesorios para esmeriladora especificados en este manual Estos deber n ser adquiridos aparte Instale la almohadilla de goma en el eje Ubique el disco abrasivo sobre la almohadilla de goma y aju...

Page 23: ...taescobillas Ambas escobillas de carb n deber n ser sustituidas al mismo tiempo Utilice nicamente escobillas de carb n originales e id nticas Utilice un destornillador para quitar Tapa del carb n Extr...

Page 24: ...NTA O USO DEL PRODUCTO ESTA RENUNCIA SER APLICABLE TANTO DURANTE COMO DESPU S DEL T RMINO DE ESTA GARANT A MAKITA RENUNCIA LA RESPONSABILIDAD POR CUALQUIER GARANT A IMPL CITA INCLUYENDO GARANT AS IMPL...

Page 25: ...25...

Page 26: ...26...

Page 27: ...27...

Page 28: ...nos polvos creados por el lijado aserrado esmerilado taladrado y otras actividades de la construcci n contienen sustancias qu micas reconocidas por el Estado de California como causantes de c ncer def...

Reviews: