OPERATION
69
Incline the quick-fit coupling so that the forks are not in
the horizontal position. Approach the load slowly with
the boom lowered and insert the forks under it.
Apply the parking brake and set the reverse gear lever
in the neutral position.
Lift the load
[1]
slightly and incline the quick-fit coupling
upwards
[2]
to make the load stable. Take care to avoid
modifying the load balance negatively.
Taking a load from a height with the vehicle on
tyres
Position the vehicle at right angles to the chosen load.
Make sure the forks pass under the load and are
adjusted to the maximum possible width.
Bring the vehicle near the load slowly with the forks in
the horizontal position. Move carefully to insert the
forks under the load. The forks must enter the pockets
of the pallet all the way with precision. Take care to
avoid knocking against the load.
Apply the parking brake and set the reverse gear lever
in the neutral position.
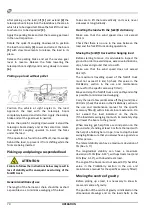
Lift the load
[1]
slightly and incline the quick-fit
coupling upwards
[2]
to make the load stable, taking
care to avoid modifying the balance negatively.
If possible, lower the load without shifting the vehicle:
lift the boom to move the load away
[3]
, retract the
telescopic boom
[4]
and lower it to bring the load to
the transport position
[5]
.
If the load cannot be lowered without shifting the
vehicle, move gently in reverse and with utmost care
[6]
to move the load away. Retract the telescopic
boom
[7]
and lower it
[8]
to bring the load to the
transport position.
Bring the load to the transport position
Every time reference is made to the “transport
posi
tion” in this Manual, it means the configuration of
the vehicle is as described below:
-
Turret in central position;
-
Stabilisers completely retracted and raised;
-
Telescopic boom completely retracted;
-
Quick-fit coupling rotated slightly upwards;
-
Telescopic boom lowered in such a way as to keep the
load approx. 300 mm off the ground.
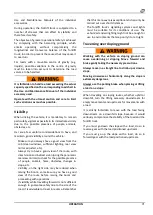
Placing a load at a height with the vehicle on
tyres
3
4
5
6
7
8
1
3
2
4
5
6
Summary of Contents for RTH 4.18
Page 6: ......
Page 27: ...SECTION ON PRODUCT INFORMATION 27 DIMENSIONS RTH 4 18 RTH 5 18 ...
Page 28: ...28 SECTION ON PRODUCT INFORMATION RTH 5 21 RTH 5 23 ...
Page 29: ...SECTION ON PRODUCT INFORMATION 29 RTH 5 25 RTH 6 21 ...
Page 30: ...30 SECTION ON PRODUCT INFORMATION RTH 6 23 RTH 6 25 ...
Page 78: ......


