


32/113
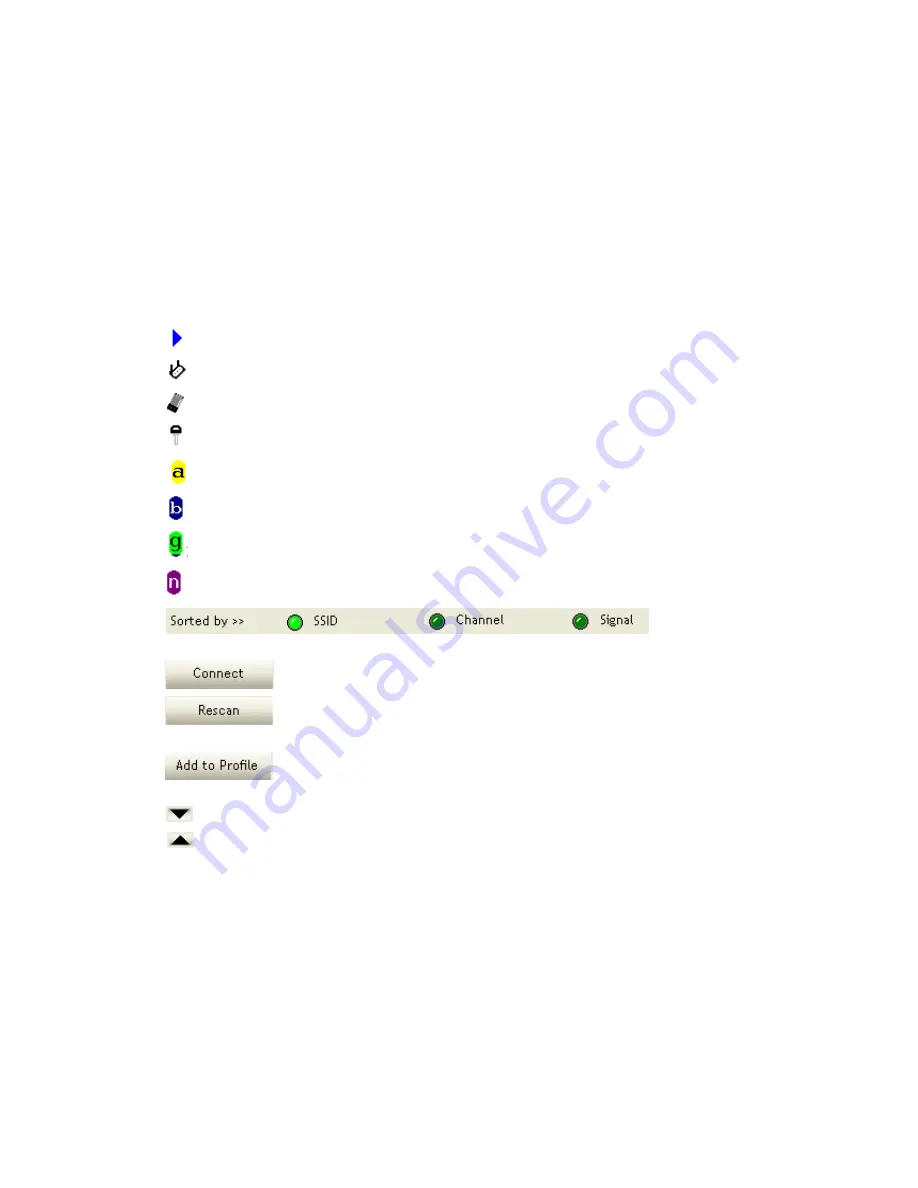
Definition of each field:
SSID: Name of BSS or IBSS network.
Network Type: Network type in use, Infrastructure for BSS, Ad-Hoc for IBSS
network
Channel: Channel in use.
Wireless Mode: AP support wireless mode. It may support 802.11a, 802.11b,
802.11g or 802.11n wireless mode.
Security-Enable: Indicates if the AP provides a security-enabled wireless network.
Signal: Receive signal strength of the specified network.
Icons and buttons:
: Indicates that the connection is successful.
: Indicates the network type is in infrastructure mode.
: Indicates the network type is in Ad-hoc mode.
: Indicates that the wireless network is security-enabled.
: Indicates 802.11a wireless mode.
: Indicates 802.11b wireless mode.
: Indicates 802.11g wireless mode.
: Indicates 802.11n wireless mode.
Indicate that the AP list is sorted by SSID, Channel or Signal.
: Button to connect to the selected network.
: Issues a rescan command to the wireless NIC to update information
on the surrounding wireless network.
: Adds the selected AP to the Profile setting. It will bring up a profile
page and save the user's setting to a new profile.
: Shows the Status Section.
: Hides the Status Section.
Connected network:
When RaUI first runs, it will select the best AP to connect to automatically.
If the user wants to use another AP, they can click "Connect" for the intended AP to
make a connection.
If the intended network uses encryption other than "Not Use," RaUI will bring up the
security page and let the user input the appropriate information to make the
connection. Please refer to the example on how to fill in the security information.
When you double click an AP, you can see detailed information about that AP.
The detailed AP information is divided into three parts. They are General, WPS, CCX
information and 802.11n (The 802.11n button only exists for APs supporting N mode.)
Summary of Contents for LP-7617
Page 1: ...1 113 Wireless LAN USB Adapter User Manual 1 0 2010...
Page 14: ...14 113 Double click WLAN AutoConfig Manage the AutoConfig properties in the dialog box...
Page 17: ...17 113 Double click the Network and Sharing Center icon...
Page 21: ...21 113 Figure 2 1 5 Profile page Figure 2 1 6 Network page Figure 2 1 7 Advance page...
Page 22: ...22 113 Figure 2 1 8 Statistics page Figure 2 1 9 WMM page Figure 2 1 10 WPS page...
Page 28: ...28 113 The Add Profile will appear...
Page 30: ...30 113 Now the profile which the user set appears in the profile list Click Activate...
Page 37: ...37 113 Click Add to Profile...
Page 39: ...39 113 Next you will see the new profile in the profile list Click Activate...
Page 78: ...78 113 The Auth Encry function will appear as below...
Page 80: ...80 113 Click OK The dialog box will appear as below...
Page 82: ...82 113 Auth Encry function appears...
Page 87: ...87 113 Click 8021X and the setting page will appear...
Page 89: ...89 113 2 Click OK The dialog box should appear as below...
Page 93: ...93 113 3 Click OK The dialog box should appear as the image below...
Page 98: ...98 113 2 Click OK The dialog box should appear as the image below...
Page 99: ...99 113 3 If the connection is successful the dialog box will appear as the image below...
Page 101: ...101 113 Press Connect button show Auth Encry window authentication mode is WAPI PSK...
Page 102: ...102 113 Key type is Hex enter 1234567890...
Page 103: ...103 113 You can also connect AP with WAPI CERT authentication mode...
Page 104: ...104 113 Select user certificate...
Page 105: ...105 113 Select authentication server certificate...
Page 111: ...111 113 It can t add the profile in Network page...


