background image


35 

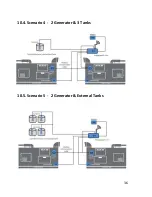
10.2. Scenario 2 - 

 1 Generator & 2 Tanks 


10.3. Scenario 3 - 2 Generator & 2 Tanks (Internal Tanks) 


Summary of Contents for EnergyLogicIQ

Page 1: ...2018 LogicLadder Instruction Manual EnergyLogicIQ Generator Monitoring System Version 12 2017...

Page 2: ......

Page 3: ...Specifications 5 5 1 EnergyLogicIQ IoT Cloud Connector 5 5 2 Ultrasonic Fuel Level Sensor 6 5 3 Energy Meter 8 5 4 Flow Meter Totalizer 9 6 Mounting Information 10 7 EnergyLogicIQ IoT Cloud Connector...

Page 4: ...21 8 Ultrasonic Fuel Sensor 21 8 1 Working Principle 21 8 2 Wiring Connection 22 8 3 Sensor Installation 23 8 4 Sensor Calibration 25 9 Energy Meter 27 9 1 Energy Meter Mounting 27 9 2 Wiring Diagram...

Page 5: ...6 10 5 Scenario 5 2 Generator External Tanks 36 11 EnergyLogicIQ Cloud Software 37 11 1 Sign Up 37 11 2 Sign In 37 11 3 Setup Cloud Connector Generator 37 12 Troubleshooting 38 13 Declaration of Confo...

Page 6: ...attachments and power supplies provided by the manufacturer connecting non approved antennas or power supplies may damage the unit cause interference or create an electric shock hazard and will void...

Page 7: ...ot present Bonding between conduit and Protective Earth PE is required and must be part of the installation Mounting the device in a correct orientation will ensure proper operation Please verify the...

Page 8: ...tor V4 x 1 Nos 2 Ultrasonic fuel level Sensor x 1 Nos 3 Energy meter x 1 Nos 4 Flow meter Optional 5 Installation flyer x 1 Nos 3 Product Certifications Product Compliance Standard Directive Approval...

Page 9: ...4 4 Introduction EnergyLogicIQ Generator hardware and software provides real time remote generator monitoring over the internet...

Page 10: ...SIM Support Yes Sim Slot Class 10 both Mobile Station Class B Code Scheme 1 to 4 Band Quad 850 900 1800 1900 MHz Sim Slot Holder 3 5V 6 8 Pin Mechanical Environment Protection IP 65 Operating Tempera...

Page 11: ...on off and Run hours Yes Generator External Tanks Monitored 2 Generator tanks and 2 more Internal External Fuel Tanks Fuel Level and Volume Yes Generator Battery Voltage Yes Network Signal Strength Ye...

Page 12: ...25 Indicator LED Yellow Solid Yellow object in the evaluation range Yellow flashing Program function object detected LED RED Solid Red Error Red flashing Program function object not detected Output Ou...

Page 13: ...ous Current Direct Current 0 02A to 6A Accuracy 0 5 of reading Secondary Current 1A to 5A Accuracy 0 5 of reading CT Ratio 1 to 9999 Programmable Starting Current 10mA Accuracy Power Factor 0 5 of rea...

Page 14: ...uency 45Hz to 65Hz Accuracy 0 5 of reading On hour Up to 65000 hours 5 4 Flow Meter Totalizer Parameter Specification Electrical Specification Power Supply 3 8 24VDC nominal 24VDC Output Signal RS485...

Page 15: ...d in an IP65 enclosure Mount the enclosure on a rigid surface using four fastening screws The GPS antenna of the IoT Cloud Connector should be mounted in a way that it has a considerably clear view to...

Page 16: ...11...

Page 17: ...12 7 EnergyLogicIQ IoT Cloud Connector A Top View B Top Side View...

Page 18: ...13 C Left Side View D Bottom Side View...

Page 19: ...12 RS232 Port 3 Digital Input LED 13 RS485 Port 4 GSM network LED 14 Debug Port 5 Power LED 15 4 20 mA current sensor ports 6 GSM Antenna 16 0 30V voltage sensor ports 7 GPS Antennae 17 Digital Input...

Page 20: ...first device you will automatically guided on the screen through a wizard to provision your device 4 If this is your second or subsequent device click on Click on setting icon on the right top corner...

Page 21: ...Color dot Meaning Green dot Device is online Red dot Device is offline Grey dot Device is not successfully provisioned 7 5 Connecting Ultrasonic Fuel Level Sensors You can connect up to four ultrasoni...

Page 22: ...7 7 6 Connecting Energy Meters Flow Meters Controllers Energy meters Flow meters and Generator Controllers are all daisy chained on the same RS485 port Multiple devices are daisy chained as shown belo...

Page 23: ...of Batteries 1 30V as below Channels has marking to connect batteries for generator Do not connect batteries of higher voltage rating without scaling them down to this range using a PT coil Connecting...

Page 24: ...19 7 8 Connecting Generator On Off Signal and Run Hours...

Page 25: ...D blink on data transmission byte to connected peripheral RX Green LED blink on receiving data byte from connected peripheral Debug TX Yellow LED blink on data transmission byte on debug port RX Green...

Page 26: ...SM chipset can be upgraded by connecting micro USB Detailed Process can be performed in consultation with LogicLadder Support 8 Ultrasonic Fuel Sensor The following instructions are for sensors models...

Page 27: ...22 travelled by the ultrasonic pulse is calculated and the distance of the fuel surface from sensor is found This is converted to a linear 4 20 mA sensor output 8 2 Wiring Connection...

Page 28: ...point on the center of the oil tank surface Corner installation will cause inner wall reflection and erroneous reading Sensor sound wave must have sufficient diameter to cause no inner wall reflection...

Page 29: ...un shade for outside installations to prevent the sensor body from overheating and causing erroneous measurements The sensor body should stay equal to the ambient air temperature so the sensor s built...

Page 30: ...he Teach In input for at least 1s LEDs indicate whether the sensor has recognized the target during the calibration procedure 1 Mount the sensor on the tank and ensure the fuel level is at minimum lev...

Page 31: ...fill the tank with fuel to the maximum level 6 Calibrate for maximum level by applying UB to the Teach In input yellow LED flashes 7 Disconnect the Teach In input from UB to save the maximum level cal...

Page 32: ...27 9 Energy Meter 9 1 Energy Meter Mounting The front bezel panel of the basic model is molded plastic Bezel dimensions are 92x92mm Depth 50mm behind the bezel...

Page 33: ...ge levels to bring current and voltage in the input range of the energy meter 6A current and 350 L N Voltage Install the CT and PT as per the diagram below 9 2 1 3 Phase 4 wire System Fig 1 Connection...

Page 34: ...ting Connect the neutral wire to the terminal marked N Connect the two wires from the R phase CT to the terminal marked IR and IR such that S1 from CT goes to IR Connect the two wires from the Y phase...

Page 35: ...er There are basically two modes of operations 1 Program Mode a View Mode b Edit Mode 2 Run Mode After supplying auxiliary power 85 AC to 265V AC the unit displays immediately power information KEY MO...

Page 36: ...ode Exit from PROG mode to RUN mode RUN Key Press is used to display previous parameter PROG Edit Mode Increment value in edit mode View Mode Display previous configuration parameter in view mode RUN...

Page 37: ...32 After mounting up and powering up the meter follow the below setup instruction 1 Set up procedure for CT and PT Ratio...

Page 38: ...33 2 Setup communication parameter...

Page 39: ...ollowing table Device Slave ID Generator 1 Slave ID Generator 2 Energy Meter 1 2 Flow Meter 3 4 Generator Controller 5 6 10 Installation Scenario There are three scenarios where different setup is req...

Page 40: ...35 10 2 Scenario 2 1 Generator 2 Tanks 10 3 Scenario 3 2 Generator 2 Tanks Internal Tanks...

Page 41: ...36 10 4 Scenario 4 2 Generator 3 Tanks 10 5 Scenario 5 2 Generator External Tanks...

Page 42: ...generator energylogiciq com 11 3 Setup Cloud Connector Generator If you are setting up the first device after Sign Up you should follow the instruction on the web portal to add provision your first de...

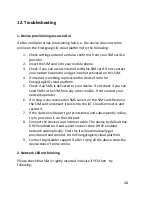
Page 43: ...ck if you can send SMS to the SIM from any other mobile If not contact your network operator 6 If in step 4 you received an SMS save it on the SIM card Remove the SIM card and insert it back into the...

Page 44: ...2 Check that the sensor deadband and sensor range are set correct 3 If the above two parameters are correct check if the sensor is clear of the tank side walls and obstructions 4 There is any fixed of...

Page 45: ...tus perform above steps for generator ON OFF detection issues Run hours are computed from ON OFF signal 2 Contact support for further assistance 7 Energy Meter display does not turn ON Check that ther...

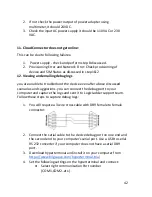
Page 46: ...m http www modbustools com download html b Connect a USB to RS485 converter to your laptop this can be procured locally c Connect RS485 out of energy meter with Laptop using USB to RS485 connecting co...

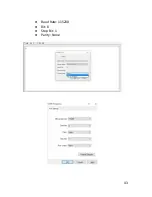
Page 47: ...iscussed scenarios and suggestions you can connect the debug port to your computer and capture the logs and sent it to LogicLadder support team Follow these steps to capture debug logs 1 You will requ...

Page 48: ...43 Baud Rate 115200 Bit 8 Stop Bit 1 Parity None...

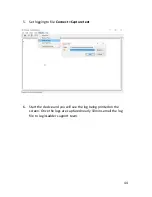
Page 49: ...5 Set logging to file Connect Capture text 6 Start the device and you will see the log being printed on the screen Once the logs are captured nearly 10mins email the log file to LogicLadder support te...

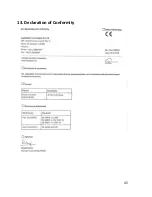
Page 50: ...45 13 Declaration of Conformity...

Page 51: ...46...

Page 52: ...47...

Page 53: ...anual any software drivers or associated application software provided with this product and specifically disclaims any expressed or implied warranties of merchantability or fitness for any particular...

Page 54: ......
Page 55: ...LogicLadder Technologies Private Limited Phone 91 9870109122 E mail support logicladder com Online https support logicladder com www logicladder com...

Reviews: