Guided Tours
Tour #3: Controlling Chamber Conditions
3-26
Using the LI-6400
3
10
Enter a target thatÕs too wet
Press
f2
and enter a wet target, such 5 mmol mol
-1
above the original value
used back in Step 4 (e.g. 25, since we used 20). Soon the message
>> FLOW: Need
¯
SCRUB or drier target <<
will be flashing on the center of the display. Notice that the flow rate is about
30 µmol s
-1
if you have a CO
2
mixer, or near zero if you donÕt. Change the
desiccant to full bypass and wait; the target humidity may or may not be
achieved, and in fact you may even get ÒHigh Humidity AlertÓ messages
while you are waiting.
11
Return to the original target
WeÕll end this experiment by returning the target to the original value, and the
desiccant to the mid-range setting.
About Warning Messages
While in New Measurements mode, there are a handful of situations that
will cause OPEN to alert you to possible problems. Experiment #2 illus-
trated two. The complete list of possible causes is in
on page 20-7. When such a situation occurs, a
warning message is displayed on the middle label line on the display, as
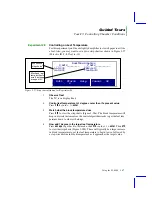
illustrated in Figure 3-20.
If you wish to disregard the displayed message and get it out of the way,
press
ctrl Z
to turn it off (hold the
ctrl
key down and press
Z
). Note that this
is a toggle: if you press
ctrl Z
again, the message will re-appear. Also, note
that each time you re-enter New Measurements mode, OPEN resets this
flag, so that warnings will again be displayed.
Points to Remember
¥ Sample humidity is a balance between what is coming from the leaf, and
the flow from the console: how dry (desiccant scrub setting) and how fast
(flow rate).
¥ If you ask for humidities outside what can be achieved, given a desiccant
tube scrub setting and leaf transpiration rate, youÕll get a warning message.
¥ These flow warnings can be remedied by adjusting the scrub knob, or
changing the target value, or sometimes just by waiting.
Summary of Contents for LI-6400
Page 1: ...Using the LI 6400 Portable Photosynthesis System ...
Page 15: ...Part I The Basics ...
Page 16: ......
Page 174: ...Making Measurements Answers to Questions 4 56 Using the LI 6400 4 ...
Page 175: ...Part II Useful Details ...
Page 176: ......
Page 200: ...Standard Tools Power ON Hooks 5 24 Using the LI 6400 5 ...
Page 214: ...Real Time Data Real Time Graphics 6 14 Using the LI 6400 6 ...
Page 234: ...Environmental Control Light Control 7 20 Using the LI 6400 7 ...
Page 244: ...Light Sensor Considerations Gallium Arsenide Phosphide GaAsP Sensor 8 10 Using the LI 6400 8 ...
Page 288: ...Data Logging Making Your Own AutoPrograms 9 44 Using the LI 6400 9 ...
Page 289: ...Part III Working With Files ...
Page 290: ......
Page 312: ...The LPL File System Troubleshooting 10 22 Using the LI 6400 10 ...
Page 340: ...Downloading Files Using a Data Capture Program 11 28 Using the LI 6400 11 ...
Page 375: ...Part IV Configuration Issues ...
Page 376: ......
Page 420: ...Defining User Variables Old Style vs New Style 15 18 Using the LI 6400 15 ...
Page 454: ...Using an Energy Balance Further Reading 17 12 Using the LI 6400 17 ...
Page 455: ...Part V Maintenance Troubleshooting ...
Page 456: ......
Page 572: ...Troubleshooting Useful Information 20 46 Using the LI 6400 20 ...
Page 593: ...Part VI Programming ...
Page 594: ......
Page 622: ...Programming with LPL Compiler Directives 22 28 Using the LI 6400 22 ...
Page 846: ...Index I 16 Using the LI 6400 ...


