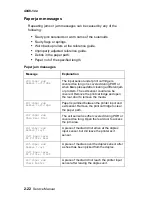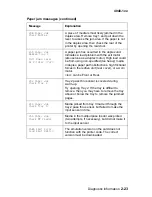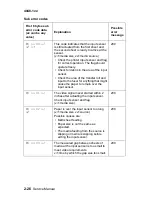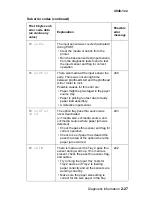
2-36
Service Manual
4048-1xx
Service checks
Service checks involve measuring voltages of the LVPS, HVPS, and
controller card assembly. Continuity and resistance verifications are
done on cables and components as required.
Note: When looking at the printed side of a printed circuit board,
connectors are designated with “J” followed by a number. Pin #1 is
designated on the board by an adjacent “1” or triangle. Pin numbers
index sequentially to the opposite end of the connector. See
“Controller card assembly” on page 5-2
for more information.
The controller card 5 V dc and +24 V dc from the LVPS to
its clients. Therefore, when either voltage is missing as an output on
the controller card, be sure to verify the inputs from the LVPS (J17,
sockets 1 and 2 at +24 V dc and socket 5 at +5 V dc).
Cooling fan service check
FRU
Action
Cooling fan (fuser)
Cooling fan (LVPS)
Make sure the plugs of the cooling fan cables
are properly seated.
Both fans are connected to the same +24 V dc
on pin #1 at J19 on the controller. Pin #2 is
ground for both fans. Therefore if one fan
functions and the other does not, either the fan
or the cable is faulty. Turn the printer off and
disconnect the cooling fan cable at the suspect
cooling fan. Turn the printer on. Within
approximately 15 seconds the controller card
assembly should apply +24V dc to the fan. See
“Controller card assembly” on page 5-2
for
more information.
• If voltage is present, reconnect the fan to
verify the fan is faulty. If it is, replace the fan.
• If voltage is not present, disconnect the
cable from the controller card (J19) and
check for continuity on each cable.
–
If the cable is good, see
“Controller
card service check” on page 2-38
for
more information.
–
If the cable is damaged, replace the
cable.
Summary of Contents for T 430
Page 14: ...xiv Service Manual 4048 1xx Japanese Laser Notice Chinese Laser Notice ...
Page 15: ...Laser notices xv 4048 1xx Korean Laser Notice ...
Page 16: ...xvi Service Manual 4048 1xx ...
Page 21: ...Safety information xxi 4048 1xx ...
Page 34: ...1 12 Service Manual 4048 1xx ...
Page 122: ...3 28 Service Manual 4048 1xx ...
Page 143: ...Repair information 4 21 4048 1xx 8 Disconnect the cable from the operator panel card ...
Page 202: ...4 80 Service Manual 4048 1xx 8 Remove the bellcrank while holding the link guide ...
Page 205: ...Locations and connections 5 1 4048 1xx 5 Locations and connections Exterior locations ...
Page 216: ...6 4 Service Manual 4048 1xx ...
Page 218: ...7 2 Service Manual 4048 1xx Assembly 1 Covers ...
Page 220: ...7 4 Service Manual 4048 1xx Assembly 2 Paper feed ...
Page 222: ...7 6 Service Manual 4048 1xx Assembly 3 Frame ...
Page 226: ...7 10 Service Manual 4048 1xx Assembly 6 Charging ...
Page 228: ...7 12 Service Manual 4048 1xx Assembly 7 Electronics and cables 1 ...
Page 230: ...7 14 Service Manual 4048 1xx Assembly 8 Electronics and cables 2 ...
Page 232: ...7 16 Service Manual 4048 1xx Assembly 8 cont Electronics and cables II ...
Page 234: ...7 18 Service Manual 4048 1xx Assembly 9 Sensors ...
Page 236: ...7 20 Service Manual 4048 1xx Assembly 10 Options 1 2 3 4 ...
Page 249: ......

