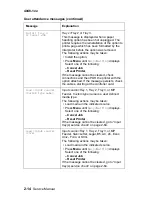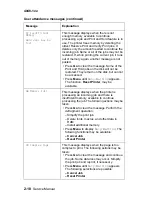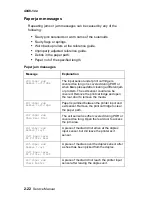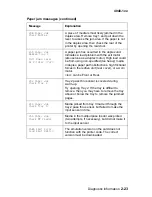
Diagnostic information
2-27
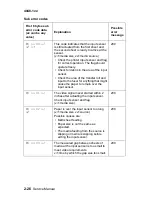
4048-1xx
84
xx
04
The input sensor was covered (activated)
during POST.
• Clear the media or debris from the
printer.
• Run the base sensor test (input sensor)
from the diagnostic tests menu to test
the input sensor and flag for correct
operation.
84
xx
05
x1
There was media at the input sensor too
early. There was not enough time
between printhead start and the printhead
mirror motor to lock.
Possible causes for this error are:
• Paper might be pre-staged in the paper
source tray.
• Paper is picking too fast due to faulty
paper feed assembly.
• A defective input sensor.
200
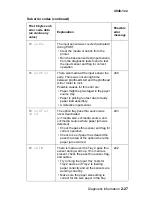
84
xx
0F
x1
x2
x3
The option tray pass thru sensor was
never deactivated.
(x1=media size, x2=media source, and
x3=media source where paper jam was
detected)
• Check the pass thru sensor and flag for
correct operation.
• Check to see if paper has cleared the
pass thru area of the option where the
paper jam occurred.
243
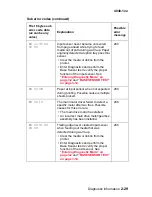
84
xx
18
There is media over the Tray 2 pass thru
sensor during warm up. If no media is
present, check the pass thru sensor, flag,
and cables.
• Try running the Input Tray Tests for
Tray 2 and see if Tray 2 is feeding
paper correctly and all the sensors are
working correctly.
• Make sure the paper size setting is
correct for the size paper in the tray.
242
Sub error codes (continued)
First 6 bytes sub
error code data
(xx can be any
value)
Explanation
Possible
error
message
Summary of Contents for T 430
Page 14: ...xiv Service Manual 4048 1xx Japanese Laser Notice Chinese Laser Notice ...
Page 15: ...Laser notices xv 4048 1xx Korean Laser Notice ...
Page 16: ...xvi Service Manual 4048 1xx ...
Page 21: ...Safety information xxi 4048 1xx ...
Page 34: ...1 12 Service Manual 4048 1xx ...
Page 122: ...3 28 Service Manual 4048 1xx ...
Page 143: ...Repair information 4 21 4048 1xx 8 Disconnect the cable from the operator panel card ...
Page 202: ...4 80 Service Manual 4048 1xx 8 Remove the bellcrank while holding the link guide ...
Page 205: ...Locations and connections 5 1 4048 1xx 5 Locations and connections Exterior locations ...
Page 216: ...6 4 Service Manual 4048 1xx ...
Page 218: ...7 2 Service Manual 4048 1xx Assembly 1 Covers ...
Page 220: ...7 4 Service Manual 4048 1xx Assembly 2 Paper feed ...
Page 222: ...7 6 Service Manual 4048 1xx Assembly 3 Frame ...
Page 226: ...7 10 Service Manual 4048 1xx Assembly 6 Charging ...
Page 228: ...7 12 Service Manual 4048 1xx Assembly 7 Electronics and cables 1 ...
Page 230: ...7 14 Service Manual 4048 1xx Assembly 8 Electronics and cables 2 ...
Page 232: ...7 16 Service Manual 4048 1xx Assembly 8 cont Electronics and cables II ...
Page 234: ...7 18 Service Manual 4048 1xx Assembly 9 Sensors ...
Page 236: ...7 20 Service Manual 4048 1xx Assembly 10 Options 1 2 3 4 ...
Page 249: ......


