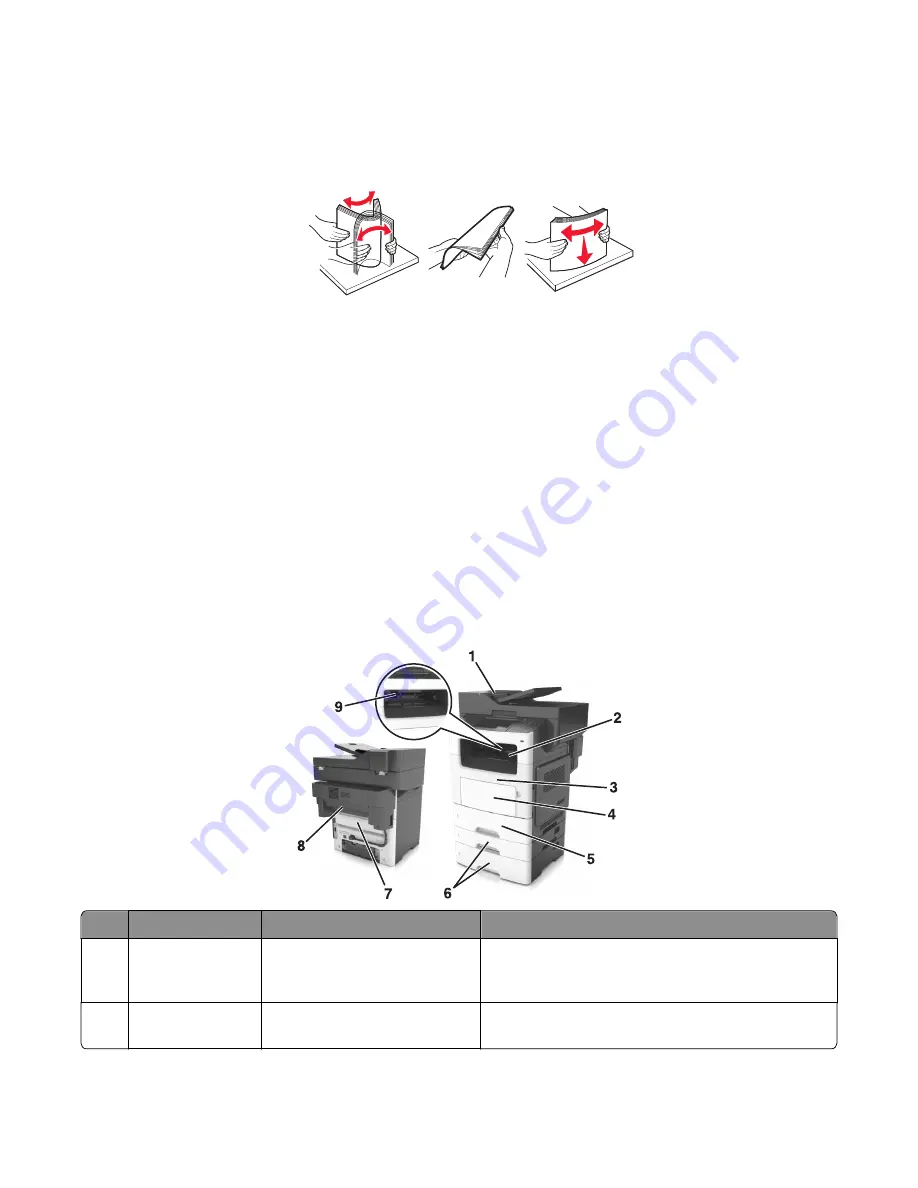
Use recommended paper
•
Use only recommended paper or specialty media.
•
Do not load wrinkled, creased, damp, bent, or curled paper.
•
Flex, fan, and straighten paper before loading it.
•
Do not use paper that has been cut or trimmed by hand.
•
Do not mix paper sizes, weights, or types in the same tray.
•
Make sure the paper size and type are set correctly on the computer or printer control panel.
•
Store paper according to manufacturer recommendations.
Understanding jam messages and locations
When a jam occurs, a message indicating the jam location and information to clear the jam appears on the printer
display. Open the doors, covers, and trays indicated on the display to remove the jam.
Notes:
•
When Jam Assist is set to On, the printer automatically flushes blank pages or pages with partial prints to the
standard bin after a jammed page has been cleared. Check your printed output stack for discarded pages.
•
When Jam Recovery is set to On or Auto, the printer reprints jammed pages. However, the Auto setting does not
guarantee that the page will print.
Jam access area
Printer control panel message
What to do
1
Automatic
document feeder
(ADF)
[x]
‑
page jam, open ADF to clear
jam. [28y.xx]
Remove all paper from the ADF tray, and then remove the
jammed paper.
2
Standard bin
[x]
‑
page jam, clear standard
bin. [20y.xx]
Remove the jammed paper.
7016
Diagnostic information
47
Summary of Contents for 7016-630
Page 14: ...7016 Table of contents 14 ...
Page 22: ...7016 22 ...
Page 24: ...7016 24 ...
Page 34: ...7016 34 ...
Page 160: ...7016 160 ...
Page 184: ...D ADF cover open E Flatbed cover open F Paperfeed sensor 7016 Service menus 184 ...
Page 200: ...7016 200 ...
Page 240: ...5 Remove the screw A from the rear side of the printer 7016 Repair information 240 ...
Page 249: ...4 Remove the four screws B and then remove the right front mount 7016 Repair information 249 ...
Page 332: ...4 Remove the screw D 5 Disconnect the spring E 7016 Repair information 332 ...
Page 337: ...Remove the screw A then remove the cover 7016 Repair information 337 ...
Page 352: ...7 Remove the four screws A from the power supply unit 7016 Repair information 352 ...
Page 366: ...7016 366 ...
Page 377: ...Power supply PCN1 PCN2 PCN3 PCN5 PCN4 7016 Component locations 377 ...
Page 378: ...7016 378 ...
Page 383: ...7016 383 ...
Page 385: ...Assembly 1 Covers 1 2 3 4 5 6 15 16 7 12 8 11 10 9 13 14 7016 Parts catalog 385 ...
Page 387: ...Assembly 2 Imaging 1 2 3 4 5 6 7 10 9 8 11 12 13 14 15 16 7016 Parts catalog 387 ...
Page 389: ...Assembly 3 Control panel 1 2 3 4 5 8 7 6 7016 Parts catalog 389 ...
Page 391: ...Assembly 4 Electronics 1 1 2 3 5 7 8 4 6 7016 Parts catalog 391 ...
Page 393: ...Assembly 5 Electronics 2 4 3 2 1 5 6 7 8 7016 Parts catalog 393 ...
Page 395: ...Assembly 6 Frame 3 10 11 12 13 14 9 1 6 5 7 8 15 2 4 7016 Parts catalog 395 ...
Page 397: ...Assembly 7 Option trays 3 4 5 6 1 2 7016 Parts catalog 397 ...
Page 399: ...Assembly 8 Staple finisher option 1 7016 Parts catalog 399 ...
Page 401: ...Assembly 9 Staple finisher right 1 2 3 4 5 6 7 7016 Parts catalog 401 ...
Page 403: ...Assembly 10 Staple finisher top 1 2 3 4 5 6 7016 Parts catalog 403 ...
Page 405: ...Assembly 11 Staple finisher rear 1 2 3 4 5 6 7 7016 Parts catalog 405 ...
Page 408: ...7016 Parts catalog 408 ...
Page 410: ...7016 Parts catalog 410 ...
Page 412: ...7016 412 ...
Page 418: ...7016 418 ...
Page 442: ...7016 Index 442 ...
Page 448: ...7016 Part number index 448 ...
Page 454: ...7016 Part name index 454 ...


