11.
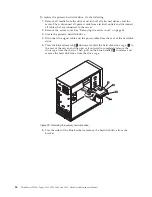
Carefully lift the failing system board out of the chassis.
12.
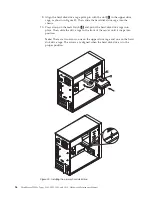
Position the new system board into the chassis so that the screw holes in the
new system board are aligned with those in the chassis. Install the screws that
secure the system board following the sequence shown in Figure 25.
13.
Remove the microprocessor socket cover from the new system board.
14.
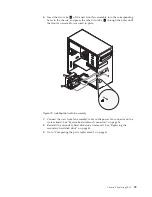
Install the memory modules, PCI cards, battery, microprocessor, and heat sink
and fan assembly that you removed from the failing system board to the new
system board.
15.
Reinstall the secondary hard disk drive. See “Replacing the secondary hard
disk drive” on page 43.
16.
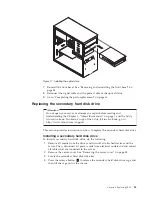
Connect all cables to the system board. See “System-board internal
connectors” on page 26.
17.
Go to “Completing the parts replacement” on page 61.
The failing system board must be returned with a microprocessor socket cover to
protect the pins during shipping and handling.
To install the microprocessor socket cover:
1.
Remove the microprocessor from the microprocessor socket. See “Replacing the
microprocessor” on page 48.
2.
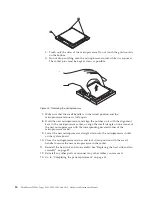
Align the notches
1
on the microprocessor socket cover with the alignment
keys
2
in the microprocessor socket.
3.
Install one side of the socket cover into the microprocessor socket as shown.
Figure 25. Removing the system board
52
ThinkServer TS200v Types 0981, 0992, 1008, and 1010: Hardware Maintenance Manual
Summary of Contents for ThinkServer TS200v
Page 1: ......
Page 2: ......
Page 3: ...ThinkServer TS200v Types 0981 0992 1008 and 1010 Hardware Maintenance Manual ...
Page 28: ...22 ThinkServer TS200v Types 0981 0992 1008 and 1010 Hardware Maintenance Manual ...
Page 34: ...28 ThinkServer TS200v Types 0981 0992 1008 and 1010 Hardware Maintenance Manual ...
Page 84: ...78 ThinkServer TS200v Types 0981 0992 1008 and 1010 Hardware Maintenance Manual ...
Page 107: ......
Page 108: ...Part Number XXXXXX Printed in USA 1P P N XXXXXX ...

