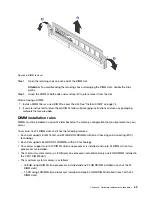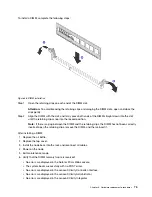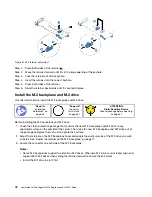
To install a DIMM, complete the following steps:
Figure 38. DIMM installation
Step 1. Open the retaining clips on each end of the DIMM slot.
Attention:
To avoid breaking the retaining clips or damaging the DIMM slots, open and close the
clips gently.
Step 2. Align the DIMM with the slot, and firmly press both ends of the DIMM straight down into the slot
until the retaining clips snap into the locked position.
Note:
If there is a gap between the DIMM and the retaining clips, the DIMM has not been correctly
inserted; open the retaining clips, remove the DIMM, and then reinsert it.
After installing a DIMM:
1. Replace the air baffle.
2. Replace the top cover.
3. Install the node back into the rack and reconnect all cables.
4. Power on the node.
5. Exit maintenance mode.
6. Verify that the DIMM memory failure is resolved:
• No errors are displayed in the Nutanix Prism Web console.
• The system boots successfully with no POST errors.
• No errors are displayed in the Lenovo XClarity Controller interface.
• No errors are displayed in the Lenovo XClarity Administrator
• No errors are displayed in the Lenovo XClarity Integrator
.
Hardware replacement procedures
75
Summary of Contents for ThinkAgile HX2320 Appliance
Page 4: ...ii User Guide for ThinkAgile HX2320 Appliance and HX2321 Node ...
Page 16: ...12 User Guide for ThinkAgile HX2320 Appliance and HX2321 Node ...
Page 32: ...28 User Guide for ThinkAgile HX2320 Appliance and HX2321 Node ...
Page 38: ...34 User Guide for ThinkAgile HX2320 Appliance and HX2321 Node ...
Page 86: ...82 User Guide for ThinkAgile HX2320 Appliance and HX2321 Node ...
Page 90: ...86 User Guide for ThinkAgile HX2320 Appliance and HX2321 Node ...
Page 92: ...88 User Guide for ThinkAgile HX2320 Appliance and HX2321 Node ...
Page 94: ...90 User Guide for ThinkAgile HX2320 Appliance and HX2321 Node ...
Page 96: ...92 User Guide for ThinkAgile HX2320 Appliance and HX2321 Node ...
Page 99: ......
Page 100: ......

