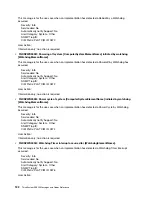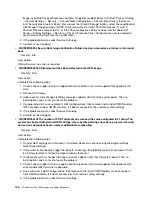
Image. assert the Physical Presence and then change Secure Boot Policy to Custom Policy ( in Setup
-> System Settings -> Security -> Security Boot Configuration -> Security Boot Policy), then enter
into "Security Boot Custom Policy" Menu, press the "Enroll Efi Image" button, select the unauthorized
UEFI Image in the popup box. (NOTE: There're two ways to assert Physical Presence. 1) switch
Physical Presence Jumper to ON ; 2) If the Physical Presence Policy has been set to enabled ( F1
Setup -> System Settings -> Security -> Physical Presence Policy Configuration), user is allowed to
assert remote Physical Presence via IPMI tool.)
3. If the problem persists, collect Service Data logs.
4. Contact Lenovo Support.
•
FQXSFPU0023I: Secure Boot Image Verification Failure has been cleared as no failure in this round
boot.
Severity: Info
User Action:
Information only; no action is required.
•
FQXSFPU0030N: A firmware fault has been detected in the UEFI image.
Severity: Error
User Action:
Complete the following steps:
1. Check Lenovo support site for an applicable service bulletin or firmware update that applies to this
error.
2. Reflash UEFI image.
3. Undo recent system changes (settings or devices added). Verify that the system boots. Then, re-
install options one at a time to locate the problem.
4. If problem persists, save customer's UEFI configurations, then remove and re-install CMOS battery
for 30 seconds to clear CMOS contents. If it boots successfully, then restore system settings.
5. If the problem persists, collect Service Data logs.
6. Contact Lenovo Support.
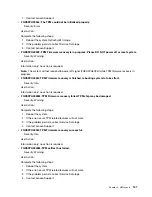
•
FQXSFPU0031N: The number of POST attempts has reached the value configured in F1 setup.The
system has booted with default UEFI settings. User specified settings have been preserved and will
be used on subsequent boots unless modified before rebooting.
Severity: Error
User Action:
Complete the following steps:
1. Original UEFI settings are still present. If customer desires to continue using the original settings,
select Save Settings.
2. If User did not intentionally trigger the reboots, check logs for probable cause. For example, if there
is a battery fault event, follow the steps to resolve that event.
3. Undo recent system changes (settings or devices added). Verify that the system boots. Then, re-
install options one at a time to locate the problem.
4. Check Lenovo support site for an applicable service bulletin or firmware update that applies to this
error. Update UEFI firmware if applicable.
5. Save customer's UEFI configurations, then remove and re-install CMOS battery for 30 seconds to
clear CMOS contents. If it boots successfully, then restore system settings.
6. If the problem persists, collect Service Data logs.
136
ThinkSystem SR250 Messages and Codes Reference
Summary of Contents for 7Y51
Page 1: ...ThinkSystem SR250 Messages and Codes Reference Machine Type 7Y51 7Y52 7Y72 and 7Y73 ...
Page 4: ...ii ThinkSystem SR250 Messages and Codes Reference ...
Page 8: ...4 ThinkSystem SR250 Messages and Codes Reference ...
Page 127: ...Information only no action is required Chapter 2 XClarity Controller events 123 ...
Page 128: ...124 ThinkSystem SR250 Messages and Codes Reference ...
Page 172: ...168 ThinkSystem SR250 Messages and Codes Reference ...
Page 174: ...170 ThinkSystem SR250 Messages and Codes Reference ...
Page 175: ......
Page 176: ...Part Number SP47A37842 Printed in China 1P P N SP47A37842 1PSP47A37842 ...

