


To replace the heat sink and fan assembly, do the following:
1. Remove all media from the drives and turn off all attached devices and the computer. Then, disconnect
all power cords from electrical outlets and disconnect all cables that are connected to the computer.
2. Remove the computer cover. See “Removing the computer cover” on page 85.
3. Lay the computer on its side for easier access to the system board.
4. Locate the heat sink and fan assembly. See “Locating major FRUs and CRUs” on page 70.
5. Disconnect the heat sink and fan assembly cable from the microprocessor fan connector on the system
board. See “Locating parts on the system board” on page 73.
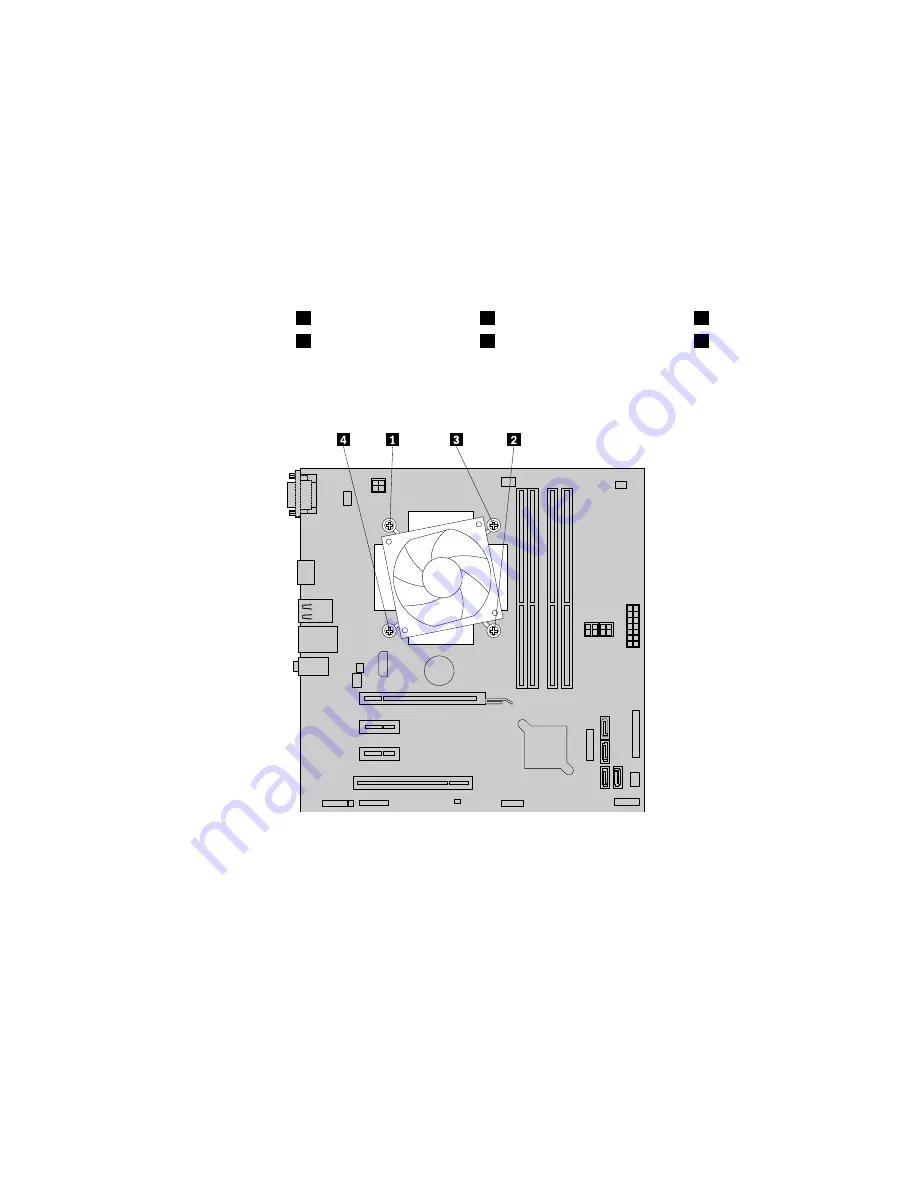
6. Follow this sequence to remove the four screws that secure the heat sink and fan assembly to the
system board:
a. Partially remove screw
1
, then fully remove screw
2
, and then fully remove screw
1
.
b. Partially remove screw
3
, then fully remove screw
4
, and then fully remove screw
3
.
Note:
Carefully remove the four screws from the system board to avoid any possible damage to the
system board. The four screws cannot be removed from the heat sink and fan assembly.
Figure 29. Removing the heat sink and fan assembly
7. Lift the failing heat sink and fan assembly off the system board.
Notes:
a. You might have to gently twist the heat sink and fan assembly to free it from the microprocessor.
b. When handling the heat sink and fan assembly, do not touch the thermal grease on the bottom
of the heat sink and fan assembly.
8. Place the new heat sink and fan assembly on the system board so that the four screws are aligned with
the corresponding holes in the system board.
Note:
Position the new heat sink and fan assembly so that the heat sink and fan assembly cable is
toward the microprocessor fan connector on the system board.
100
ThinkCentre E93 Hardware Maintenance Manual
Summary of Contents for 10AQ
Page 1: ...ThinkCentre E93 Hardware Maintenance Manual Machine Types 10AR and 10AQ ...
Page 6: ...2 ThinkCentre E93 Hardware Maintenance Manual ...
Page 13: ...Chapter 2 Safety information 9 ...
Page 17: ...Chapter 2 Safety information 13 ...
Page 18: ...1 2 14 ThinkCentre E93 Hardware Maintenance Manual ...
Page 19: ...1 2 Chapter 2 Safety information 15 ...
Page 24: ...1 2 20 ThinkCentre E93 Hardware Maintenance Manual ...
Page 25: ...1 2 Chapter 2 Safety information 21 ...
Page 28: ...24 ThinkCentre E93 Hardware Maintenance Manual ...
Page 32: ...28 ThinkCentre E93 Hardware Maintenance Manual ...
Page 86: ...82 ThinkCentre E93 Hardware Maintenance Manual ...
Page 128: ...124 ThinkCentre E93 Hardware Maintenance Manual ...
Page 183: ......
Page 184: ......