EN
188
Additional functions
TAKING PHOTOGRAPHS WITH THE SELF-TIMER
You can use the self-timer to take a picture with a delay of either 2
or 12s. This can be particularly useful, for example in the first case
if you want to avoid the picture being out of focus due to camera
shake caused by pressing the shutter button or, in the second
case, for group photographs where you want to appear in the pic-
ture yourself.
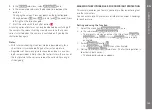
Setting and using the function
1. Select the menu item
Drive Mode
, and
2. in the sub-menu the line with the desired delay time.
3. Start delay time with the shutter button
18
.
• The LED
7
on the front of the camera flashes - for the first
10s of a 12s delay time - to show the progress of the delay
time. The countdown is shown in the monitor at the same
time.
While the 12s self-timer delay time is running, it can be canceled at
any time by pressing the
MENU
button
22
– the relevant setting is
retained and the function can be restarted by pressing the shutter
button again.
Important:
In self-timer mode, the exposure is not set by pressing the shutter
button to the pressure point, it is set immediately before the pic-
ture is taken.
INTERVAL PICTURE SERIES
This camera makes it possible to automatically take pictures of
motion sequences over a long period of time in the form of picture
series. In order to do this, you must define the intervals between
pictures and the number of pictures.
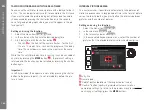
Setting and using the function
1. Select the menu item
Drive Mode
,
2. in the sub-menu
Interval
, and
3. in the relevant sub-menu,
Frames
.
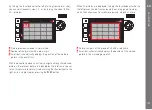
4. In the associated keyboard sub-menu, select the number of
pictures that the intended interval series should comprise.
AA
B
C
D
A
Entry line
B
Numeric pad
C
“Delete” button (deletion of the respective last value)
D
“Confirm” button (confirming individual values as well as
completed settings; to return to the previous menu level without
confirming all settings: press the
MENU
button)
Summary of Contents for M 10
Page 1: ...LEICA M10 ANLEITUNG INSTRUCTIONS ...
Page 2: ...1 10 11 13 15 14 12 12b 19 20 17 18 18a 12c 16a 12a 16 2 3 4 5 2 8 9 6 7 ...
Page 3: ...35 36 37 21 22 23 24 25 26 27 28 30 31 29 33 34 32 ...
Page 4: ......
Page 5: ...LEICA M10 Anleitung ...
Page 7: ...DE 3 ...
Page 41: ...DE 37 Kamera Grundeinstellungen ...
Page 102: ...DE 98 Anhang ANHANG DIE ANZEIGEN IM SUCHER 1 2 3 ...
Page 117: ...LEICA M10 Instructions ...
Page 153: ...EN 149 Camera default settings ...
Page 214: ...EN 210 Appendix APPENDIX VIEWFINDER DISPLAYS 1 2 3 ...

