background image


PC50 User Guide- 32   

1.


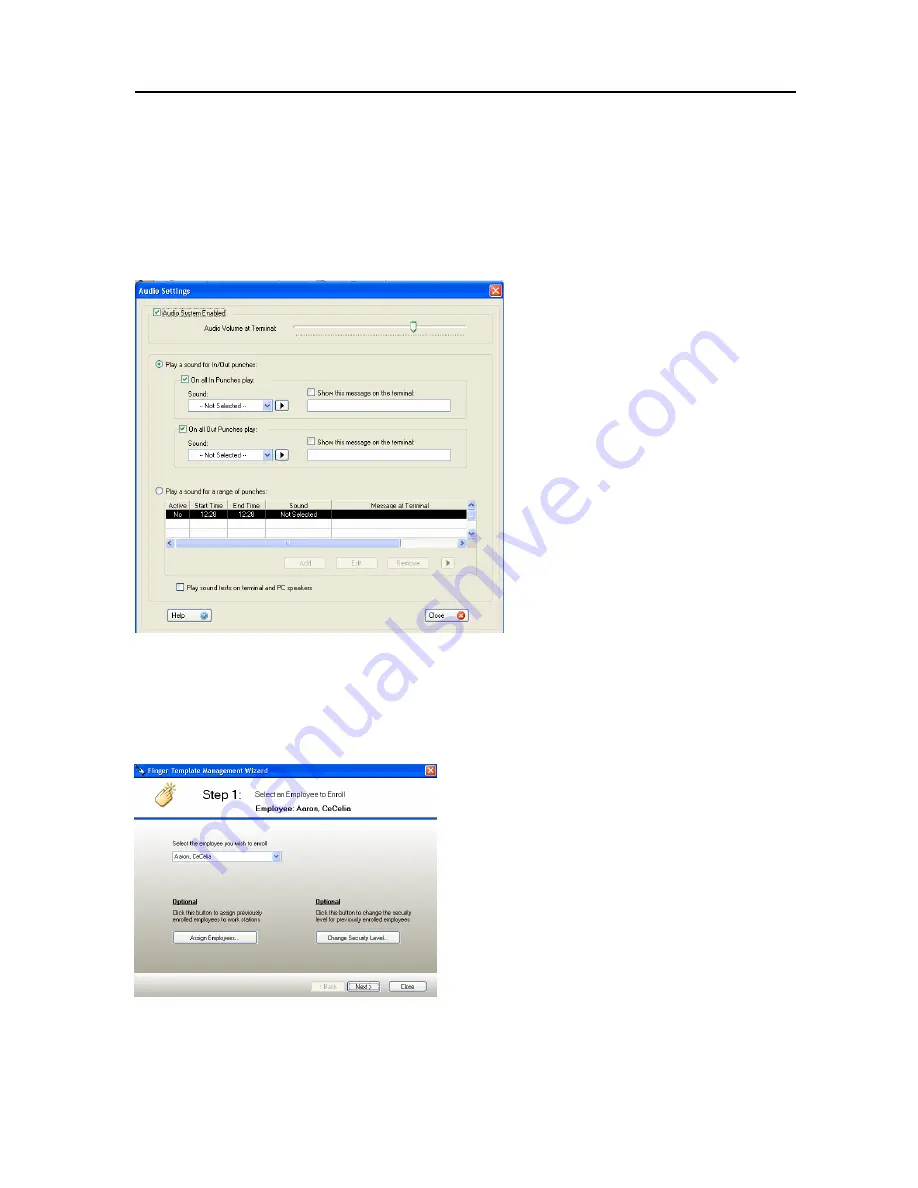
First, set the volume level you prefer for 
the PC50. 

 
2.


If you’d like to set the clock up to play a 
specific greeting for In and Out punches, 
select 

Play a sound for In/Out punches


3.


To select a message to be played for all 
In punches, check the box next to 

On all 

In Punches play

.  Next, use the scroll 

down menu to select the sound or 
message you prefer.  You may preview 
messages and sounds by clicking the 
preview button to the right of the 
selection field.  Repeat these steps to 
select a message for all Out punches by 
checking the box next to 

On all Out 

Punches play

.   


4.


Select 

Play a sound for a range of 

punches 

to choose what audio sound 

and/or message plays on the


PC50 

terminal for all punches during a specific 
period of time. 


A

DJUST 

A

UDIO 

S

ETTINGS


E

NROLL 

F

INGERPRINTS


6.


Locate the destination for your archive file under 

Write the Archive 

to this location

 section.  If you would like to make this destination 

file as your default, select 

Save as my Default Backup Location

.   

7.


To create the archive file, click 

Create.  

Then close the file by 

clicking 

Close.


NOTE:  
You have the option of setting up 
messages for In punches, Out punches, 
or both. 


1.


Select the 

Finger Sensor 

Icon

 from the 

Ribbon Bar


2.


Select the employee you 
would like to enroll from 
the drop down menu


Summary of Contents for PAYCLOCK PC50

Page 1: ...oice 770 831 8048 Fax 770 831 8598 Transmitter Certification Test Report FCC ID UP3PC50 FCC Rule Part CFR 47 Part 15 209 ACS Report Number 06 0407 15C Applicant LATHEM TIME CORP Equipment Type Time At...

Page 2: ...P PC C5 50 0 T TI IM ME E A AN ND D A AT TT TE EN ND DA AN NC CE E S SY YS ST TE EM M U US SE ER R G GU UI ID DE E QUICK START SOFTWARE INSTALLATION HARDWARE INSTALLATION PAYROLL MANAGEMENT Insert im...

Page 3: ...a residential installation This equipment generates uses and can radiate radio frequency energy and if not installed and used in accordance with the instructions may cause harmful interference to rad...

Page 4: ...E SOFTWARE INSTALLATION INSTALLING THE PAYCLOCK EXPRESS SOFTWARE CD LOGGING IN CREATING AND CHANGING YOUR PASSWORD REGISTERING YOUR PC50 LOGGING OUT HARDWARE SETUP CONNECTING THE PC50 TO YOUR COMPUTER...

Page 5: ...UP DATA ARCHIVE DATA ADJUST AUDIO SETTINGS ENROLL FINGERPRINTS USE FEATURE WIZARD EXIT PAYCLOCK EXPRESS GLOSSARY INDEX Copyright 2006 Lathem Time Corporation All rights reserved Reproduction of this d...

Page 6: ...rements Insert CD Use Setup Tab to configure preferences 2 2 Setup your PC50 Attach PC50 terminal to your computer Mount your PC50 to the wall 3 3 Launch PayClock Express Click on the PayClock Icon th...

Page 7: ...open schedule of 14 hours to calculate employee time and attendance This means that an employee s schedule begins with his her punch and ends 14 hours later The employee is able to punch in and out f...

Page 8: ...a LED bar with colored lighting green or red to quickly indicate to employees that their badge has been accepted Real Time Data The PC50 is a real time device and does not require polling to get up t...

Page 9: ...ges PayClock ez and PayClock Pro Upgrading is as easy as visiting http shop lathem com online also accessible within the Information Area of the Home Screen and selecting the software you would like t...

Page 10: ...y Asked Questions refer to the Troubleshooting section of this User Guide on page __ ONLINE AND EMAIL SUPPORT Lathem com provides access to numerous support resources that will allow you maximize your...

Page 11: ...ar product warranty has expired To learn more about Lathem support contracts and to make a purchase contact us at 404 691 1065 or visit http www lathem com news supportplan shtml GENERAL MAINTENANCE G...

Page 12: ...to Windows LOGGING IN To begin using PayClock Express you must first Log In to the system at the Log In Window PayClock has one default user the Administrator The Administrator has full access to sys...

Page 13: ...rom the telephone menu Visit www Lathem com register and follow the steps outlined LOGGING OUT There are two ways to exit PayClock Express In the upper right hand corner of the Home Screen select From...

Page 14: ...Biometric Fingerprint Reader is available for purchase at http shop lathem com 1 Connect the TS RFS the Biometric Fingerprint Reader Attachment to one of the two additional USB ports on your PC50 In t...

Page 15: ...the PayClock Express functions are contained within one screen The Home Screen Within the Home Screen there are four sections the Ribbon Bar the Express Timecard the Employee List and the Information...

Page 16: ...to click on and move windows THE RIBBON BAR Instead of a menu and toolbar the Ribbon Bar allows you to manage and edit your settings as well as create reports within one comprehensive area The Setup I...

Page 17: ...pay period data into the payroll program previously established Close the selected pay period to future editing after you close a pay period you may not go back to edit the data within that period Bac...

Page 18: ...punches and non work time as well as delete punches and find missing punches This button lets you add a new punch as well as the date and time for the new punch This button lets you add time off for...

Page 19: ...reflect the most recent activity This button will locate any missing punches within an Employee Timecard PayClock looks for an even number of punches When an odd number of punches is found PayClock a...

Page 20: ...ck System Button located at the top left hand corner of the Home Screen allows quick access to a number of important tools CREATE COMPANY PROFILE AND SETUP PAY PERIOD The General Tab will allow you to...

Page 21: ...set up how to software calculates overtime hours You may define up to two overtime levels To begin configuring your payroll preferences 1 Click on the Setup Icon within the Ribbon Bar 2 Select the Gen...

Page 22: ...eekly overtime are set up 4 Choose your Weekly OT Start Day select the day on which hour rounding 15 minute rounds with a 7 minute break point Time is recorded in increment of 15 minutes 00 15 30 or 4...

Page 23: ...ata or to run individual reports The Employee Icon is used to add delete and filter employees Software Time Settings determines how time will be displayed 12 Hour displays time in increments of twelve...

Page 24: ...ADD NEW EMPLOYEES 1 Within the Employee Icon click Add New 2 Insert the employee s personal information in the appropriate blanks You may include Base Pay rate in the employee s profile in order to al...

Page 25: ...ion from the Employee Icon within the Ribbon Bar Use the arrow to select either Hiding Terminated Employees or Hiding Inactive Employees EMPLOYEE LIST POP UP MENU The Employee List Pop Up Menu allows...

Page 26: ...elect this menu item to move to the first cell of the employee s timecard in the Express Timecard area Show the Employee Details Report this menu item will display a Details report for the selected em...

Page 27: ...If not click No 5 Click OK to exit the screen You will no longer see the deleted punch displayed on the Employee Time Card DELETE PUNCHES REFRESH DATA To refresh your data simply click the Refresh Dat...

Page 28: ...Pop Up Calendar allow you to change pay periods 1 Using the scroll buttons or Pop up Calendar select the pay period for which you would like to generate a report 2 Select the desired employee from th...

Page 29: ...rt 6 Select All Timecards from the Reports Icon Timecards will appear in alphabetical order PERIOD TOTALS REPORT The Period Totals Report provides a summary view of all Employees total hours and total...

Page 30: ...setup your data for export into a format your payroll service can read PayClock Express can export data into QuickBooks PayChex and ADP payroll software You can also export data into ASC II format CR...

Page 31: ...ay period RECALCULATE DATA Selecting Recalculate from the System Button option will instantly update the data calculations for all employees in the software REFRESH DATA 1 Select Reopen Last Pay Perio...

Page 32: ...of the file in the Note field Selecting Refresh from the System Button option will instantly update and reload the screen BACKUP DATA It is important to backup your data to protect your records in th...

Page 33: ...king the box next to On all Out Punches play 4 Select Play a sound for a range of punches to choose what audio sound and or message plays on the PC50 terminal for all punches during a specific period...

Page 34: ...onding button 3 Select the finger s the employee will use for enrollment 4 Adjust the security level to meet your company s needs and click Next 5 Click Begin Registration Follow the step by step inst...

Page 35: ...r question or issue please contact Lathem support by telephone at 1 800 241 4990 charges may apply if you do not have a support agreement or refer to the support section of our website at http www lat...

Page 36: ...slider bar left to lower the volume or right to increase the volume on the PC50 Play a sound for In Out Select this option to choose what audio sound plays on the PC50 terminal for In Out punches On a...

Page 37: ...export your data first to ensure it is correct before closing the pay period Employee List The employee list appears below the Ribbon bar when the Express Home window opens Along with the list of emp...

Page 38: ...es in PayClock at the Employees button First select the employee from the Employee List and then click the Employees button Inactive employees stay in the system but cannot punch the clock You can sti...

Page 39: ...me you close a custom pay period you will be prompted to set the date that the new next pay period will end NOTE Use the plus and minus keys on your numeric keypad to move the date forward or backward...

Page 40: ...ns all the functions needed to setup your system You will use most of these features the first time you setup your software but seldom after that The Data tab contains the functions typically used whe...

Page 41: ...nt feature is disabled If you need to define rounding rules other than these you can do this in the Rounding Rules tab at the Schedules icon Examples 1 4 Hour punch rounding is selected An employee pu...

Page 42: ...You can setup your Company Info Pay Period Overtime Rounding Time Date Format and Payroll Exports Timecard Icon The Express Timecard is used to view and edit an employees punch and non work data By d...

Page 43: ...PC50 User Guide 42 THE ADD TIME OFF ICON THE DELETE ICON THE REFRESH ICON THE FIND MISSING ICON THE TIME CARD TABLE TROUBLESHOOTING...

Reviews: