


10
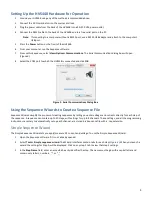
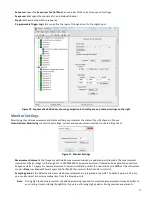
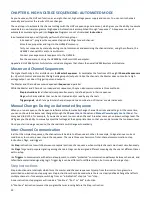
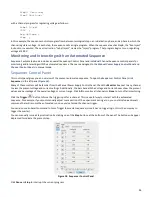
Figure 4. Simple Sequence Wizard Window
4.
Set the
Switch step
settings to specify the condition at which the sequence will move from the current step to the next
step in the sequence:
a.
Select
Only manually
to switch steps manually, using the Master Controller (see
Sequencer Control Panel
).
b.
Select
After delay
, enter a time period (in milliseconds), and select the
Next Step
to which the sequence should
jump after that specified time.
c.
Select
After trigger
, choose the condition that will trigger a step change, then select the
Next Step
to which the
sequence should jump when the trigger condition occurs. The trigger conditions can be a high or low TTL signal
at any of the four inputs In1 – In4.
5.
Enter the setting changes for each channel during this step:
a.
Select
Unchanged
to leave the channel in the same state as the previous sequence step.
b.
Select
Input
to use the channel as a voltmeter for an incoming signal.
c.
Select
D.C. Voltage
, then specify the voltage for the channel to maintain during this step. You can set the
voltage by entering the value in the box or by dragging the slider. If you are running in constant current mode,
you do not need to specify this value.
6.
Complete 1-4 for each of the steps in the sequence.
7.
Click
Apply
to send the program to the HVS448.
8.
Choose
File>Save
, then specify a location and file name to which to save the sequence file. It will be saved as a “.seq”
file.
Note
: Once a file name has been specified, click
OK
to save the program and send it to the HVS448.


