


© copyright 2008
(P/N)702.087 v1 • 8/08
Kaba Mas LLC
page 4 of 11
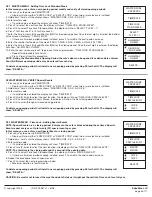
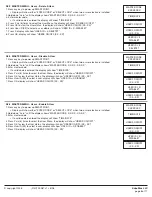
2.4 MASTER MEnU - View Audit
1. Press any key to power up SMARTPOINT.
• Display will show either “ENTER CODE” or “SELECT LOCK” when two or more locks are installed.
2. Hold down “zero” until the display shows “MASTER CODE, X-X-X-X-X-X-X-X”.
3. Enter master code.
• If a valid code is entered the display will show “TIME/DATE”
4. Press P three (3) times to select the next function, the display will show “VIEW AUDIT”.
5. Press OK to select, the display will show “MM/DD MM:SS, UX LX C:XX”.
• Please see the last page of this instruction sheet for a list of codes.
6. Press OK to scroll through the last 1000 system events.
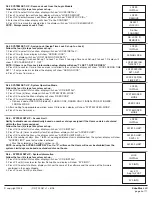
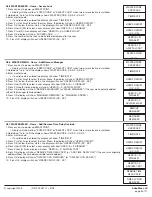
2.5 MASTER MEnU - PC Link
1. Press any key to power up SMARTPOINT.
• Display will show either “ENTER CODE” or SELECT LOCK” when two or more locks are installed.
2. Hold down “zero” until the display shows “MASTER CODE, X-X-X-X-X-X-X-X”. Enter the Master code.
3. Press the P button four (4) times to select PC Link, the display will show “PC LINK”.
4. Press the OK button to start communication with the PC.
5. Press the P to stop the communication.
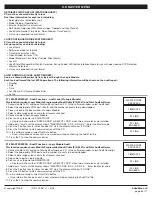
2.6 SYSTEM SET-UP
System Set-Up allows access to the following functions:
• Install Locks to Logic Module (Ability to set locks to AUTOOPEN status)
• Remove Locks
• Assign Lock (Assigns Time Lock Schedule, i.e., TL1 or TL2, to a specific Lock)
• System Operation Mode (User Code Only[System Default], Dual User Code, Fingerprint Only, Fingerprint plus User Code, Fingerprint plus
Dual Code, Dual Fingerprint plus Dual Code)
• Access Limit (Ability to delete user automatically based on number of days assigned)
• System Information (Shows firmware version set in Logic Module)
nOTE: IF THERE IS A LOCK SET TO AUTO OPEn
- In a multiple lock system you can set an outer door lock to AUTO OPEN. This will allow
the user (if authorized) to open the inner compartment lock and have the outer door lock automatically open. The AUTO OPEN lock always
opens first.
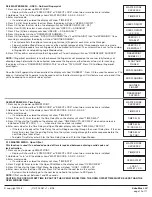
SYSTEM SET-UP
1. Press any key to power up SMARTPOINT.
• Display will show either “ENTER CODE” or “SELECT LOCK” when two or more locks are installed.
2. Hold down “zero” until the display shows “MASTER CODE, X-X-X-X-X-X-X-X”.
3. Enter MASTER code
4. Press the P button five (5) times to select System Set-up, the display will show “SYSTEM SET-UP”.
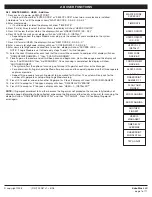
2.6.1 SYSTEM SET-UP - Install a Lock to the Logic Module
Follow the four (4) steps for system set-up.
1. Press OK to select this function, display will show “LOCKS INSTALL”.
2. Press OK to select this function, display will show “SELECT LOCK ID = ”.
3. Enter Lock ID number (always start with ID number = 1), display will show “Do You CONFIRM?”
4. Press OK to confirm, display will show “LOCK #, IS AUTOOPEN”
• Press P for NO and OK for YES, display will show, “OK, LOCK # INSTALLED”
• If the display shows “LOCK=1, COMM FAIL!”, the SMARTPOINT is not communicating with the lock or lock
has not been programmed. Check the lock ID, power connection and all cable connections & retry.
• The system must be set-up by installing Lock 1 first. By attempting to enroll any other lock prior to enrolling
Lock 1, the display will show, “FIRST LOCK 1, INSTALL”.
MASTER CODE
XXXXXXXX
MASTER CODE
XXXXXXXX
LOCKS
INSTALL
TIME/DATE
TIME/DATE
SELECT
LOCK ID =
VIEW AUDIT
PC LINK
Do You
CONFIRM?
MM/DD MM:SS
UX LX C:XX
PC LINK
ENABLED
LOCK #
IS AUTOOPEN
OK, LOCK #
INSTALLED!
FIRST LOCK 1
INSTALL!


