


© copyright 2008
(P/N)702.087 v1 • 8/08
Kaba Mas LLC
page 9 of 11
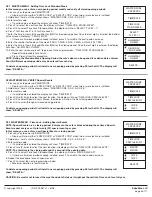
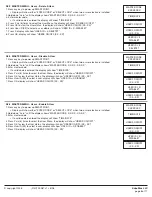
2.8.5 MASTER MEnU - Users - Access Lock
1. Press any key to power up SMARTPOINT.
• Display will show either “ENTER CODE” or “SELECT LOCK” when two or more locks are installed.
2. Hold down “zero” until the display shows “MASTER CODE, X-X-X-X-X-X-X-X”.
3. Enter master code.
• If a valid code is entered the display will show “TIME/DATE”
4. Press P six (6) times to select the User Menu, the display will show “USERS ON/OFF? “.
5. Press OK to view the User status, the display will show “USERS ON/OFF, (XX - XX)”
6. Press User ID (XX) to select a user, display will show “USER ID = 2, DISABLE?”
7. Press P two (2) times, display will show “USER ID = X, ACCESS LOCK?”
8. Press OK, display will show “ACCESS LOCK, -----”
9. Press the number for the lock to be installed or removed for the user.
10. Press OK, display will show “USERS ON/OFF, (XX - XX)”
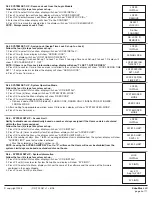
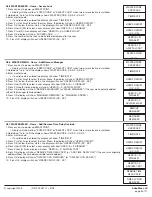
2.8.6 MASTER MEnU - Users - Add/Remove Manager
1. Press any key to power up SMARTPOINT.
• Display will show either “ENTER CODE” or “SELECT LOCK” when two or more locks are installed.
2. Hold down “zero” until the display shows “MASTER CODE, X-X-X-X-X-X-X-X”.
3. Enter master code.
• If a valid code is entered the display will show “TIME/DATE”
4. Press P six (6) times to select the User Menu, the display will show “USERS ON/OFF? “.
5. Press OK to view the User status, the display will show “USERS ON/OFF, (XX - XX)”
6. Press User ID (XX) to select a user, display will show “USER ID = 2, DISABLE?”
7. Press P three (3) times, display will show “USER ID = X, ADD/DEL MGR?”
8. Press OK, display will show “REMOVE, MANAGER” (or “MAKE, MANAGER” if the user was originally added
without the manager feature added.)
9. Press OK, display will show “MANAGER, REMOVED” (or “MANAGER, ADDED”)
10. Press OK, display will show “USERS ON/OFF, (XX - XX)”
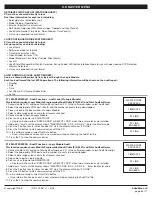
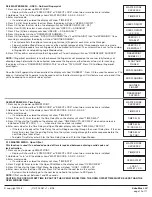
2.8.7 MASTER MEnU - Users - Add/Remove Time Delay Override
1. Press any key to power up SMARTPOINT.
• Display will show either “ENTER CODE” or “SELECT LOCK” when two or more locks are installed.
2. Hold down “zero” until the display shows “MASTER CODE, X-X-X-X-X-X-X-X”
3. Enter master code.
• If a valid code is entered the display will show “TIME/DATE”
4. Press P six (6) times to select the User Menu, the display will show “USERS ON/OFF?”
5. Press OK to view the User status, the display will show “USERS ON/OFF, (XX - XX)”
6. Press User ID (XX) to select a user, display will show “USER ID = 2, DISABLE?”
7. Press P four (4) times, display will show “USER ID = X, ADD/DEL TDO?”
8. Press OK, display will show “REMOVE TIME, DELAY OVR” (or “ADD TIME, DELAY OVR” if the user was originally
added without the time delay override feature added.)
9. Press OK, display will show “TIME DLY OVR, REMOVED” (or “TIME DLY OVR, ADDED”)
10. Press OK, display will show “USERS ON/OFF, (XX - XX)”
MASTER CODE
XXXXXXXX
MASTER CODE
XXXXXXXX
MASTER CODE
XXXXXXXX
TIME/DATE
TIME/DATE
TIME/DATE
USERS ON/OFF
USERS ON/OFF
USERS ON/OFF
USERS ON/OFF
(XX - XX)
USERS ON/OFF
(XX - XX)
USERS ON/OFF
(XX - XX)
USER ID = #
DISABLE?
USER ID = #
DISABLE?
USER ID = #
DISABLE?
USER ID = X
ACCESS LOCK?
ACCESS LOCK
_____
USER ID = X
ADD/DEL MGR?
REMOVE
MANAGER
MANAGER
REMOVED
USER ID = X
ADD/DEL TDO?
REMOVE TIME
DELAY OVR
TIME DLY OVR
REMOVED


