background image

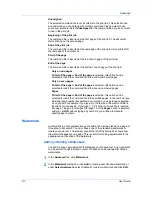
Edit Quick Print

This feature lets you customize the Quick Print view with your

preferred print job options.

Enable client profile

Client profile refers to profile settings saved on a server and

accessed by clients in a client/server environment. This feature in the Advanced tab
lets an administrator control and distribute profiles.

G

GDI compatible mode

A page description language option that accurately

reproduces what is viewed on the screen using the Microsoft Graphical Device
Interface (GDI) component to render the document. It generates data in a raster
printing format, creating a larger printable file.

Gutter

Blank space on the left side or top of a printed page that can be increased

by scaling down text and graphics. This supports stapling and hole punching. When
used with Duplex printing, the enlarged blank space lines up evenly on both sides of
the sheet. The larger blank space is created by shifting the printable area to the right
or down as much as one inch (25.4 mm).

J

Job accounting

An accounting system that records and controls the number of

pages printed by each account ID. Account IDs can be assigned at the printing system
and stored in the driver. After account IDs are assigned, you can use the Job
accounting option to print in the Job accounting mode.

Job name

A Job name is a unique identifier for each print job, to help you find and

print the job from the printing system’s operation panel. When you send a print job
using one of the Job storage (e-MPS) options, you can assign a custom name to the
job or use the name of the application file.

Job storage

Job option that stores a print job permanently on a hard disk for

printing later. You also have the option of protecting the print job from unauthorized
printing by using an access code. This feature is available when a hard disk is installed
and selected in Device Settings.

M

Media source enumeration

A

Device

Settings

option

that

maintains

compatibility for cassettes and feeders between old drivers and new drivers or when
moving from one manufacturer to another. Compatibility creates a smooth transition
for environments using macros or PRESCRIBE commands to access cassettes and
feeders.

MP tray

Source tray used for labels, transparencies, envelopes, and custom

printing media.

Multiple pages per sheet

This feature lets you print several pages on a single

sheet of paper for the purpose of reviewing the document and conserving paper.

O

Operation panel

The keys and display on the printing system. Use the operation

panel to set options such as media type and EcoPrint, and to print jobs stored on the
hard disk.

Optional Printer Components

Optional Printer Components include Common

Profiles and Plug-In Modules, and need to be installed separately from the driver
installer. They are located on the Product Library CD in the Advanced Tools menu.

vi

KX DRIVER

Summary of Contents for ECOSYS FS-C5150DN

Page 1: ......

Page 2: ... of Apple Computer Inc Adobe Acrobat Adobe Reader Photoshop and PostScript are trademarks of Adobe Systems Incorporated All other brand and product names herein are registered trademarks or trademarks of their respective companies Examples of the operations given in this guide support the Windows 7 printing environment Essentially the same operations are used for Microsoft Windows Vista Windows XP...

Page 3: ...ter Wizard 1 10 Installing a Printer Driver in Windows 7 and Windows Vista 1 10 Installing a Printer Driver in Windows XP and Windows 2000 1 10 Printer Driver Settings Access 1 10 Changing the Default Driver Settings 1 11 Chapter 2 Device Settings Accessing Device Settings 2 1 Device Options 2 2 Setting Device Options 2 2 Setting up Custom Boxes 2 2 Auto Configure 2 3 Enabling Auto Configuration 2...

Page 4: ...Chapter 4 Basic Basic Settings 4 1 Source and Media Types 4 2 Print Size and Page Size 4 2 Creating a Custom Page Size 4 3 Printing with Custom Size Pages 4 3 Duplex Printing 4 3 Printing in Duplex Mode 4 4 Collate 4 4 Printing Collated Documents 4 5 Printing in Color Black White and EcoPrint 4 5 Print Preview 4 5 Previewing a Print Job 4 5 Kyocera Logo 4 6 Displaying Version Information 4 6 Displ...

Page 5: ...ng RGB Red Green Blue 6 10 Adjusting Grayscale 6 10 Text and Graphics Effects 6 11 Chapter 7 Publishing Cover Mode 7 1 Printing Covers 7 1 Cover Mode Options 7 2 Choosing Cover Media 7 4 Page Insert 7 5 Printing Page Inserts 7 5 Page Insertion Options 7 6 Transparency Interleaving 7 6 Inserting Backing Sheets Between Transparencies 7 7 Chapter 8 Job Job Storage e MPS 8 1 Job Storage e MPS options ...

Page 6: ...ertion Point 9 2 Watermark 9 3 Adding or Editing a Watermark 9 3 Selecting Pages for Watermark 9 4 Security Watermark 9 5 Adding or Editing a Security Watermark 9 6 Adjusting Security Watermark Calibration 9 7 Selecting Pages for Security Watermark 9 7 Color Optimizer 9 8 Optimizing RGB Color for Printing 9 8 Configuring Status Monitor 9 9 Setting Status Monitor Preferences 9 10 EMF Spooling 9 11 ...

Page 7: ...nded feature set In Windows if the Found New Hardware Wizard dialog box appears during the installation process click Cancel If the Hardware Installation warning dialog box appears click Continue Anyway 2 Insert the Product Library CD into the CD drive After the installation wizard begins the Main Menu appears Note If the Product Library fails to start after inserting the Product Library CD into t...

Page 8: ...staller Installing Utilities On the Installation Method page click Utilities to install printer utilities You can also select utilities to install during the Custom Installation procedure Upgrading Driver Components If the installation wizard detects older driver or utility components the Software Component Upgrade page appears 1 Choose the component to upgrade Click Next 2 Confirm your upgrade se...

Page 9: ...splays the IP address contact your system administrator Not available with a USB connection 5 Click Information if you want to open a dialog box with details about IP Address Host Name Printer Model Contact Location and Serial Number Click OK Click Next Not available with a USB connection 6 On the Printer Settings page you can assign a name to your printing system Note With a first time USB connec...

Page 10: ...ides basic support for your printer The KX XPS DRIVER and XPS minidriver is only available for printing systems used with Windows 7 and Windows Vista The XPS driver is discussed in the Device Settings chapter Minidriver functionality is not documented in this user guide Installing in Custom Mode with a Network Connection using Discover This section describes the custom installation procedure of th...

Page 11: ...ings where you can choose installed options for your printing system The Device Settings check box appears only in Windows XP When the installation completes successfully click Finish to exit the installation wizard and return to the Product Library CD menu A message may appear if there is a software installation failure Click Finish and retry the installation If the same message appears again con...

Page 12: ...ick Next 6 On the Confirm Settings page click Install if the settings are correct Click Back to correct the settings Note If the Hardware Installation warning dialog box appears click Continue Anyway 7 The Installation Completed page appears displaying the following driver options Print a test page This selection verifies a connection with the printer and creates a print out of the installed drive...

Page 13: ...e not intended for installation Click Next If you only select software packages from the Utility tab you will skip to the Confirm Settings page 7 On the Printer Settings page you can assign a name for your printing system You can also choose to share this printer with others or set this printer as the default printer Make your selections and then click Next 8 On the Confirm Settings page click Ins...

Page 14: ...turned on and connected using a USB cable Note In Windows 7 and Windows Vista a driver installation will be made from the Microsoft Windows Update site if a certified driver is available and the system is connected to the web We recommend the Custom Mode using Discover for USB connections to ensure a reliable installation 2 On the Installation Method page select Custom Mode 3 The Discover Printing...

Page 15: ...h to exit the installation wizard and return to the Product Library CD menu A message may appear if there is a software installation failure Click Finish and retry the installation If the same message appears again contact your system administrator The installation of the printer is now complete If prompted restart your computer Optional Printer Components You can expand the functionality of your ...

Page 16: ...ick Print a test page if you want to produce sample print output from the newly installed printer To close the Add Printer Wizard click Finish Installing a Printer Driver in Windows XP and Windows 2000 This section describes how to install a printer driver using the Add Printer Wizard in Windows XP and Windows 2000 1 Click Start and Printers and Faxes 2 Click Add a printer 3 The Add Printer Wizard...

Page 17: ... within each application 1 Click Start and click Devices and Printers Windows 7 or click Control Panel and double click Printers Windows Vista or Printers and Faxes Windows XP 2 Right click on your printing system icon 3 Click Printing Preferences 4 In the Printing Preferences dialog box select the desired features in all tabs 5 Click OK to save the settings KX DRIVER 1 11 ...

Page 18: ... Description Language and Compatibility settings can also be selected Accessing Device Settings Device Settings can be accessed from Devices and Printers Windows 7 Printers Windows Vista or Printers and Faxes Windows XP folder 1 Click Start and click Devices and Printers Windows 7 or click Control Panel and double click Printers Windows Vista or Printers and Faxes Windows XP 2 Right click the desi...

Page 19: ...nd Box name appear in the Defined custom boxes list 3 In the Defined custom boxes list a new Box number and Box name appear If desired change the number and name in the Box number and Box name boxes The number must be within a range of 1 to 1000 and the name length can be up to 32 characters You can also type a user name up to 20 characters Note Shared box is selected by default to enable all netw...

Page 20: ... only available for printing systems installed in Windows 7 or Windows Vista In a client server environment this feature is unavailable to a client logged in as a restricted user Enabling Auto Configuration The Auto Configure button can be used to detect all available device options when the printing system is connected to a network through a TCP IP port 1 Verify that all optional devices are atta...

Page 21: ...nt speed of collated multiple copies by sending the print job just once Setting RAM Disk You can set the RAM disk to save print requests into the printing system s memory 1 At the printing system s operation panel turn on RAM disk and set its size 2 In Device Settings Device options select RAM disk 3 In the RAM disk text box type or select the desired RAM disk size Click the up and down arrows unt...

Page 22: ...ob type an account ID when prompted then click OK to print The account ID is validated against the account ID list If typed incorrectly you are prompted to type it again Display account ID list Select this option to display the account ID list at the time of printing The print job can be assigned to a user or group The account ID list is stored in the driver and more than one ID must be establishe...

Page 23: ... user Selecting Set Quick Print tab as default opens to this tab when you access Printing Preferences Selecting Hide Edit Quick Print control prevents users from customizing the Quick Print tab Send Count Information This option lets you embed count information in the print job which can be used by some applications for accounting purposes Count information includes the number of copies produced a...

Page 24: ... settings check box 4 Click OK Associate Profile with Application This option lets you set all printing from each installed application to use the same driver settings as defined in a profile Before using this feature A profile must be created in the Profiles dialog box accessed from any Printing Preferences tab An association must be created between a profile and an application in the Application...

Page 25: ...trator must first make selections in the Profiles and Application Based Profile dialog boxes The administrator can then ensure that all print jobs use those settings by locking this feature Selecting Lock Profile with Application also prevents any user changes in the Application Based Profile dialog box Lock Job tab If the Job tab is among the available driver tabs the administrator must first mak...

Page 26: ...uthorized printing to the SNMPv3 printing system SNMP settings must be set in the printer driver and in the printing system s Command Center The following SNMP options are available SNMPv1 v2c This option ensures successful Auto Configure communication using Read community name and Write community name SNMPv3 This option ensures secure Auto Configure communication using a user name and password Au...

Page 27: ... For SNMPv3 type a User name to a maximum of 32 characters and a Password from 8 to 32 characters 3 To set authentication and privacy options for SNMPv3 click Settings 4 In the SNMPv3 dialog box select from the available options 5 Click OK in the SNMPv3 dialog box 6 Optional Under Apply to other models you can click Select and choose from available models The SNMP settings are applied to all selec...

Page 28: ...Available languages vary depending on your locale and your computer settings Setting Language Preference You can select a user interface language 1 In Device Settings User Settings select the desired language from the Select language list 2 Click OK in the User Settings and Properties dialog boxes PDL Page Description Language A Page Description Language PDL specifies the contents and layout of a ...

Page 29: ...t speeds may be slower than PCL 5c Requires more printing system memory than PCL 5c Enables native TrueType font downloading Supports most Graphics settings options PDF Output to PDF is a plug in feature that lets you print and save documents from multiple sources to Adobe PDF This feature can be used as an alternative to existing commercial applications for creating PDF documents Documents saved ...

Page 30: ...ng documents to Adobe PDF format See PDF topics for details Selecting a PDL You can select a page description language from PDL options 1 In Device Settings PDL PDL Settings select the desired page description language from the Select PDL list 2 You can select the GDI compatible mode option to improve the output quality of graphics created by your application 3 Select Settings when the PDL is set ...

Page 31: ...It is supported for Adobe Acrobat and Adobe Reader 5 0 or later Passwords Select passwords for changing security settings and for opening a document Passwords are supported to a maximum of 16 characters in length Require password to change security settings Type an Owner password Within Adobe Acrobat this password is required to change the document restrictions in the Files Properties Security sec...

Page 32: ... Windows 7 and Windows Vista the XML Paper Specification XPS Page description language provides the most efficient method for displaying processing and printing documents As both a PDL and a document format XPS requires compatible printer hardware and software written for the Windows Presentation Foundation WPF architecture PCL and KPDL are not compatible with an XPS environment Therefore an XPS d...

Page 33: ...a source and click Apply To align settings with a different driver this value should align with those in the other driver 3 Click OK in the Compatibility Settings and Properties dialog boxes You can restore all the options in Compatibility Settings to the default by clicking Reset Ignore Application Collation This option bypasses the Collate setting in software applications and gives priority to t...

Page 34: ...es You can restore all the options in Compatibility Settings to the default by clicking Reset Removing a Plug in You can remove an installed plug in from the driver If removed the plug in features do not appear in the driver interface Note To remove the Output to PDF module PDF must not be selected in the PDL Settings dialog box 1 In Device Settings click Kyocera logo Plug in 2 Select a plug in mo...

Page 35: ...k Print Options You can set one or more print options on the Quick Print tab You can create your own customized view of print options with Edit Quick Print And you can also select from profiles that have been set with predefined options for frequently run print jobs Common Printing Options The upper section of the Quick Print tab has several icons that represent the most common options for print j...

Page 36: ... printing CMYK or printing with black toner only When the selection appears in color all color settings in the driver are enabled Color cannot be chosen if Black White mode is selected in the Device Settings Administrator Settings Collate Collate specifies the order in which the pages of a multiple copy job are printed With Collate selected the first time the print job is sent to the printing syst...

Page 37: ...is not available when the driver is accessed from an application s Print dialog box Editing Quick Print Options You can select from a limited set of driver features to appear in the Quick Print tab 1 Click Start and click Devices and Printers Windows 7 or click Control Panel and double click Printers Windows Vista or Printers and Faxes Windows XP 2 Right click on the desired printing system model ...

Page 38: ...k Apply The side panel displays the options for that profile using an icon and a summary 3 Click OK Profiles dialog box 1 In any of the Printing Preferences tabs click Profiles 2 In the Profiles dialog box select a profile 3 Click Apply The side panel displays the options for that profile 4 Click OK Saving a Profile The Save button lets you create your own profiles You can select the printing opti...

Page 39: ...e the selected profile to the current print job or click OK to close the dialog box Importing a Profile The Import button lets you import a copy of a profile from other printer drivers into your printer driver 1 Click Profiles Import 2 Browse for the existing profile KXP select it and click Open A message appears if any of the profile settings in the imported file are unavailable in the existing d...

Page 40: ...vironment clients can view details about server associations but cannot change settings or select another profile Adding an Association Once profiles have been created or imported you can create an association between a profile and an application Then the application always prints using the associated profile settings 1 In any tab click Profiles to open the Profiles dialog box 2 Click Application ...

Page 41: ...d click Edit to open the Edit Association dialog box 4 Change desired settings under Association name File name or Profile 5 Click OK in the Edit Association and Application Based Printing dialog boxes to save the revised association KX DRIVER 3 7 ...

Page 42: ...fies the cassette or tray that the printing system draws paper from Unless you are using a custom paper type you can leave it set to Auto source selection Media type This setting selects the Source based on the types of media that are specified in the printing system In general you can leave it set to Unspecified Destination This setting specifies which output tray is used for the print job output...

Page 43: ...uto media selection is selected then the printer searches for another tray or cassette using the same media Transparencies labels and envelopes must be supplied from the MP tray Ensure the paper is properly loaded by following the instructions outlined in the printing system s Operation Guide Note Source and Media type are separate items in the dialog box but can be combined using the Combine sour...

Page 44: ...elect the name of the custom page size and click Delete Printing with Custom Size Pages You can print on custom sized pages 1 Load custom sized paper into the MP tray 2 In the Basic tab select the name of your custom page size in the Print Size list 3 Click OK to return to the Print dialog box 4 Click OK to start printing Duplex Printing Duplex printing is printing on both sides of each page Selec...

Page 45: ... With Collate selected the first time the print job is sent to the printing system the data is rendered as page images in the printing system s memory The remaining job copies are printed from the stored data This avoids the extra processing involved in sending every copy from the computer to the printing system With Collate selected the driver prints the complete job set by set With Collate clear...

Page 46: ... output appear lighter The following color modes are available Color CMYK This mode prints full four color text and graphics Black White This mode prints with black toner only constraining all color settings EcoPrint makes the entire image text and graphics appear lighter in the printed job EcoPrint does not increase print speed Color Black White and EcoPrint also appear in the Quick Print tab and...

Page 47: ... number and driver plug in information Displaying Version Information In Device Settings or any tab click Kyocera logo Version to view the following driver information File Name Version Description Date Manufacturer Comments To view copyright information click Legal Notices Click OK to close the driver information dialog boxes Displaying Plug in Information A plug in integrates with the printer dr...

Page 48: ... increased You can set the arrangement of the pages from the Layout tab as well as print borders around each of the pages When Multiple pages per sheet is selected Poster and Scaling are unavailable Printing Multiple Pages per Sheet You can print several pages on a single sheet of paper 1 In the Layout tab select Multiple Pages per sheet 2 In Pages per sheet select the number of pages to print on ...

Page 49: ...eates additional blank space on the left side and at the top of the sheet It is often used for binding hole punch or stapling to make a print job easier to read Increasing the measurements in Gutter increases the margins around your text and graphics on the left side or top of the printed sheet This creates a larger margin space by shifting the printable area to the right or down as much as one in...

Page 50: ...an print a booklet 1 In the Layout tab select Booklet and one of the two binding options Left edge binding This selection prints text that reads from left to right Right edge binding This selection prints text that reads from right to left 2 Click OK to return to the Print dialog box 3 Click OK to start printing Poster The Poster feature lets you create a document to a size that is larger than the...

Page 51: ...g numbers on adjoining sheets Assemble each sheet edge to the same numbered edge on another sheet Use Print format to print a proof sheet along with the poster to guide you in assembling the printed poster sheets Poster pages This selection prints all of the sheets to be assembled as a poster Proof sheet This selection prints all the poster pages on one sheet with markings that display the sheet a...

Page 52: ...ing Print Quality In the Imaging tab select a Print quality from the list High quality Select this setting to print at the highest print quality Custom Custom lets you choose a setting for EcoPrint Selecting Custom without EcoPrint results in a default setting to the highest print quality Selecting EcoPrint EcoPrint changes toner saturation in the printed job making the entire print image includin...

Page 53: ...de simulates high gloss copies by adding a glossy appearance to printed text and images Note When Gloss mode is selected EcoPrint options are unavailable Fonts A computer font is a data file containing a set of glyphs visual representations of textual elements characters or symbols Common terms for fonts are Bitmap fonts define each character as a pattern of pixels the smallest resolvable rectangu...

Page 54: ... creates large file sizes This is best suited for print jobs with custom fonts very small fonts point size 1 4 or Asian fonts Substitute with device fonts System fonts and device fonts are automatically matched based on typeface name This function increases print speed and efficiency It is useful for changing a font used throughout a large document by replacing the old font with the desired font N...

Page 55: ...TT TrueType icon remains Disabling Device Fonts You can prevent substitution of device fonts for TrueType fonts 1 In Imaging Font Settings select the Disable device fonts check box 2 Click OK to save your settings Graphics Graphics are pictorial representations of information Graphics can be functional charts diagrams or artistic drawings photographs Graphics Settings let you select options for yo...

Page 56: ...white areas of the image Mirror print This setting prints the page content backwards as it would appear in a mirror image Optimization Settings Optimization is a process or methodology of improving a printing system s function or effectiveness In the Imaging tab click Graphics to open the Graphics settings dialog box and access the Optimization settings The settings are available when KPDL is sele...

Page 57: ...depending on how color data is received from the application This feature is available when KPDL is selected in the PDL Settings dialog box In Imaging Graphics Settings select from the following CMYK processing options Printer settings Select this option to use the settings currently on the device 3 channels Select this option if the driver receives RGB data from the application 4 channels Select ...

Page 58: ...e following options None application corrected With this option color data processes without applying the adjustments contained in the printing system s internal color lookup tables Ink simulation will not be executed This is useful if the application provides its own color correction ICM system corrected This option specifies color rendering in the print job to make it as close to the original as...

Page 59: ...nd Printers Windows 7 or click Control Panel and double click Printers Windows Vista 2 Right click on the desired color printer 3 Click Printer properties Windows 7 or click Properties Windows Vista 4 Select the Color Management tab 5 Click Color Management to open the Color Management dialog box 6 Select the Device tab 7 In the Device list select the desired color printer 8 Select Use my settings...

Page 60: ...d color settings select Edit to open the Adjustment Settings dialog box 3 From the Custom color adjustment list select Custom 1 Custom 2 or Custom 3 4 To open the Custom Color Adjustment dialog box click Settings 5 Select HSL hue saturation and lightness or RGB red green blue to work with as the color space 6 Click the arrow buttons beneath the photograph to select one of three different images Di...

Page 61: ...ust the relative values of Red Green and Blue between 10 and 10 You can also type values in the boxes 3 If you want to return all RGB settings to zero click Reset 4 Click OK to save the new RGB settings Adjusting Grayscale The Adjustment settings change the Brightness and Contrast of graphics These settings are useful if graphic images are printing too light too gray or too dark Text remains unaff...

Page 62: ...text as black This option prints all color text as black It produces faster printing of color print jobs by reducing the amount of data sent to the printer In Black White printing it increases the detail for light colored text printed White text and image colors are unaffected Available with all of the Color mode options Continuous tone Images are represented by a series of evenly graduated tones ...

Page 63: ...ver settings in the Publishing tab Print on both sides must be selected in the Basic tab or Quick Print tab in order to print using the Front inside or Back outside options Although Cover mode and Page insert can be used simultaneously they cannot be used with Transparency interleaving Printing Covers You can choose cover pages for printing 1 In the Publishing tab select Cover mode 2 Select Front ...

Page 64: ...n Type Front Inserts a blank front cover Front Prints on the outside surface of the front cover Front outside Front Prints on the inside surface of the front cover Front inside Prints on the outside and inside Front surfaces of the front cover Front outside Front inside continued User Guide 7 2 ...

Page 65: ...rface of the Front and back front cover and inserts a blank back cover Front outside Prints on the inside surface of the front Front and back cover and inserts a blank back cover Front inside Prints on both sides of the front cover Front and back and inserts a blank back cover Front outside Front inside continued KX DRIVER 7 3 ...

Page 66: ...urface of the Front and back back cover and inserts a blank front cover Back outside Prints on both sides of the back cover Front and back and inserts a blank front cover Back inside Back outside Prints on both sides of the front and Front and back back covers Front outside Front inside Back inside Back outside Choosing Cover Media You can select media for the cover User Guide 7 4 ...

Page 67: ...be used simultaneously they cannot be used with Transparency interleaving Printing Page Inserts Several ways are available to arrange page inserts you can print on one or both sides or insert a blank sheet 1 In Publishing Page insert select the option corresponding to your desired page arrangement 2 To print on both the front and back of the inserted page select the Print onto front and Print onto...

Page 68: ...ts on the back side of the inserted page Print onto back Prints on both sides of the inserted Page insert page Print onto front Print onto back Transparency Interleaving Transparency interleaving inserts a backing sheet between printed transparencies The backing sheet also known as an interleaf helps keep transparencies clean and prevents them from clinging together This feature is User Guide 7 6 ...

Page 69: ...ity Settings Media type does not appear Instead in the Source list select Auto Transparency 2 Click Publishing Transparency interleaving 3 To print the transparency content on the inserted pages also select the Print onto backing check box 4 In the Media for backing list select the Media type of the backing sheet or the Source paper cassette When you choose the media type a source cassette matchin...

Page 70: ...ting system s operation panel and printing of sensitive documents can be restricted to approved users E MPS is a multitier solution that provides advanced print management directly from the desktop By storing a job in the printing system you can print it from the operation panel without sending it again from the computer To use the Job storage e MPS features you must set a user name in the User Se...

Page 71: ...on the printing system s hard disk 1 In the Job tab select Job storage e MPS then select Custom box 2 Click Settings 3 Select a Custom Box Settings option Select Use specific box number and type the box number and password Select Prompt for box number and click OK When the Custom Box dialog box appears type a box number If a password was set type the password Select Display box number list and cli...

Page 72: ...e date and time under Overwrite job name Printing a Quick Copy Job With a hard disk installed Quick copy lets you print a document and save it in the printing system until the job is manually deleted or the printing system is turned off 1 In the Job tab select Job storage e MPS 2 Select Quick copy 3 Click OK in all dialog boxes Proof and Hold Proof and hold is a Job storage e MPS option that print...

Page 73: ...hen sending a sensitive document to the printing system a user must type a four digit access code which is attached to the print job along with the job name and user name The job is not printed until a user enters the access code at the printing system s operation panel After the job is printed it is removed from printing system memory The number of Private print jobs that can be stored is limited...

Page 74: ...job name To prevent this select Use job name date and time under Overwrite job name Storing a Job Storage Job Job storage lets you store a document permanently in printing system memory without printing and gives you the option to protect it with an access code This job remains on the hard disk until it is manually deleted 1 In the Job tab click Job storage e MPS 2 Click Job storage 3 In the Acces...

Page 75: ...emory Selecting a Job Name You must select a job name to use with Job storage e MPS features so that you can find your job in job lists on the printing system s operation panel The selected job name is saved with the print job when the job is sent to printing system memory 1 In the Job tab select Job storage e MPS 2 Under Job name select a name Application defined This option uses the name of the ...

Page 76: ...t For example a Prologue Epilogue command file may contain a macro that places a graphic object such as a logo at the top of a letterhead document Selecting a Prologue Epilogue File A Prologue Epilogue file must be available on your computer before it can be added to a print job To create this file use a text editor like Windows Notepad In Advanced Prologue Epilogue select a Prologue Epilogue file...

Page 77: ...gue select a Prologue Epilogue file name from the list 2 Under Insertion Point select a place to insert the Prologue Epilogue file Unassigning a Prologue Epilogue File If you designate a Prologue Epilogue file as unassigned you are removing it from the print job It remains in the list Unassigned selections are useful when the list contains several Prologue Epilogue files and you want to use some b...

Page 78: ...End of the page is selected this option can be selected to insert the command file into specified pages In the text box type individual page numbers separated by commas or a page range separated by a hyphen For example if you type 2 in the text box the command file is inserted only into page 2 If you type 1 3 5 12 the command file is inserted into page 1 page 3 and pages 5 through 12 If the Pages ...

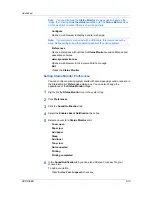
Page 79: ...pointer to move the watermark image 8 Select the Angle of the watermark with one of the following options Diagonal default This option places the watermark text at the default angle on the page User defined This option lets you type a degree value for the angle An angle is measured in degrees from 0 to 360 You can also change the angle by clicking the angle button at the bottom of the preview area...

Page 80: ...s text or image and you can create custom security watermark text A notable feature of Security Watermark is the Document guard pattern which prevents the document from being photocopied scanned faxed or printed from memory If a scan fax or print from memory is attempted the process is stopped and an error message appears on the printer s operation panel The Optional Printer Components wizard offe...

Page 81: ... style and angle of the text 6 Select Print as footer also if you want the first available line of security watermark text to be printed at the bottom of the page Select the page position from the list This option is useful because the security watermark itself is not normally visible on the printed page 7 Under Background pattern select a design for the security watermark background Standard patt...

Page 82: ...tial options Light Normal Dark Select the shading density of the background pattern Contrast 1 9 Select the level of contrast against the background pattern from lightest to darkest These selections may need to be changed after printing a sample in the next step 4 Click Print Sample to print a page displaying all nine contrast options against the selected pattern shading It is recommended to print...

Page 83: ...o select the color or RGB values can be entered if you know them A printed Color Optimizer Table lets you see 121 color variations on paper and select your variation Hue and Lightness settings are adjusted in the driver according to the selected variation You can specify up to three custom settings that correspond to the custom settings in the Imaging Adjustment feature You can also select a Print...

Page 84: ...e Color Optimizer dialog box 9 Click OK or Apply to save the settings Configuring Status Monitor The Status Monitor displays printing system status messages in the lower right corner of the window during printing You can start a status monitor for each supported printing system More than one status monitor can be displayed at one time 1 In the Advanced tab click Status Monitor 2 If you want the St...

Page 85: ...web browser to the Kyocera Mita home page Exit Closes the Status Monitor Setting Status Monitor Preferences You can configure printing system alerts with accompanying sound or speech in the Status Monitor Preferences dialog box You can also change the appearance of the Status Monitor image 1 Right click the Status Monitor icon in the system tray 2 Click Preferences 3 Click the Sound Notification t...

Page 86: ...save your settings click OK to save your settings and close the dialog box or click Cancel to close the dialog box without saving any settings EMF Spooling EMF Enhanced MetaFile is a spool file format used in printing by the Microsoft Windows operating system When a print job is sent from an application it is transferred to the spool file The application writes to and the printer driver reads from...

Page 87: ...le client profile check box to select profiles from the server to apply to print jobs created by the driver Server profiles are read only Select the Enable client profile check box for using custom profiles locally in the driver 9 12 User Guide ...

Page 88: ...printer Color optimizer Advanced tab plug in feature that accurately matches a single color in a print job The documents for printing can contain only one color besides black such as a letterhead or a company logo Color Optimizer does not work for a document with multiple colors or photographs Continuous tone Imaging feature that represents images or photographs in a series of evenly graduated ton...

Page 89: ...r for each print job to help you find and print the job from the printing system s operation panel When you send a print job using one of the Job storage e MPS options you can assign a custom name to the job or use the name of the application file Job storage Job option that stores a print job permanently on a hard disk for printing later You also have the option of protecting the print job from u...

Page 90: ...nt Job option that saves print jobs on a hard disk or when RAM disk memory is installed for printing until a four digit access code is entered Private print jobs are deleted when the printing system is reset or turned off Profile A set of user defined driver settings that are saved as a group Once saved you can select a profile by name and apply its settings to a print job without selecting each f...

Page 91: ...to the SNMPv3 printing device SNMP settings must be set in the Administrator settings in Device Settings and in the printing system s Command Center Status monitor Optional feature that displays printing system status messages in the lower right corner of the window during printing You can customize the appearance of the status monitor and determine what messages are displayed and how by selecting...

Page 92: ...ersey 07004 0008 Telephone 973 808 8444 Fax 973 882 4401 National Operation Center National Training Center 2825 West Story Road Irving Texas 75038 5299 Telephone 972 659 0055 Fax 972 570 5816 Midwestern Region 201 Hansen Court Suite 119 Wood Dale Illinois 60191 Telephone 630 238 9982 Fax 630 238 9487 Latin America Division 8240 NW 52nd Terrace Dawson Building Suite 100 Miami Florida 33166 Telepho...

Page 93: ...KYOCERA MITA Svenska AB Esbogatan 16B 164 75 Kista Sweden Telephone 46 8 546 55000 S A KYOCERA MITA Belgium N V Sint Martinusweg 199 201 1930 Zaventem Belgium Telephone 32 2 720 9270 KYOCERA MITA Norge Postboks 150 Oppsal NO 0619 Oslo Olaf Helsetsvei 6 NO 0694 Oslo Norway Telephone 47 22 62 73 00 KYOCERA MITA France S A Espace Technologique de St Aubin Route de I Orme 91195 Gif sur Yvette CEDEX Fr...

Page 94: ...el Singapore 349572 Telephone 67418733 KYOCERA MITA New Zealand LTD 1 3 Parkhead Place Albany P O BOX 302 125 NHPC Auckland New Zealand Telephone 09 415 4517 KYOCERA MITA Hong Kong LTD 16 F Mita Centre 552 566 Castle Peak Road Tsuen Wan New Territories Hong Kong Telephone 24297422 KYOCERA MITA Thailand Corp LTD 335 Ratchadapisek Road Bangsue Bangkok 10800 Thailand Telephone 02 586 0333 KYOCERA MIT...

Page 95: ...Rev 12 21 2010 8 ...

Reviews: