background image


Copyright © 1997-2009 KT&C Co., Ltd. All Rights Reserved.


Korea Technology & Communications Co., Ltd. 

46 

KVS-1000 User’s Manual 

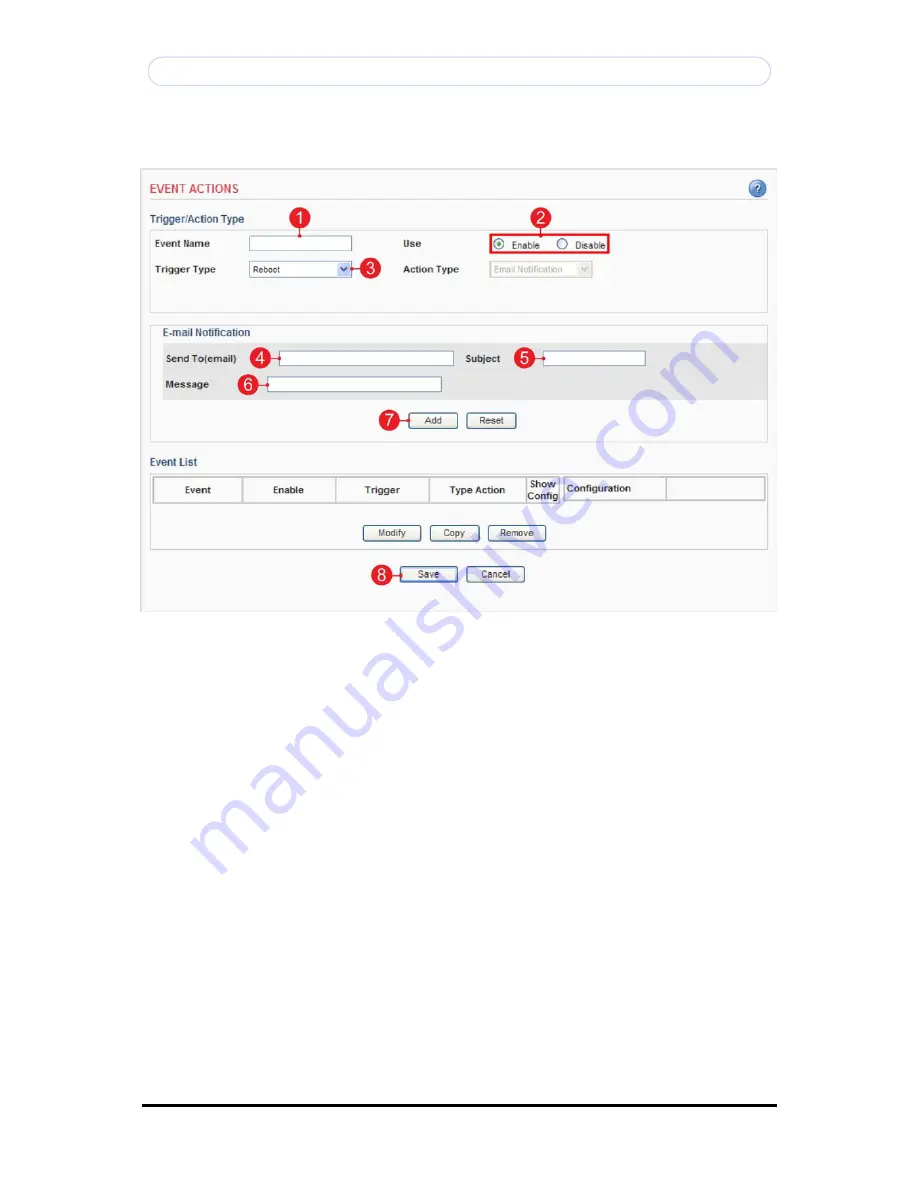
Action configuration for [Reboot] 


1.


Enter a descriptive event name. 

2.


Select the enable. 

3.


Select the trigger type to reboot. 

Note:

 Action type is pre-selected to e-mail notification.


4.


Enter the e-mail address which receives notification. 

5.


Enter a descriptive subject. 

6.


Enter a descriptive message. 

7.


Click the Add button to add configuration on the event list. 

8.


Click the Save button to save configuration. 


Summary of Contents for KVS-1000

Page 1: ...KVS 1000 Video Server User s Manual Firmware Version KVS 1000 1 1 5 Date 15 OCTOBER 2009...

Page 2: ...may cause harmful interference to radio communications Operation of this equipment in a residential area is likely to cause harmful interference in which case the user will be required to correct the...

Page 3: ...on configuration for Sensor Input Upload Image E mail 32 Action configuration for Sensor Input Upload Image SD Card 34 Action configuration for Sensor Input Activate Output 36 Action configuration for...

Page 4: ...ams at up to 30 25 fps in full D1 resolution SD SDHC memory card support for recoding video streams Maximum 32GB support Power over Ethernet PoE Class 2 3 Embedded 4ch web viewer Bi directional audio...

Page 5: ...blem Caution This feature will reset all setting values to the original factory default settings 10 Power Out The video server can supply power to an analog camera or auxiliary equipment Caution Maxim...

Page 6: ...ows operating systems Note For information on installing the Network Camera please refer to the Installation Guide Accessing the Video Server 1 Start your browser 2 Enter the IP address or host name o...

Page 7: ...View ActiveX Control a Login page will be displayed Enter the user ID and password Note Default User ID and Password is ID admin Password admin 8 The video image displays in your browser Important To...

Page 8: ...channel Live View mode 3 Four Channel View Click this button to change to the four channels Live View mode Note we recommend that you should upgrade your Internet Explorer to Internet Explorer 7 x or...

Page 9: ...al such as an alarm or light Pulse Click this button to activate the digital output terminal for a defined period of time e g to switch on a light for 10 seconds 12 Viewer Magnification The magnificat...

Page 10: ...cameras simultaneously on the web browser through the 4 Channels Live View mode Each channel can be separately controlled by the screen selector Note Adding network camera or video server registration...

Page 11: ...s to the entire Setup menu Operators who have access to the Video Image Audio and Event Configuration setting The Video Server is configured from the Setup menu in a standard web browser Accessing the...

Page 12: ...it then you may have to reset the unit to the factory default and redo the installation again 2 Network Configuration A IP Address Specify a unique IP address for your Network Camera B Subnet mask Spe...

Page 13: ...ach user can be configured to a different level of authority for MIC Speaker Alarm In Out PTZ etc B User List Displays list of authorized user for the network camera Click the modify button to modify...

Page 14: ...mum color saturation C Brightness The image brightness can be adjusted in the range 0 100 where a higher value produces a brighter image D Contrast The image contrast can be adjusted in the range 0 10...

Page 15: ...aximum time in seconds minutes or hours When the set time has expired a new stream can be started by refreshing the page in the browser Note The maximum video stream time does not apply to clients con...

Page 16: ...Appearance A Resolution Select the resolution for to use for the JPEG image B Image quality Changing the image quality affects the amount of bandwidth required High value improves image quality but u...

Page 17: ...rate The target bit rate can be adjusted in the range 256Kbps 10000Kbps Higher value improves video quality but uses more bandwidth Note When the variable bit rate is applied the target bit rate will...

Page 18: ...g this option allows you to enter the time and date manually B Synchronize with NTP server The Network Camera will sync the time with a NTP server The NTP server s IP address or host name is specified...

Page 19: ...ess or host name Important DNS server must be specified in the Setup Advanced Advanced network if you are using a host name Port No Enter the port number used by the FTP server The default is 21 Uploa...

Page 20: ...rious actions can be configured to run when certain types of event occur 1 Trigger Action Type Defines the trigger type or action type 2 Action Configuration Configures parameters of event action desc...

Page 21: ...ve name of your choice User Name and Password to SMTP server Variation of event action configuration Trigger Type Action Type Upload Type Consequence Motion detection Upload image FTP Upload images to...

Page 22: ...he trigger type to motion detection 4 Select the action type to upload image 5 Select the upload type to FTP 6 Select the FTP server that will receive uploaded image files 7 Select the image frequency...

Page 23: ...ffer A pre trigger buffer contains images video from the time immediately preceding the trigger These are stored internally in the camera This buffer can be very useful when checking to see what cause...

Page 24: ...descriptive event name 2 Select the enable 3 Select the trigger type to motion detection 4 Select the action type to upload image 5 Select the upload type to E mail 6 Enter the e mail address which re...

Page 25: ...figuration on the event list 19 Click the Save button to save configuration Note Pre trigger buffer A pre trigger buffer contains images video from the time immediately preceding the trigger These are...

Page 26: ...Copyright 1997 2009 KT C Co Ltd All Rights Reserved Korea Technology Communications Co Ltd 26 KVS 1000 User s Manual Action configuration for Motion Detection Upload Image SD Card...

Page 27: ...Enter a descriptive image name 12 Select the suffix of image name 13 Select the schedule by a day of the week 14 Enter the start time in a 24hour format 15 Enter the end time in a 24hour format 16 Cl...

Page 28: ...t name 2 Select the enable 3 Select the trigger type to motion detection 4 Select the action type to activate output 5 Check the enable 6 Enter the output active time 7 Select the schedule by a day of...

Page 29: ...tion 1 Enter a descriptive event name 2 Select the enable 3 Select the trigger type to motion detection 4 Select the action type to e mail notification 5 Enter the e mail address which receives notifi...

Page 30: ...Copyright 1997 2009 KT C Co Ltd All Rights Reserved Korea Technology Communications Co Ltd 30 KVS 1000 User s Manual Action configuration for Sensor Input Upload Image FTP...

Page 31: ...lect the post trigger buffer 11 Enter a descriptive image name 12 Select the suffix of image name 13 Select the schedule by a day of the week 14 Enter the start time in a 24hour format 15 Enter the en...

Page 32: ...ations Co Ltd 32 KVS 1000 User s Manual Action configuration for Sensor Input Upload Image E mail 1 Enter a descriptive event name 2 Select the enable 3 Select the trigger type to sensor in 4 Select t...

Page 33: ...e image name 15 Select the suffix of image name 16 Select the schedule by a day of the week 17 Enter the start time in a 24hour format 18 Enter the end time in a 24hour format 19 Click the Add button...

Page 34: ...2009 KT C Co Ltd All Rights Reserved Korea Technology Communications Co Ltd 34 KVS 1000 User s Manual Action configuration for Sensor Input Upload Image SD Card 1 Enter a descriptive event name 2 Sel...

Page 35: ...e disabled 10 Select the pre trigger buffer 11 Select the post trigger buffer 12 Enter a descriptive image name 13 Select the suffix of image name 14 Select the schedule by a day of the week 15 Enter...

Page 36: ...vent will trigger when input condition is active B Inactive Event will trigger when input condition is inactive C Change Event will trigger when input condition is changed 5 Select the action type to...

Page 37: ...the input condition A Active Event will trigger when input condition is active B Inactive Event will trigger when input condition is inactive C Change Event will trigger when input condition is chang...

Page 38: ...Rights Reserved Korea Technology Communications Co Ltd 38 KVS 1000 User s Manual Action configuration for Manual Trigger Upload Image FTP 1 Enter a descriptive event name 2 Select the enable 3 Select...

Page 39: ...tart time in a 24hour format 14 Enter the end time in a 24hour format 15 Click the Add button to add configuration on the event list 16 Click the Save button to save configuration Note Pre trigger buf...

Page 40: ...ights Reserved Korea Technology Communications Co Ltd 40 KVS 1000 User s Manual Action configuration for Manual Trigger Upload Image E mail 1 Enter a descriptive event name 2 Select the enable 3 Selec...

Page 41: ...hedule by a day of the week 16 Enter the start time in a 24hour format 17 Enter the end time in a 24hour format 18 Click the Add button to add configuration on the event list 19 Click the Save button...

Page 42: ...ights Reserved Korea Technology Communications Co Ltd 42 KVS 1000 User s Manual Action configuration for Manual Trigger Upload Image SD Card 1 Enter a descriptive event name 2 Select the enable 3 Sele...

Page 43: ...suffix of image name 13 Select the schedule by a day of the week 14 Enter the start time in a 24hour format 15 Enter the end time in a 24hour format 16 Click the Add button to add configuration on th...

Page 44: ...t name 2 Select the enable 3 Select the trigger type to manual trigger 4 Select the action type to activate output 5 Check the enable 6 Enter the output active time 7 Select the schedule by a day of t...

Page 45: ...tion 1 Enter a descriptive event name 2 Select the enable 3 Select the trigger type to manual trigger 4 Select the action type to e mail notification 5 Enter the e mail address which receives notifica...

Page 46: ...descriptive event name 2 Select the enable 3 Select the trigger type to reboot Note Action type is pre selected to e mail notification 4 Enter the e mail address which receives notification 5 Enter a...

Page 47: ...the motion detection field as desired on the screen 2 Motion Detection Setting A Motion Detection Setup Creates Motion Detection field Enter the name of the Motion Detection field Object Size Sensitiv...

Page 48: ...Detection window in the following steps 1 Enter a descriptive window name 2 Select the Object Size Note Higher level Only very large objects trigger motion detection Lower level Even small objects tri...

Page 49: ...on to create a new Motion Detection window 6 Display the name of Motion Detection window 7 Click the center of the window and drag to the desired position 8 Drag the bottom right hand corner to adjust...

Page 50: ...r A Server Address Enter the SMTP server s Network address or host name Important A DNS server must be specified in the Setup Advanced Advanced network if you are using a host name B User Name Enter t...

Page 51: ...domain name and is always one word with no period 2 DNS Setting A Primary DNS Enter the IP address of the primary DNS server This server provides the translation of host names to the IP addresses on...

Page 52: ...ault port is 80 Alternatively any port in the range 1024 65535 may be used but check first with your system administrator before changing the default setting 5 RTSP RTSP Port Enter the RTSP port numbe...

Page 53: ...e IP address that the Network Camera will use for multicast Multicast IP address has to be specified in the range 224 xxx xxx xxx 239 xxx xxx xxx Port Enter the multicast port the Network Camera will...

Page 54: ...an configure a Privacy Mask window as desired on the screen 2 Privacy Mask Setting A Setup Mask Creates Privacy Mask window Enter the name of the Privacy Mask window enable the check box for use then...

Page 55: ...the following steps as shown below 1 Enter a descriptive window name 2 Check the check box for use 3 Click the add button to create the new Privacy Mask window 4 Displays the name of Privacy Mask wind...

Page 56: ...buttons check the preferred check box In case of Manual alarm button users can select pulse or active inactive mode 2 User Defined Web Links Displays the web link specified by the user in the live vie...

Page 57: ...c IP address 1 Security Function Deny When you enable this function with the on button the IP address in the list will be denied access to the Network Camera 2 IP Filter A Add IP Filter Enter the IP a...

Page 58: ...era can be configured to behave in different ways A On The status LED shows steady red during normal operation B Off The status LED is off during normal operation C Flash The status LED flashes whenev...

Page 59: ...model Select the connected camera s protocol B Device ID Select ID allotted to camera and differentiate camera to be controlled C Baud rate Set the data transmission speed per second D Data bit Set t...

Page 60: ...tion 1 Live Screen This screen displays the live video image and user can configure preset position as desired 2 PTZ Control Using the Pan Tilt and Zoom PTZ controls move the camera view to the requir...

Page 61: ...Format Click the Format button to initialize the SD card Caution This feature will erase all recorded files permanently B Unmount Click the Unmount button before removing the SD card from the Network...

Page 62: ...s the recorded files in the SD card You can download it by clicking the corresponding link 2 Date It shows the date of recorded files in the SD card 3 Time It shows the time of recorded files in the S...

Page 63: ...ettings to the factory default values which also means that the IP address will need to be set again to make the unit accessible 2 Backup Restore A Backup Click the backup button to make a backup of a...

Page 64: ...This section describes the system logs 1 System Logs The Network Camera records when a particular event occurs in the log record A First Page Go to the first page of the log record B Previous Page Go...

Page 65: ...information and help menu 1 System Information Displays the system information of the Network Camera 2 Guide for Troubleshooting If you suspect a problem is being caused by incorrect configuration or...

Page 66: ...nalog PTZ cameras supports 10 presets camera Audio Audio Streaming Two way full duplex Audio Codec G 711 G 726 Audio Input output External microphone or line in input selectable Line level output Netw...

Page 67: ...DC 12V 1A Power over Ethernet Class 2 3 IEEE 802 3af Interfaces Analog composite BNC input NTSC PAL auto sensing RJ 45 for Ethernet 10baseT 100baseTX with PoE Terminal block Power Power feed to the c...

Page 68: ...r supply unit by an Ethernet CAT 5 cable Some power supply unit that can connect multiple PoE terminal devices are not supplied with power when the total power supply limitation is exceeded Read the O...

Page 69: ...atically configure a network device give it an IP address C CGI Common Gateway Interface A set of rules or a program that allows a Web Server to communicate with other programs Client Server Describes...

Page 70: ...zation or corporation Usually closed to external traffic IP Internet Protocol IP address A unique number used by a computer on the network to allow it to be identified and found J JPEG A standard imag...

Page 71: ...ending e mail SNMP Simple Network Management Protocol An application layer protocol that facilitates the exchange of management information between network devices It is part of the TCP IP Transmissio...

Page 72: ...user URL Uniform Resource Locator An address on the network V Varifocal A varifocal lens provides a wide range of focal length as opposed to a lens with a fixed focal length which only provides one W...

Reviews: