


6.1
Both Sides Adjustment
6
AccurioPress C2070series
6-24
%
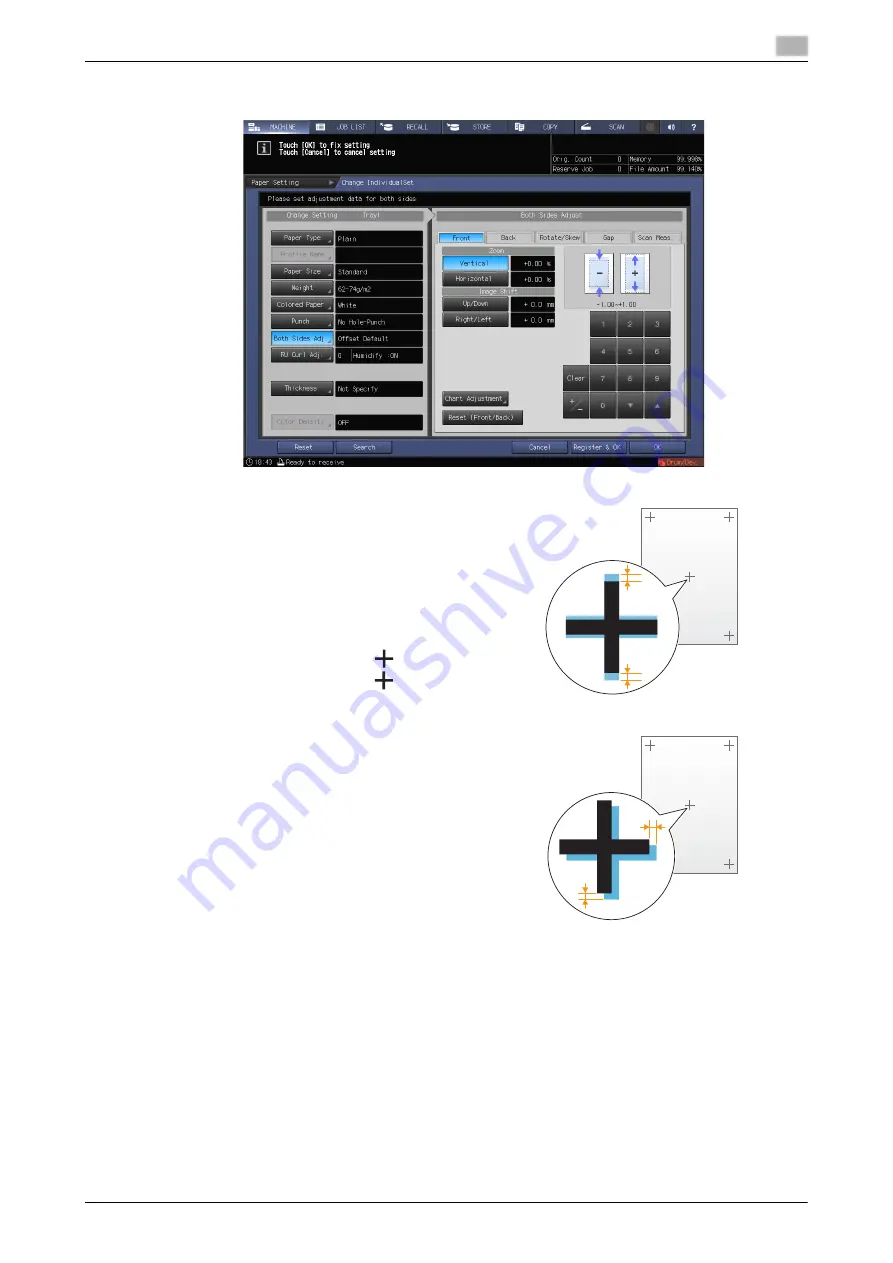
To adjust the zoom ratio and image shift, check the status in the center of a page.
Zoom ratio adjustment example:
The image on the front side is 10 mm in a length-
wise direction while the image on the back side
has been lengthened to 10.1 mm.
%
Press [Vertical] of [Back], then press [1][0][0].
%
Then, press [+/-] to change the mark to set
the adjustment value to [-1.00].
The image on the back side is reduced by 1%.
In this figure, the black mark
indicates the
front side and the blue mark
indicates the
back side.
Image shift adjustment example:
The image on the back side is misaligned 0.5
mm downward and 0.3 mm rightward com-
pared with that on the front side.
%
Press [Up/Down] of [Back], then press [5] to
set the adjustment value to [+0.5 mm].
%
Next, press [Right/Left], then press [3] and
[+/-] in sequence to set the adjustment value
to [-0.3 mm].
The image on the back side shifts 0.5 mm up-
ward and 0.3 mm leftward.
Summary of Contents for AccurioPress C2060
Page 2: ......
Page 6: ...Contents 4 AccurioPress C2070series ...
Page 7: ...1 Introduction ...
Page 8: ......
Page 16: ...1 10 AccurioPress C2070series Make a Note about This Machine Information 1 1 6 ...
Page 17: ...2 Before Getting Started ...
Page 18: ......
Page 32: ...2 2 Available Operations in this Machine 2 AccurioPress C2070series 2 16 ...
Page 33: ...3 Let s Make Prints ...
Page 34: ......
Page 37: ...4 Installing Software ...
Page 38: ......
Page 57: ...5 Basic Operations ...
Page 58: ......
Page 75: ...6 Maintaining the Finishing Quality ...
Page 76: ......
Page 119: ...7 Troubleshooting ...
Page 120: ......
Page 136: ...7 7 If you forget the administrator password 7 AccurioPress C2070series 7 18 ...
Page 137: ...8 Appendix ...
Page 138: ......
Page 184: ...8 6 Maximum paper size and printing area 8 AccurioPress C2070series 8 48 ...


