


AccurioPress C2070series
6-39
6.2
Image Quality Adjustment
6
Using Fiery Command WorkStation (Image Controller IC-417/Image Control-
ler IC-313)
This section describes how to carry out calibration for daily maintenance using
Fiery Command WorkSta-
tion
and a colorimeter (
EFI Spectrometer ES-1000
).
Tips
-
This section describes how to carry out calibration when using coated paper as an example.
1
Use a USB cable to connect
EFI Spectrometer ES-1000
to your computer.
For information about
EFI Spectrometer ES-1000
setting and adjustment, refer to the manual supplied
with this machine.
2
Start
Fiery Command WorkStation
.
For information about how to start this application, refer to page 4-19.
3
Click [Job Center] - [Calibrate] in sequence.
Calibrator starts.
4
Select the printing preferences for calibration.
%
Calibrate: Coated
%
Paper source: Paper tray with coated paper loaded
%
Measurement method: EFI ES-1000
NOTICE
This section describes how to specify a printing environment when using coated paper as an example.
Specify a printing environment according to the paper and tray actually used.
5
Click [Continue].
A chart is printed out in a matter of time after this machine started running.
6
Click [OK].
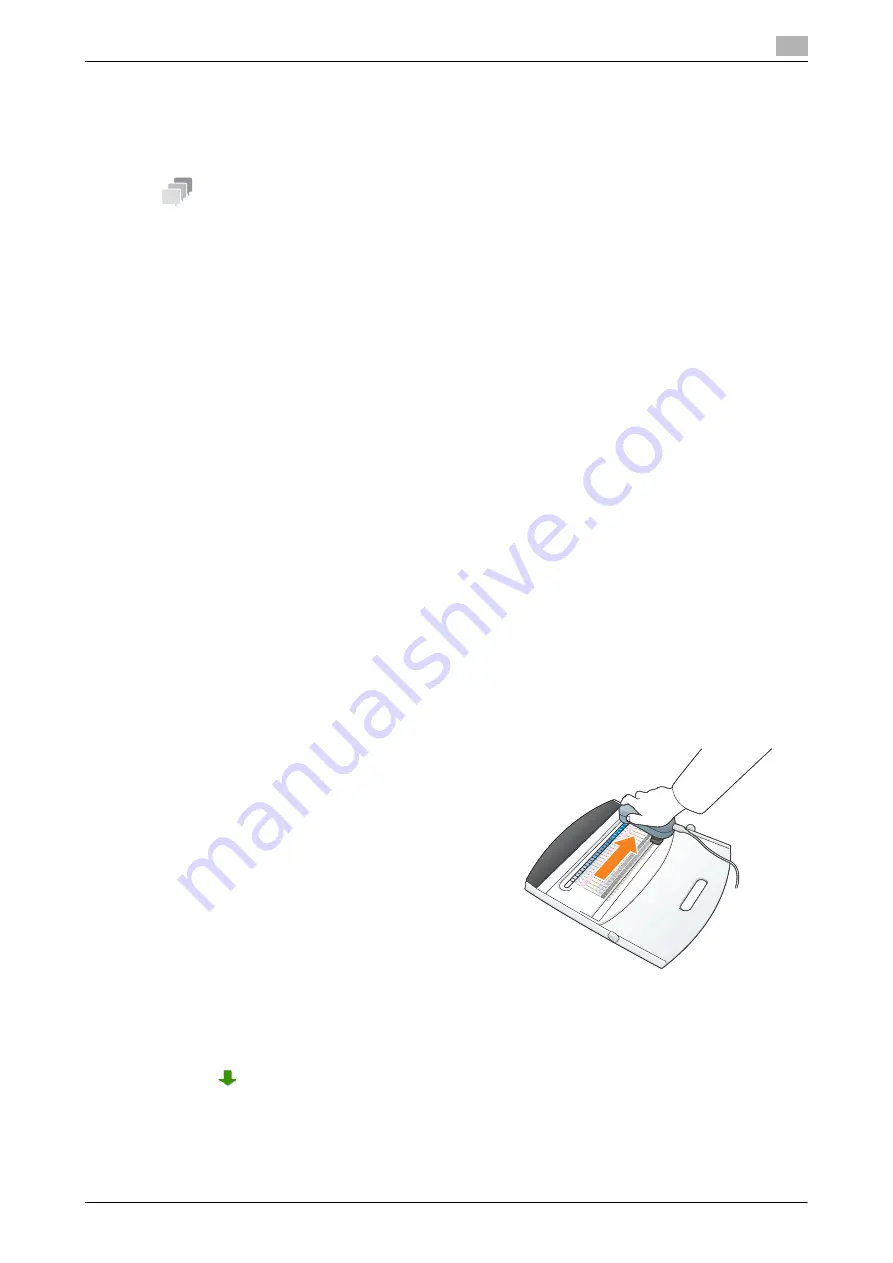
7
Securely place
EFI Spectrometer ES-1000
in the calibration cradle, then click [Continue].
8
Load the measurement page on the measurement guide plate.
9
Follow the instructions on the measurement
screen to measure color strips in sequence.
%
Place approximately 10 sheets of plain pa-
per beneath the measurement page or use a
backer board, before starting measurement.
%
Hold down the measurement button of
EFI
Spectrometer ES-1000
. After you hear a
beep, slide it while holding down the meas-
urement button.
Slide EFI Spectrometer ES-1000 to the end
of strip, then release the measurement but-
ton.
%
For details about how to use
EFI Spectrom-
eter ES-1000
, refer to the manual supplied
with this machine.
10
In the same way, measure all colors.
%
When a strip is measured successfully, a check mark is displayed at the side of the color name, and
is displayed for the color to be measured next.
%
Measure colors in the order displayed in the measurement screen.
11
When all the patches have been read successfully, click [Continue].
Summary of Contents for AccurioPress C2060
Page 2: ......
Page 6: ...Contents 4 AccurioPress C2070series ...
Page 7: ...1 Introduction ...
Page 8: ......
Page 16: ...1 10 AccurioPress C2070series Make a Note about This Machine Information 1 1 6 ...
Page 17: ...2 Before Getting Started ...
Page 18: ......
Page 32: ...2 2 Available Operations in this Machine 2 AccurioPress C2070series 2 16 ...
Page 33: ...3 Let s Make Prints ...
Page 34: ......
Page 37: ...4 Installing Software ...
Page 38: ......
Page 57: ...5 Basic Operations ...
Page 58: ......
Page 75: ...6 Maintaining the Finishing Quality ...
Page 76: ......
Page 119: ...7 Troubleshooting ...
Page 120: ......
Page 136: ...7 7 If you forget the administrator password 7 AccurioPress C2070series 7 18 ...
Page 137: ...8 Appendix ...
Page 138: ......
Page 184: ...8 6 Maximum paper size and printing area 8 AccurioPress C2070series 8 48 ...


