background image

A-61601   June 2012

7-1

7

Troubleshooting

Contents

Problem solving .............................................................................. 7-1

Installation issues............................................................................ 7-3

Application issues ........................................................................... 7-3

Conflicts with other applications...................................................... 7-3

Application configuration................................................................. 7-4

Data removal................................................................................... 7-5

Error codes ..................................................................................... 7-6

LED codes ...................................................................................... 7-9

Log files......................................................................................... 7-10

Contacting Service........................................................................ 7-10

Problem solving

Occasionally you may encounter a situation with your scanner where it 
may not function properly. Use the chart below as a guide to check 
possible solutions to help you resolve the situation before calling 
Technical Support. 

Problem

Possible Solution

Photos are jamming or multiple photos 
are feeding

Make sure that:

• the side guides are adjusted for the width of the photos you are 

scanning.

• the output tray is adjusted for the length of the photos you are 

scanning.

• all photos meet the specifications for size, weight and type as outlined 

in Appendix A,

 Specifications

.

• the scanner and tires are clean.
• the spring on the pre-separation module is adjusted to the proper 

tension. See the procedures in Chapter 5, 

Maintenance

.

• the feed module and pre-separation module are installed properly and 

securely in place. See the procedures in Chapter 5, 

Maintenance

.

• Photos sometimes stick due to static electricity. Fan the photos and 

make sure the ambient humidity is sufficient.

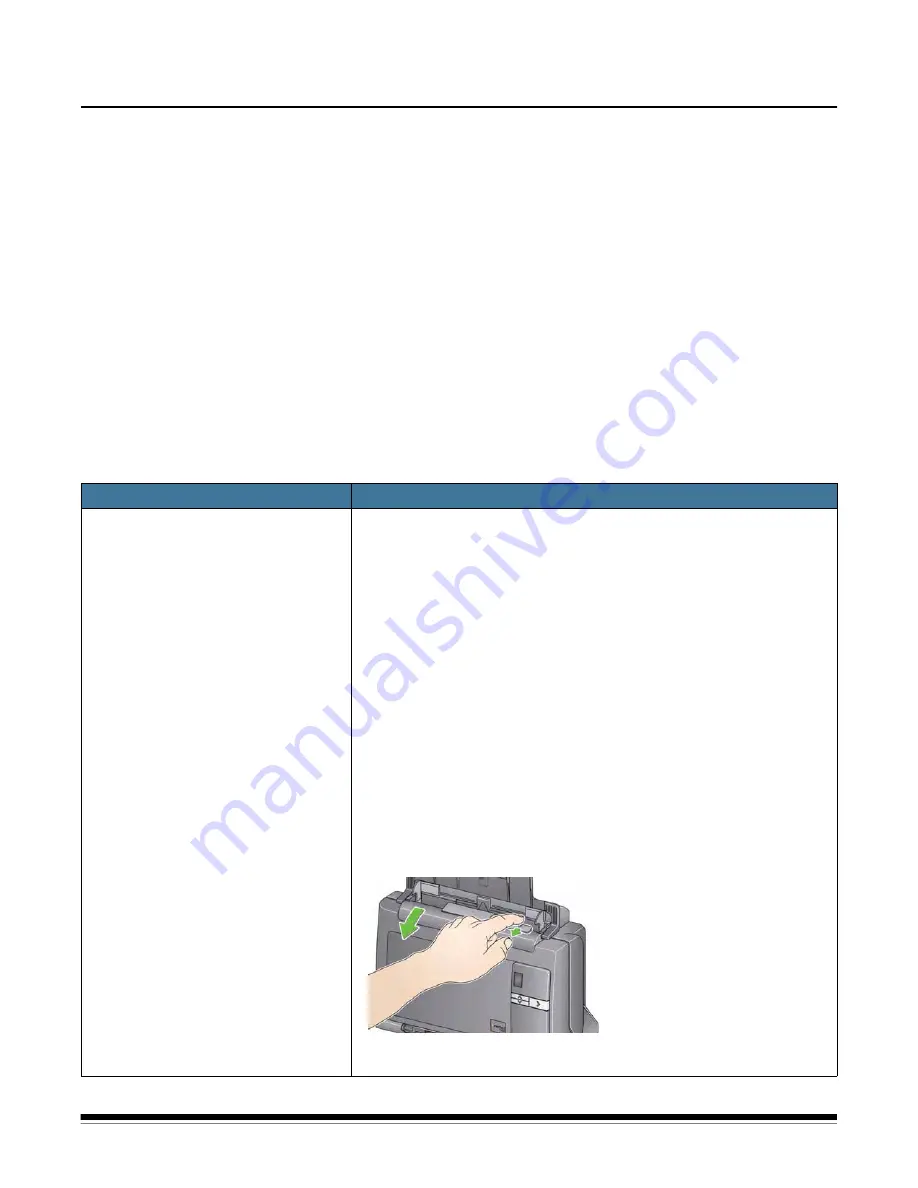
To remove a photo jam:

IMPORTANT: Be sure the input tray is up before opening the cover. Do 

not pull the jammed photo out of the scanner; open the 
scanner cover first.

• Open the scanner cover.

• Remove any jammed photo(s) from inside the scanner.
• Close the scanner cover and resume scanning.

Summary of Contents for PS80 Series

Page 1: ...A 61601 5K1277 Picture Saver Scanning System PS80 Series User s Guide...
Page 2: ...This product contains portions of imaging code owned and copyrighted by Pegasus Imaging Corp Tampa FL www pegasustools com ALL RIGHTS RESERVED...

Page 3: ...procedures Do not use air liquid or gas spray cleaners These cleaners displace dust dirt and debris to another location within the scanner which may cause the scanner to malfunction Material Safety Da...

Page 4: ...ion which can be determined by turning the equipment off and on the user is encouraged to try to correct the interference by one or more of these measures Reorient or relocate the receiving antenna In...

Page 5: ...INTRODUCTION 1 1 INSTALLATION 2 1 SCREEN DESCRIPTIONS 3 1 SCANNING PHOTOS 4 1 MAINTENANCE 5 1 ACHIEVING GOOD QUALITY IMAGES 6 1 TROUBLESHOOTING 7 1 APPENDICES A C...

Page 6: ...move red eye retouch and rotate images apply image sharpening and output scans to a CD DVD Kodak Picture CD or USB or network drive Once the photos are scanned the images can be used in a variety of w...

Page 7: ...Kodak Picture Saver Scanning Systems PS50 PS55 PS80 allows you to scan pages from your photo albums or scrapbooks without removing the photos from the page or removing the page protector When using t...

Page 8: ...power cord bundles USB software dongle Sample Cleaning Kit Dust cover Welcome Folio which includes Installation CD with the following software that is installed on the PC during installation Kodak Pi...

Page 9: ...art Touch User s Guide Start button illuminates or flashes indicating scanner status Steady green ready to scan Flashing green preparing to scan Steady red scanner not communicating with the PC Flashi...

Page 10: ...y keep the imaging area clean This area can be cleaned using the Kodak approved cleaning supplies See Chapter 5 Maintenance Separation module release lever push this lever down to release the separati...

Page 11: ...hen the scanner is moved Security lock port connects a security lock to the scanner similar to the security lock port used for a laptop You can purchase a standard security lock at an office supply st...

Page 12: ...PS80 Select Video Resources on the Support tab NOTE If you have already performed all of the steps in the Installation Guide skip this section Power down any scanners attached to the PC before instal...

Page 13: ...istration screens may be displayed instead of the application splash screen If this happens re install and re register your Kodak Picture Saver Application Installing the Kodak Picture Saver System So...

Page 14: ...ation must be completed to use the Picture Saver Scanning System software application An Internet connection is required to complete Product Registration Make sure that the following Internet address...

Page 15: ...er cord for your region from the supply of power cords packed with your scanner 2 Attach the power cord you selected to the power supply NOTE Be sure that the power cord is securely attached to the po...

Page 16: ...scanner will flash as the scanner goes through a series of self tests Please wait while the operating system synchronizes the scanner with the installed software When the installation process is compl...

Page 17: ...tion Valid values are 0 240 minutes Turning the scanner off with the rocker power switch If your scanner has the rocker power switch press the button on the back of the scanner to the Off O position S...

Page 18: ...e screens and icons that are available when using the Kodak Picture Saver Scanning System NOTE Some of the screens and options described in this chapter are only available if you have the Kodak Photo...

Page 19: ...address and email address information These are not required fields NOTE These fields will auto fill with any saved values when opening a previous order and the data may be modified Up to 58 character...

Page 20: ...humbnail images of the scans in each folder When you burn a CD DVD or Kodak Picture CD or copy your order to a USB or network drive you can print these pages on any available printer First Page Only t...

Page 21: ...elete Orders Now button It is the responsibility of the operator of the Kodak Picture Saver Scanning System PS80 to back up or delete customer orders from the hard drive as needed Deleting files using...

Page 22: ...e saved into e g foldername _00001A ext If you are re opening an order you may scan additional images to any folder or move to the next screen If the order was created on a previous version of the Pic...

Page 23: ...nd enabled will be displayed Select Folder allows you to change the active folder by choosing from a list of all folders in the current order or by creating and naming a new folder Scanned images will...

Page 24: ...image click on the thumbnail The Enhance Picture screen will be displayed 16 Up Display window displays up to 16 images at a time from the active folder The last images scanned will be displayed initi...

Page 25: ...tomatically rotate images to the correct orientation This option works most effectively for photos with faces therefore some photos may still need to be rotated manually For two sided scans the back s...

Page 26: ...ry the software will identify and select separate images within the original flatbed scanned image These are collectively referred to as separated images and the individual image selections as selecti...

Page 27: ...yed immediately in the Selected Images pane Zoom in magnifies the image in the Original Image pane Zoom out reduces the image in the Original Image pane Fit to window reduces or magnifies the image in...

Page 28: ...E If there are no photos in the feeder at the time Stop Scanner was clicked the scanner will continue to run until the transport time out is reached and the Scan Images or Enhance Picture screen will...

Page 29: ...d mode for photos Back Side captures the back side of the photo that is in the input tray Two Sided captures both sides of the photo as two separate image files labeled A and B NOTE Photos should alwa...

Page 30: ...size that is 2 to 8 times larger than JPEG Superior Select TIFF None for archival scanning NOTES Any order that includes TIFF image files cannot be burned to a Kodak Picture CD 1200 dpi resolution is...

Page 31: ...n it KODAK Perfect Touch will have no effect on the back side of the image running KODAK Perfect Touch only on the front side will reduce processing time For single sided scanning KODAK Perfect Touch...

Page 32: ...save the changes Return goes back to the Scan Images screen Start Over goes back to the Customer Order Information screen and clears the system of all data for the current order The confirmation mess...

Page 33: ...ne of the images You may select to rescan the photos Front Side Back Side or Both Sides or from the flatbed if a flatbed is attached Rescanned images will be displayed in the Scan Viewer screen or Pho...

Page 34: ...files Finalize Order completes this order by adding order information to the Activity Log and Data Log You can optionally print the Order Summary as part of order completion Previous displays the Scan...

Page 35: ...bar on the Creating Thumbnail Pages dialog box If you click Cancel the system will stop generating thumbnail pages and you can proceed to output your order to the chosen media After the first thumbna...

Page 36: ...rned to the media however you can add them by selecting Add Files on the Burn Files tab See the previous section entitled Thumbnail pages for more information The Burn CD DVD dialog box will be displa...

Page 37: ...to burn Disc Label defaults to the media label You can change the default Up to 32 characters are allowed in this field Close media defaults to checked which will finalize the CD DVD to play in other...

Page 38: ...tab has the following options Eject when finished if checked will automatically eject the CD RW DVD RW when formatting is complete Quick Format if checked will perform a quick formatting process other...

Page 39: ...single Kodak Picture CD the system will partition the order to fit on multiple media labeled FD_01 FD_02 etc and will display a progress bar for this operation Burn Files tab Destination drive allows...

Page 40: ...n Copy to If Print Thumbnail pages is checked on the Administrator System Settings screen pages with thumbnails of your images will be generated and a dialog box allowing you to print these pages will...

Page 41: ...Even though your scanner can be tilted to an upward and downward position it is strongly recommended that you scan your photos in the downward position 1 Be sure the scanner is on and ready to scan gr...

Page 42: ...uides by sliding them in or out to accommodate the size of the photos you are scanning 4 Adjust the input tray and output tray to accommodate your scanning needs The output tray can be extended to acc...

Page 43: ...e the scanner and photos 3 Any inks and correction fluids on the photos must be dry before scanning is started 4 Place the photos you want to scan in the input tray of the scanner Be sure the photo s...

Page 44: ...h from the top of this stack and place them face up in the scanner For example if your stack has 9 photos you would place them face down on the table so that photo 1 is facing the table and the back o...

Page 45: ...photos Due to copyright laws any professionally taken photos that are copyrighted cannot be scanned without written permission from the owner Two sided photo scanning If you have a batch of photos wh...

Page 46: ...er Information screen will be displayed 2 If you want to change any of the system settings click the Setup button to go to the Administrator System Settings screen make any desired changes and click O...

Page 47: ...or as a single photo on the flatbed platen for a Flatbed Scan Be sure the photos you want to scan are facing up properly NOTES For best feeding performance always scan the photos with the scanner bod...

Page 48: ...ed or Kodak A3 Flatbed the photo must always be placed face down on the platen When Batch Scan is selected you have 1 to 20 seconds to place photos into the Picture Saver System Scanner depending on t...

Page 49: ...mages screen will be displayed NOTE If you are using the Kodak Photo Selector Accessory and are scanning photos using the flatbed the Photo Selector screen will be displayed Proceed to the next step i...

Page 50: ...er click Select Folder If you want to scan a single photo using the A3 or Legal Flatbed Accessory place the photo on the flatbed and click Flatbed Scan Use the rotate arrows on each displayed image to...

Page 51: ...ill be displayed 13 Verify that all the information in the order summary is complete Edit customer information if desired 14 Output your image files to the desired media If you want to burn a data CD...

Page 52: ...ture Saver System Scan Session will be displayed If you want to start a new scan session click Yes Otherwise click No to close the Kodak Picture Saver System Software Unless you changed the default at...

Page 53: ...dures 5 7 Replacing the separation module and tires 5 7 Replacing the pre separation pad 5 9 Replacing the feed module and tires 5 10 Adjusting the pre separation roller tension 5 12 Supplies and cons...

Page 54: ...household cleaners Allow surfaces to cool to ambient temperature before use Do not use cleaners on hot surfaces Use adequate ventilation Do not use cleaners in confined areas NOTES Before beginning cl...

Page 55: ...ift it out of position 2 Manually rotate and wipe the separation module tires with a roller cleaning pad 3 Inspect the separation module If the separation module tires show signs of wear or damage rep...

Page 56: ...the raised edge of the feed module cover and lift it up and out of position NOTE Be careful not to damage the paper present sensor when removing or cleaning around the feed module 2 Rotate the feed m...

Page 57: ...he left to fit it into position Be sure the gears are aligned and it snaps into place Roll the feed module back into place 7 Reinstall the feed module cover by aligning the tabs with the slots and pus...

Page 58: ...Remove the wrapping from the Transport Cleaning Sheet 2 Adjust the side guides to fit the cleaning sheet 3 Place a transport cleaning sheet in the input tray adhesive side facing you in portrait orien...

Page 59: ...rocedures can cause the life of the consumables to vary You should change the tires if you notice an increase in multiple feeds stoppages or a decrease in feeder performance that is not resolved by fo...

Page 60: ...Remove the separation roller from the separation module housing 4 Remove each tire by sliding the tire off the core 5 Install each new tire by gently pulling it over the core IMPORTANT Do not overstre...

Page 61: ...wo side tabs which protrude slightly from the back of the separation module 3 Push down on the side tabs until the pre separation pad protrudes slightly from the front of the separation module 4 Grasp...

Page 62: ...ot to damage the paper present sensor when removing or cleaning around the feed module 2 Rotate the feed module forward and push it to the left to lift it out of position If you are replacing the feed...

Page 63: ...shaft to the right or left so the core fits properly within the feed module housing IMPORTANT Do not overstretch the tire it may tear 5 Reinstall the feed module by aligning the pins and pushing it t...

Page 64: ...tension 4 When finished reinsert the separation module by aligning the tabs with the slots and snapping it into position Supplies and consumables Contact your scanner supplier to order supplies NOTE...

Page 65: ...t cover and shake it free of dust in a location away from the scanner Use the scanner in an area where the relative humidity is at least 50 Dry environments leads to static which promotes the accumula...

Page 66: ...that are severely curled can either be rotated 90 degrees so the curl is not in the direction of the transport or scanned from the Kodak A3 or Legal Flatbed Accessory Fanning photos for reliable feedi...

Page 67: ...ticles 3 After wiping the glass re inspect for any visible dust particles 4 Close the scanner cover and evaluate the subsequent scans If streaking or other problems remain it may be necessary to do a...

Page 68: ...g streaks The Kodak Picture Saver Scanning System has been enhanced to reduce the occurrence of streaks in your images The best method to obtain streak free images is to keep the scanner imaging area...

Page 69: ...otos that generate horizontal bands on images it is suggested that you rotate the photos by 90 degrees and feed the photos in the scanner so the curl is not in the direction of the transport This may...

Page 70: ...re scanning the output tray is adjusted for the length of the photos you are scanning all photos meet the specifications for size weight and type as outlined in Appendix A Specifications the scanner a...

Page 71: ...rectly Images are not being cropped correctly from the batch scanner Rescan and adjust the side guides for the width of the photos you are scanning Images are not being cropped correctly from the flat...

Page 72: ...e application and plug in of the USB software dongle the WIBU software does not automatically load a message may be displayed asking for the WIBU installation disk Select that you have the software di...

Page 73: ...can Viewer may be enabled disabled using the ShowViewer parameter The Scan Viewer refresh rate may be slowed down using the ViewerDelay parameter This will cause each image to remain displayed on the...

Page 74: ...ally logged on user only to Enabled 7 Set Devices Allowed to format and eject removable media to Administrators and Power Users or to Administrators and Interactive Users Data removal It is the respon...

Page 75: ...to Chapter 2 Installation 1002 Error Code 1002 Could not read image processing defaults from scannerprofile Continuing with default settings Verify that a valid scannerprofile file exists Reinstall th...

Page 76: ...Saver Scanning System Try using another burner such as an external USB CD DVD burner If you are using XP upgrade to Vista Windows 7 or Windows 8 or use the software application that came with the CD D...

Page 77: ...f the problem persists contact Kodak Service 6017 Please check if the correct USB license dongle has been inserted in your PCs USB port If this error persists please contact support with error code 60...

Page 78: ...error persists please contact support with error code 9011 Reinstall the Kodak Picture Saver Scanning System Refer to Chapter 2 Installation 9XXX Could not connect to scanner Please retry If this erro...

Page 79: ...data but may be imported into a spreadsheet as a comma separated file Error log PS80ErrorLog txt contains a running list of any error conditions and may be used to diagnose problems with the system C...

Page 80: ...g m2 to 413 g m2 9 to 110 lbs ADF Capacity Up to 50 mixed size photos per batch ADF capacity 75 sheets Continuous feeding of photos is supported Bandling weights up to 34 413 g m 9 110 lb paper ID car...

Page 81: ...SB 2 0 with administrator privileges for installation Microsoft Windows XP Service Pack 3 Windows XP 64 Service Pack 2 Windows Vista Service Pack 2 Windows Vista 64 bit Service Pack 2 Windows 7 32 bit...

Page 82: ...onent including breakage of a connector cover glass pins or seal c from service modification or repair not performed by Kodak or a service provider authorized by Kodak or by tampering use of counterfe...

Page 83: ...rs seeking services for Kodak Scanners covered under this Limited Warranty must obtain a Return Material Authorization number RMA by calling 800 822 1414 and within ten 10 business days from the date...

Page 84: ...x to ensure proper receipt and credit of the defective product Depot service If the Kodak Scanner is not eligible for Advance Exchange or On Site Service an eligible purchaser may utilize our Depot Re...

Page 85: ...l Assistance by Telephone Telephone technical support is available Monday Friday between the hours of 8 a m to 5 p m local time excluding Kodak holidays Phone 800 822 1414 For Technical Documentation...

Page 86: ...ents or that the operation of the Software will be uninterrupted or error free You assume responsibility for operation of the Software to achieve your intended results and for the installation use and...

Page 87: ...S GOVERNMENT RESTRICTED RIGHTS The SOFTWARE and documentation are provided with RESTRICTED RIGHTS Use duplication or disclosure by the Government is subject to restrictions as set forth in subdivision...

Page 88: ......

Reviews: