


Scanning, Viewing, and Managing Images
August 1, 2003
1F1976
5-3
Loading Cassettes
WARNING
:
Use only KODAK DIRECTVIEW CR 500 Cassettes.
1.
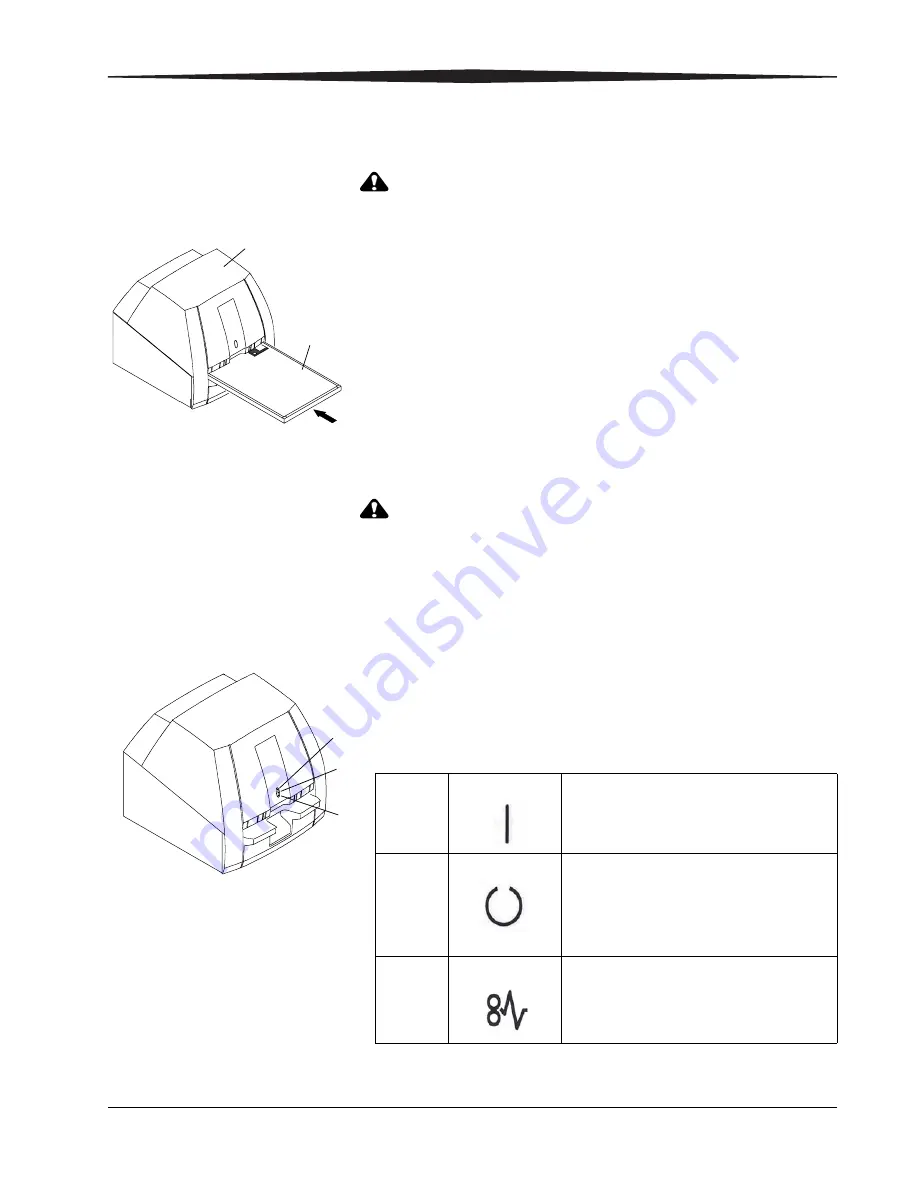
Place the cassette into the cassette feed slot in the CR 500 Reader.
NOTE: Be sure that the Tube Side label faces up, and the cassette’s gray
corners are towards you. Engraved arrows on the top edge of the
cassette indicate the direction the screen ejects, away from you.When
the cassette is inserted, the flexible phosphor screen is in scan
position and scanning starts immediately.
NOTE: The cassette interface platform may overhang the edge of the table
and allow for accidental impacts. Avoid touching or bumping the CR
500 Reader during scanning.
The scan operation takes about 55 seconds. If the cassette is not seated
properly, an alarm sounds and an error message appears on the monitor.
CAUTION
:
Do not pull the cassette out before the scanning cycle is
complete. Damage to the Reader and cassettes can result.
2.
After the flexible screen is scanned, erased, and replaced into the
cassette, the system sounds a double beep and releases the cassette
automatically. Remove the cassette from the cassette feed slot.
3.
Repeat the process for additional cassettes.
NOTE: Loading begins when the cassette is centered in the feed slot.
Successful loading is accompanied by a single beep and the green
Busy indicator glows. If an error occurs, the Fault indicator blinks.
The LEDs display with icons as follows:
H195_0022AC
H195_0022ACA
CR500 READER
CASSETTE
1
2
3
H195 0034AC
H195_0034ACA
1
Green - Power - Reader is on.
2
Green - Steady - Opening and closing
cassette.
Green - Flashing - Scanning screen
3
Yellow - Fault - Error has occurred.
Summary of Contents for DirectView CR 500 System
Page 1: ...Kodak DirectView CR 500 System User s Guide H195 0016AC...
Page 10: ...viii August 1 2003 Table of Contents...
Page 14: ...1 4 1F1976 August 1 2003 Safety and Related Information Labels H195_0001DC...
Page 15: ...Safety and Related Information August 1 2003 1F1976 1 5 H195_0002DC...
Page 16: ...1 6 1F1976 August 1 2003 Safety and Related Information H195_0003DC...
Page 28: ...2 6 1F1976 August 1 2003 Overview...
Page 36: ...3 8 1F1976 August 1 2003 Operation and Workflow...
Page 46: ...4 10 1F1976 August 1 2003 Entering Exam Data...
Page 52: ...5 6 1F1976 August 1 2003 Scanning Viewing and Managing Images Reject Images...
Page 80: ...5 34 1F1976 August 1 2003 Scanning Viewing and Managing Images...
Page 92: ...6 12 1F1976 August 1 2003 Maintaining Image Quality...
Page 97: ...Troubleshooting August 1 2003 1F1976 7 5 Clear Pending Images...
Page 108: ...8 10 1F1976 August 1 2003 Maintaining Equipment and Cassettes...
Page 189: ...Key Operator Functions August 1 2003 1F1976 9 81 Number 2 Number 3 Number 4 Number 5...
Page 190: ...9 82 1F1976 August 1 2003 Key Operator Functions Number 6 Number 7 Number 8 Number 9...
Page 191: ...Key Operator Functions August 1 2003 1F1976 9 83 Number A Number B Number C Number D...
Page 194: ...9 86 1F1976 August 1 2003 Key Operator Functions Clear All Suffix Clear All Prefix Test...
Page 202: ...9 94 1F1976 August 1 2003 Key Operator Functions...
Page 218: ...10 16 1F1976 August 1 2003 Remote Operations Panel...
Page 226: ...B 4 1F1976 August 1 2003 Printing Exceptions...
Page 235: ......


