background image

47

DM8000 User Manual

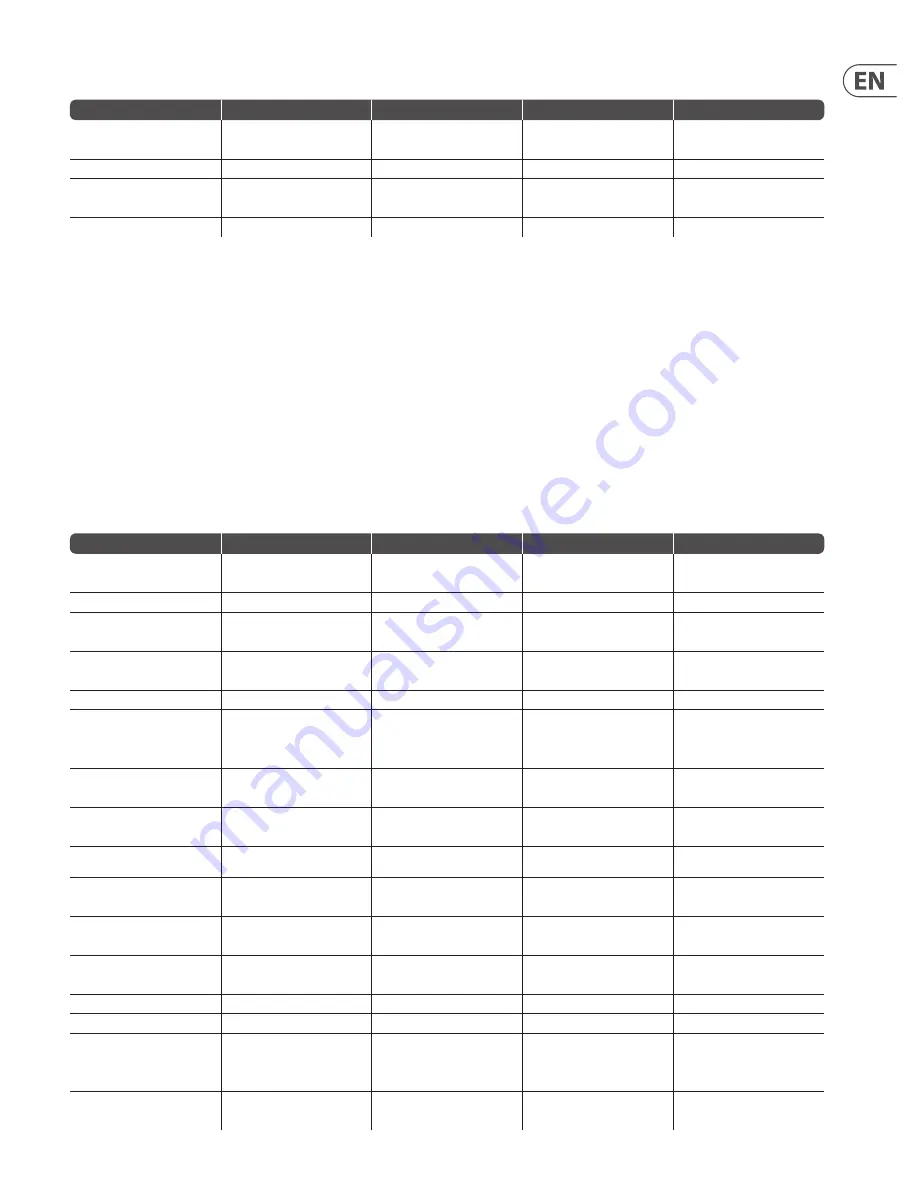
USB Output Modules

Description

Attribute

Commands

Param

Value Range

Output mute

Output_Mute

set, get, toggle

channel 

(value: 1, 2)

0 = unmuted

1 = muted

Output level

Output_Level

set, get, inc, dec

channel 

(value: 1, 2)

-100 ~ 0 dB

Output invert

Invert

set, get, toggle

channel 

(value: 1, 2)

0 = no

1 = yes

USB output status

USB_Input_Status

subscribe, unsubscribe

Examples

:

set UsbOutput1 Output_Level 2 -31;

Command format:

  command InstanceTag Attribute channel_ID value;

get UsbOutput1 Output_Level 1;

Command format:

  command InstanceTag Attribute channel_ID;

NOTE

:


This command does not require

 value.

toggle UsbOutput1 Output_Mute 1;

Command format:

  command InstanceTag Attribute channel_ID;


NOTE

:


This command does not require

 value.

5.3.9.2 Mixers

Auto Mixer

Description

Attribute

Commands

Param

Value Range

Input mute

Input_Mute

set, get, toggle

channel 

(value: 1 ~ input_count (max: 32))

0 = unmuted

1 = muted

Input level

Input_Level

set, get, inc, dec

channel 

(value: 1 ~ input_count (max: 32))

-100 ~ 12 dB

Input level state

Level_State

set, get, toggle

channel 

(value: 1 ~ input_count (max: 32))

0 = off

1 = on

Mix output mute

Mix_Output

set, get, toggle

0 = unmuted

1 = muted

Mix output level

Mix_Level

set, get, inc, dec

-100 ~ 12 dB

Mic logic

Mic_Logic

set, get

0 = none

1 = last mic hold

2 = input 1

Logic outputs follow mic logic

Logic_Outs_Follow

set, get, toggle

0 = no

1 = yes

Open mic limits enabled

OML_Enabled

set, get, toggle

0 = no

1 = yes

Open mic limits open  

microphone number

OML_Max_Open_Mics

set, get, inc, dec

0 ~ channel_number-1

Channel direct output

Channel_1_Direct_Output

set, get, toggle

channel 

(value: 1 ~ input_count (max: 32))

0 = post-gate / pre-nom

1 = post-gate / post-nom

Channel manual

Channel_1_Manual

set, get, toggle

channel 

(value: 1 ~ input_count (max: 32))

0 = off

1 = on

Channel NOM gain enable

Channel_1_NOM_Gain_Enable

set, get, toggle

channel 

(value: 1 ~ input_count (max: 32))

0 = off

1 = on

Channel off attenuation

Channel_1_Off_Attenuation_dB

set, get, inc, dec

channel 

(value: 1 ~ input_count (max: 32))

-80 ~ -10

Channel gate hold time

Channel_1_Gate_Hold_Time_ms

set, get, inc, dec

channel 

(value: 1 ~ input_count (max: 32))

1 ~ 6000

Output logic

Logic_1

set, get

channel 

(value: 1 ~ logicout_count 

(max: 32))

0 = follow gate

1 = on

2 = off

Output invert

Inverted

set, get, toggle

channel 

(value: 1 ~logicout_count 

(max: 32))

0 = no

1 = yes

Summary of Contents for DM8000

Page 1: ...User Manual DM8000 DSP Designer Software Advanced Digital Audio Processor for Installation Applications with Configurable DSP Audio Networking and Acoustic Echo Cancellation ...

Page 2: ... 3 5 CrossOvers 23 3 6 Dynamics 23 3 7 Routers 27 3 8 Delays 28 3 9 Controls 28 3 10 Meters 36 3 11 Generators 38 4 Building a Signal Processing Architecture 39 4 1 Deploying Component Objects 40 5 Operation 41 5 1 Networking 41 5 2 System Security 41 5 3 Third Party Control 43 6 Index 58 Limitedwarranty Fortheapplicablewarrantytermsandconditionsandadditionalinformation regardingMUSICGroup sLimite...

Page 3: ...product page at http www music group com brand klarkteknik 2 Click on the Downloads tab 3 Click on the download icon for the latest version of the DM8000 DSP Designer software 4 Read the software End User License Agreement and click on Agree 5 Click on Download 6 Click on the downloaded exe file and follow the installation instructions 2 Software Interface Overview 2 1 Basic Screen elements The DM...

Page 4: ...creen The Overview Screen is available to aid navigation if a system becomes too big to fit inside the available Build Screen space the Overview Screen is on the right side of the Main Screen DM8000 Overview Screen 2 1 5 Properties Screen The Properties Screen appears at the lower left of the main screen and provides an editable table of attributes regarding the Build Window and its associated Com...

Page 5: ...odules for routing audio signals into and out of the DM8000 DSP Mixers provide typical audio mixing functions with several sub categories Equalisers provide both graphic and parametric equalisation as well as feedback suppression Filters provide High Pass Low Pass High Shelf Low Shelf and All Pass filters for applications that require rolling off of frequencies simple tone controls or phase compen...

Page 6: ...wn menu Font Size determines the point size of the text in the selected Component Object Bold renders the selected text with a thicker look for emphasis Italic renders the selected text with a slanted look Underline places a line underneath the selected text Left Justify aligns the selected text along the left of the Component Object Center aligns the selected text along the middle axis of the Com...

Page 7: ... Send to Back Bring Forward and Send Backward Pack Objects removes spaces and arranges Component Objects as tightly as possible along the left right top or bottom edges of a group of objects Align Objects straightens a group of objects along the left right top or bottom edges of the group of objects You may also align a group of objects by using Horizontal Center or Vertical Middle commands Space ...

Page 8: ...l Network Panel Properties Panel and the Compile Output Panel View Toolbar View Toolbar elements Module Library launches the Module Library screen Device Panel launches the Device Panel Network Panel launches the Network Panel Properties Panel launches the Properties screen Compile Output launches the Compile Output screen 2 1 14 Main Menus Main Menus provide all of the toolbar functions mentioned...

Page 9: ...y connected to the DSP Designer software Network Panel launches the Network Audio Map on the right side of the Main Screen Properties Panel launches a Properties window for the currently selected Component Object in the Build Window Compile Output Panel opens a window that shows results and feedback from the Compile command Overview Panel launches a window on the right side of the Main Screen that...

Page 10: ...he Build Window Zoom to Fit automatically alters magnification in the Build Window so that an entire Signal Processing Architecture will be visible and fit inside the Build Window Order contains further sub commands for changing the stacking order of Component Objects in the Build Window including Bring to Front Send to Back Bring Forward and Send Backward Pack Objects removes spaces and arranges ...

Page 11: ...zed name to each device and write up a brief description of the device s role and function in your network Set Device Name Description Dialog Box Set Internal IP button launches a dialog box where you may assign IP addresses for each device in your network Set Internal IP Dialog Box Reboot button launches the Firmware Upgrade Manager Control Dialog so you may update firmware for selected devices F...

Page 12: ...ect Right clicking launches a Control Dialog Box which displays the component controls in a more conventional user interface where you can program settings and make other adjustments 3 1 Input Output Modules To open the Input Output Module Library click on the Input Output tab in the lower left of the screen or use the Module Library Toolbar at the top of the screen 3 1 1 dM8000 The DM8000 module ...

Page 13: ... Output 6 Channel The DM8000 Output 6 Channel component object routes analog audio signals out from the DSP to the six analog outputs on the DM8000 rear panel DM8000 Output 6 Channel Component Object Right click to access the Component Object s Dialog Box with the following controls DM8000 Output 6 Channel Dialog Box Mute turns the output signal on or off Level adjusts the relative output volume I...

Page 14: ...nce baseline for the AEC process AeC 1 and AeC n Component Object dialog Boxes AEC Dialog Box The AEC 1 and AEC N control dialogue allows the user to select between AEC NR and Bypass settings AEC Advanced Dialog Box Selecting the Adv tab launches an AEC Advanced dialogue window where you can select between Non Linear Processing options OFF Soft Medium Aggressive The following graphic describes a t...

Page 15: ...works using standard Internet Protocol IP over Ethernet A Dante stream distributes both audio and integrated control data over the network Dante allows for transport of low latency uncompressed audio over standard IP Ethernet networks with sample accurate synchronization automatic device and channel discovery and easy to use signal routing Many of the properties of the Dante streams or channels ar...

Page 16: ...igns logic outputs to follow Designated Mic On Last Mic Hold Open Mic Limits enables and designates a maximum allowable number of active microphones Channel Settings Channel Settings can be accessed by right clicking over the Row ID assignment nodes Channel Settings affects individual channel settings but may also be applied globally to all channels within the Auto Mixer module Channel Settings Di...

Page 17: ...rd Mixer Standard Mixer modules offer controls most similar to regular analog mixers Standard Mixer Module Icons Standard Mixer Component Objects Right click to access the Component Object s Dialog Box with the following controls Standard Mixer Dialog Box Mute In turns the input signal on or off Level In adjusts the relative input volume ID assigns inputs to specific outputs Mute Out turns the out...

Page 18: ...ng Logic inputs and outputs are provided for wall state and source selection as well as the ability to combine and control the function of Auto Mixer modules connected to the Room Combiner module s inputs When a Room Combiner module is dropped into the Build Window the software will automatically launch a Parameter Dialog Box Room Combiner Initialisation Dialog Box In the Dialog Box Room Combiner ...

Page 19: ...e output Double clicking the Room Combiner Component Object produces the following Control Dialog Box Room Combiner Control Dialog Box This Dialog Box offers the following labels and functions refer to the above screenshot Room Name can be edited as in 1 in the above screenshot Wall ID is visible as in 2 in the above screenshot Auxiliary Audio selection is displayed as in 3 above Last Mic Hold and...

Page 20: ...hic Equaliser Graphic Equaliser adjusts frequencies in set frequency bands Graphic Equaliser Module Icons Graphic Equaliser Component Object Right click to access the Component Object s Dialog Box with the following controls Graphic Equaliser Dialog Box Active Band selects the current frequency band to be adjusted Center Freq displays the center frequency for the current band Gain adjusts the amou...

Page 21: ...urve only Band highlights the current band inside the graph NOTE Feedback Suppressor modules use a hefty amount of processing power and are limited to a maximum of sixteen bands although in practice the number of bands actually in use will often be fewer The Feedback Suppressor s active bands can also be recreated within a Parametric Equalizer to save DSP resources 3 4 Filters Filter modules provi...

Page 22: ...uency for the filter These settings may also be adjusted by dragging the cursor shown inside the graph Bypass turns the filter on or off 3 4 4 Low Shelf Low Shelf Module Icon Low Shelf Component Object Right click to access the Component Object s Dialog Box with the following controls Low Shelf Dialog Box Gain selects the amount of maximum cut or boost applied by the filter Cutoff Freq selects the...

Page 23: ... Way Crossover Module Icons 2 Way 3 Way and 4 Way Crossover Component Objects Right click to access the Component Object s Dialog Box with the following controls 3 Way Crossover Dialog Box Input Level provides muting and level adjustment for the input Output Range selects the Low Middle or High frequency output Cutoff Frequency selects the filter cutoff frequency for the selected output Output Ran...

Page 24: ... in the input signal CompLimiter Module Icon CompLimiter Component Object Right click to access the Component Object s Dialog Box with the following controls CompLimiter Dialog Box Attack Time controls how quickly the Comp Limiter responds to input level changes Ratio determines the intensity of gain reduction input level increase vs output level increase Release Time determines how quickly gain r...

Page 25: ...own logic signal to another device Mix Sense enables the ducker to detect a trigger signal within a mix of multiple audio signals 3 6 4 Noise Gate Noise Gate provides automatic muting until the gate is triggered and opened by an incoming audio signal Noise Gate Module Icon Noise Gate Component Object Right click to access the Component Object s Dialog Box with the following controls Noise Gate Dia...

Page 26: ...onent Object in the signal path before routing the signal to outputs For consistent performance once levels have been set do not subsequently adjust the level settings at the outputs amplifiers or speakers 3 6 5 3 Setting Gain Min and Gain Max For best results you should set Program gain levels by using a relatively constant Program source signal If the actual source Program signal is not constant...

Page 27: ...rix To assign an input signal to an output click on the matrix node located where the In row intersects with the Out column When selected the matrix node lights green 3 7 2 Source Selection Source Selection modules allow you to route multiple audio inputs sent to a single output Only one source input at a time can be active Right click to access the Component Object s Dialog Box with the following...

Page 28: ...ingle fader 3 9 1 Level Control Level Control Module Icons Level Control Component Objects Right click to access the Component Object s Dialog Box with the following controls Level Control Dialog Box Mute turns individual channels on or off Channel level controls may be manually adjusted by dragging the fader or the level value may be entered in as a numerical value Maximum and Minimum level value...

Page 29: ...f level adjustment Inc Dec controls the amount of level change that happens each time the respective logic control terminal is triggered Logic input terminals along the top of the Component Objects display positive and negative labels Signals from the positive logic terminals increase the level by the programmed Inc Dec value Similarly signals from the negative logic terminals decrease the level b...

Page 30: ...el Inc Dec Dialog Box with Ramping per channel When Enable Ramping is active the main Level Inc Dec Dialog Box will show a new parameter for each channel Rate sets the timing in milliseconds between the repeating incremental level changes used in the ramping process Level Inc Dec Dialog Box with Ganging and Ramping enabled When Gang Controls is selected in the Parameters dialog the main Level Inc ...

Page 31: ...the related Component Object will show a G and the Invert Control Dialog Box will show a single Invert control for all of the channels Invert Control Dialog with Ganged channels 3 9 4 Mute Mute modules turn connected audio channels on or off Mute Module Icons Mute Component Objects Right click to access the Component Object s Dialog Box with the following controls Mute Control Dialog Box Mute swit...

Page 32: ...ngle output of matching polarity when ALL of the inputs are the same i e when all inputs are HIGH the module produces a single HIGH output When all inputs are LOW the module produces a single LOW output NAND produces a single LOW output when ALL inputs are HIGH while one or more LOW inputs triggers a HIGH output OR produces a single LOW output when ALL inputs LOW while one or more HIGH inputs trig...

Page 33: ...inues beyond the set time threshold the Logic Delay will then output a signal of the same on or off type Logic control signals that do not persist beyond the set time threshold are not passed on Logic Delay modules are placed in between the logic control terminals of other logic modules and or audio modules that generate or accept logic control signals Logic Delay Module Icons Logic Delay Componen...

Page 34: ...ween 3 wire and 2 wire configurations GPIO Logic Output Parameters Dialog Box The GPIO Logic Output Parameters Dialog Box contains two menus Outputs Count allows you to select up to five logic outputs to the GPIO GPIO Mapping allows you to assign each logic output to a specific GPIO pin on the back panel GPIO port When more than one logic output is specified in the Outputs Count pulldown menu the ...

Page 35: ... is assigned to Pin 6 CP8000 Parameters Dialog Box for AUX Pin Assignment to GPIO CP8000 Parameters Dialog Box for RVC Pin Assignment to GPIO After selecting and assigning GPIO pins for AUX and RVC double click on the CP8000 module to launch a Control Dialog Box to select which specific Input Output Module see 3 1 Input Output Modules will have its volume controlled from the CP8000 series unit CP8...

Page 36: ...he SOFT TOUCH BUTTON assigned to that parameter Both the button LED and the VOLUME KNOB LED ring will light up to indicate the selected volume parameter is active and ready for adjustment 3 10 Meters Meter modules provide Signal Present Peak RMS and Logic Meter functions Meter modules may be connected to any component output terminal and may be used for diagnostic and setup purposes or for applica...

Page 37: ...ceeds the last highest reading Meter Label lets you make a custom label for the audio channel being monitored 3 10 3 RMS Meter RMS Meter modules can be used to monitor the average signal level of an audio channel A single RMS Meter module can be configured to monitor multiple audio channels RMS Meter Module Icons RMS Meter Component Objects Right click to access the Component Object s Dialog Box w...

Page 38: ...problem frequencies in a room or sound system Tone Generator Module Icon Tone Generator Component Object Right click to access the Component Object s Dialog Box with the following controls Tone Generator Dialog Box Tone mode generates a single frequency Tone mode disables the Start Frequency Stop Frequency Sweep Interval and Time Interval parameters Sweep mode generates a tone that sweeps through ...

Page 39: ...Objects Right click to access the Component Object s Dialog Box with the following controls White Noise Dialog Box Mute turns the White Noise Generator module on or off Level sets the generator output level 4 Building a Signal Processing Architecture DM8000 Edit Software allows you to build a custom signal processing architecture by pulling connectable drag and drop modules from the Module Library...

Page 40: ... Window to build large processing architectures By strictly using the pulldown menus the Module Libraries and Toolbars can be hidden to provide the maximum available space for the Build Window To select Component Modules from the standard pulldown menus at the top of the screen follow these steps 1 Click on the Modules pulldown menu tab 2 Select the appropriate sub menu category 3 Within the sub m...

Page 41: ...hernet port uses a cross over or straight through CAT5 cable to connect Each DM8000 ships with a straight through CAT5 cable Ethernet switches must be 10 100 BaseT compatible with sufficient ports for connection to each DM8000 unit multiple switches may be used Ethernet has a cable length limitation of 100 meters between the Ethernet switch and a DM8000 device However using fiber optic cable can ext...

Page 42: ...hese additional functions Change and download the design Set the Device IP address Change create and delete presets Device Protection Dialog with User Privilege Option Shown One must be logged on as administrator to Create or edit users Set the device name Reboot the device Update the device s firmware Disable protection for a protected system Reset password Change the access level for an account ...

Page 43: ...illegal character An illegal character renders the DTP string an invalid command and the system will not respond to the command DTP strings may contain a maximum of 256 characters If a DTP string exceeds 256 characters the string is an invalid command Sequential spaces are acceptable within the DTP string Individual parameters within the DTP string may contain a maximum of 63 characters If a param...

Page 44: ... dec toggle subscribe and unsubscribe commands as well as the value range that the Attribute will accept Param1 Param2 determines whether Param1 Param2 or BOTH are needed for a DTP String to be complete DTP Strings can address the following DSP modules Input Output Modules USB Audio Input USB Audio Output Modules DM AEC Modules Mixer Modules Equalizer Modules Filter Modules Crossover Modules Dynam...

Page 45: ...ibe channel value 1 10 Examples setInput1Input_Gain218 decInput1Input_Level314 Command format commandInstanceTagAttributechannel_IDvalue subscribeInput1Peak1 Command format commandInstanceTagAttributechannel_ID NOTE This command does not requirevalue DM8000 Output 6 Description Attribute Commands Param Value Range Output mute Output_Mute set get toggle channel value 1 6 0 unmuted 1 muted Output le...

Page 46: ...anceTagAttributechannel_IDvalue decAEC1Min_Threshold37 Command format commandInstanceTagAttributechannel_IDvalue subscribeAEC1AEC_Status_11 Command format commandInstanceTagAttributechannel_ID NOTE This command does not requirevalue USB Input Modules Description Attribute Commands Param Value Range Input mute Input_Mute set get toggle channel value 1 2 0 unmuted 1 muted Input level Input_Level set...

Page 47: ...e channel value 1 input_count max 32 0 off 1 on Mix output mute Mix_Output set get toggle 0 unmuted 1 muted Mix output level Mix_Level set get inc dec 100 12 dB Mic logic Mic_Logic set get 0 none 1 last mic hold 2 input 1 Logic outputs follow mic logic Logic_Outs_Follow set get toggle 0 no 1 yes Open mic limits enabled OML_Enabled set get toggle 0 no 1 yes Open mic limits open microphone number OM...

Page 48: ...hannel_IDvalue toggleMixer2Output_Mute1 Command format commandInstanceTagAttributechannel_ID NOTE This command does not require avalue setMixer2Level_State213 Command format commandInstanceTagAttributechannel_ID1channel_ID2value NOTE This command requires twoChannel_IDdesignations Matrix Mixer Description Attribute Commands Param Value Range Input mute Input_Mute set get toggle input_ch value 1 in...

Page 49: ...z EQ filter gain Filter_Gain set get inc dec band value 1 band_count max 16 30 15 dB EQ band width Bandwidth set get inc dec band value 1 band_count max 16 0 01 4 EQ band bypass Bypass_Band set get toggle band value 1 band_count max 16 0 no 1 yes EQ bypass all Bypass_All set get toggle 0 no 1 yes Graphic Equaliser Description Attribute Commands Param Value Range EQ filter gain Filter_Gain set get ...

Page 50: ...escription Attribute Commands Param Value Range Center frequency Center_Frequence set get inc dec band 1 band_count max 16 20 20000 Hz Bandwidth octaves Bandwidth_octaves set get inc dec band 1 band_count max 16 0 01 4 Band bypass Bypass_Band set get toggle band 1 band_count max 16 0 no 1 yes Bypass all Bypass_All set get toggle band 1 band_count max 16 0 no 1 yes 5 3 9 5 CrossOvers 2 Way 3 Way 4 ...

Page 51: ... 1 2000 ms Response time Response_Time set get inc dec 0 1 40000 ms Compress ratio Compress_Ratio set get inc dec 1 100 Threshold Threshold set get inc dec 60 24 dBu Bypass Bypass set get toggle 0 no 1 yes Dynamic leveler status Leveler_Status subscribe unsubscribe Ducker Description Attribute Commands Param Value Range Input mute Input_Mute set get toggle 0 unmuted 1 muted Input level Input_Level...

Page 52: ... set get toggle 0 unmuted 1 muted Ambient level Ambient_Level set get inc dec 100 12 dB Ambient threshold Ambient_Threshold set get inc dec 60 24 dBu Ambient response Ambient_Response set get inc dec 500 300000 ms Minimum gain Min_Gain set get inc dec 25 10 Maximum gain Max_Gain set get inc dec 10 25 Gain ratio Gain_Ratio set get inc dec 0 25 4 Time Time set get inc dec 500 300000 ms Bypass Bypass...

Page 53: ...lue Minimum set get inc dec 100 max Level Inc Dec Description Attribute Commands Param Value Range Level mute Muted set get toggle channel 1 channel_count max 16 0 unmuted 1 muted Level value Level_dB set get inc dec channel 1 channel_count max 16 100 12 dB Maximum level value Maximum set get inc dec channel 1 channel_count max 16 min 12 dB Minimum level value Minimum set get inc dec channel 1 cha...

Page 54: ... Range Mute Muted set get toggle 0 unmuted 1 muted Mute status Mute_Status subscribe unsubscribe Logic State Description Attribute Commands Param Value Range State State set get toggle channel 0 off 1 on Logic Delays Description Attribute Commands Param Value Range Logic on delay value On_Delay set get inc dec channel 1 channel_count max 16 0 60000 ms Logic off delay value Off_Delay set get inc de...

Page 55: ...u Meter sig present status SigPresent_Status subscribe unsubscribe channel 1 channel_count max 16 Peak Meter Description Attribute Commands Param Value Range Peak hold time Hold_Time set get inc dec channel 1 channel_count max 16 0 2000 ms Peak hold Peak_Hold set get toggle channel 1 channel_count max 16 0 no 1 yes Indefinite peak hold Indefinite_Peak_Hold set get toggle channel 1 channel_count ma...

Page 56: ...Frequency set get inc dec Start_Frequency 20000 Sweep interval Sweep_Interval set get 0 1 octave 1 2 3 octave 2 1 3 octave 3 1 6 octave 4 1 12 octave 5 narrow band Interval time Time_Interval set get inc dec 100 60000 ms Pink Noise Generator Description Attribute Commands Param Value Range Pink output mute Mute set get toggle 0 unmuted 1 muted Pink output level Level set get inc dec 100 36 dBu Whi...

Page 57: ...ange Host name hostname get Network interface config ipConfig get Network status networkStatus get Serial number serialNumber get Firmware version version get Example DEVICEgetipConfig DM8000NetworkInterfaceConfig ip 192 168 1 22 netmask 255 255 255 0 gateway 0 0 0 0 SESSION Description Attribute Code Command Indexes Value Range Aliases aliases get Example SESSIONgetaliases list 123 AudioMeter1 Au...

Page 58: ...C 25 38 Automatic Noise Cancellation ANC Setup Procedure 38 Automatic Noise Cancellation ANC Setup Procedure Making Connections 28 Automatic Noise Cancellation ANC Setup Procedure Setting Gain Min and Gain Max 38 Automatic Noise Cancellation ANC Setup Procedure Setting Response Times 38 B Background Color 7 Band parameter 19 22 41 Bandwidth parameter 19 20 22 41 Basic Screen Elements 4 Bold text f...

Page 59: ...rameter 28 29 Rate parameter 28 29 44 Enter Editing Mode command 8 10 Ethernet 4 12 38 39 Ethernet Connection 38 Ethernet switch 38 Ethernet Cable Length 38 Exit command 9 F Feedback Suppressor modules 20 41 Fiber optic cable 38 File Pulldown Menu 9 Filter modules 6 20 22 All Pass 6 20 22 High Pass 6 20 21 High Shelf 6 21 Low Pass 6 20 21 Low Shelf 6 21 22 Filter Slope parameter 20 Filter Slope pa...

Page 60: ...mum parameter 27 28 43 44 Level In parameter 16 18 Level Inc Dec modules 28 29 Enable Ramping parameter 28 29 Level Out parameter 16 18 19 Leveler modules 6 22 23 42 Logic Delays modules 31 32 44 Logic Delay Off parameter 32 Logic Delay On parameter 32 Logic Gates modules 30 31 AND Gate 31 Flip Flop Gate 31 GPIO 30 HIGH Logic state 31 Logic State 31 44 LOW Logic state 31 NAND Gate 31 NOR Gate 31 N...

Page 61: ...hernet Connection 38 New file command 9 Noise Gate modules 6 22 24 42 NOM Gain 17 40 NOR Gate modules 31 NOT Gate modules 31 Non Linear Processing 15 O Open file command 9 Open Mic Limits 17 Operating Systems Recommended 4 Options 10 OR Gate modules 31 Order 8 11 37 Output Range 22 Outputs Count 33 Overview Panel 10 Overview Screen 5 P Pack Objects 8 11 37 Parametric Equaliser modules 19 Paste 9 1...

Page 62: ...annel Count parameter 26 Source Selection modules 6 26 Enable Logic parameter 26 42 Source Channel Count parameter 26 Space Evenly command 8 11 37 Standard Mixer modules 17 18 Standard Toolbar 9 Start Frequency parameter 35 45 Start Network Service 8 10 39 Status Bar 12 39 Stop Frequency parameter 35 45 Stop Network Service 8 10 Sweep parameter 35 45 Sweep Interval parameter 35 45 Sync parameter 2...

Page 63: ...63 DM8000 User Manual X XOR Gate modules 31 Z Zoom 8 11 Zoom 1 1 8 11 Zoom In 8 11 Zoom Out 8 11 Zoom to Fit 8 11 Zoom to Scale 8 ...

Page 64: ...re designed to provide reasonable protection against harmful interference when the equipment is operated in a commercial environment This equipment generates uses and can radiate radio frequency energy and if not installed and used in accordance with the instruction manual may cause harmful interference to radio communications Operation of this equipment in a residential area is likely to cause ha...

Page 65: ......

Reviews: