background image

Your Life Just Got Easier

No need to plug multiple peripherals into your notebook every time you 

return to your desk. Through one simple connection, the Kensington 

sd00v Notebook docking station with video connects you instantly to 

your external monitor, keyboard, and other peripherals. The compact size 

lets you place the docking station next to your notebook while taking up 

minimal desk space.
Please read this short manual to learn valuable information about the 

safe and proper use and installation of your docking station. Register your 

docking station online at www.kensington.com/register.

System Requirements

PC with the following specifications:
•  Windows VISTA™ or Windows® XP with Service Pack 1 or higher 

(Service Pack  recommended)

•  10MB of available disk space
•  CD-ROM or DVD drive
•  USB .0 port

Installing the Software

The Software Installation CD contains several software drivers. Drivers 

are software that allows the various components of your Docking Station 

(sound, video, and so on) to work.

Important! You must install the software before you can use 

your Docking Station with peripheral devices. If a Kensington 

docking station and related driver was previously installed into 

your system it is recommended to uninstall the old driver before 

proceeding with the installation of the Kensington sd200v 

docking station with video.

Note:

 Be sure to check www.kensington.com for driver updates or 

enhancements.

1

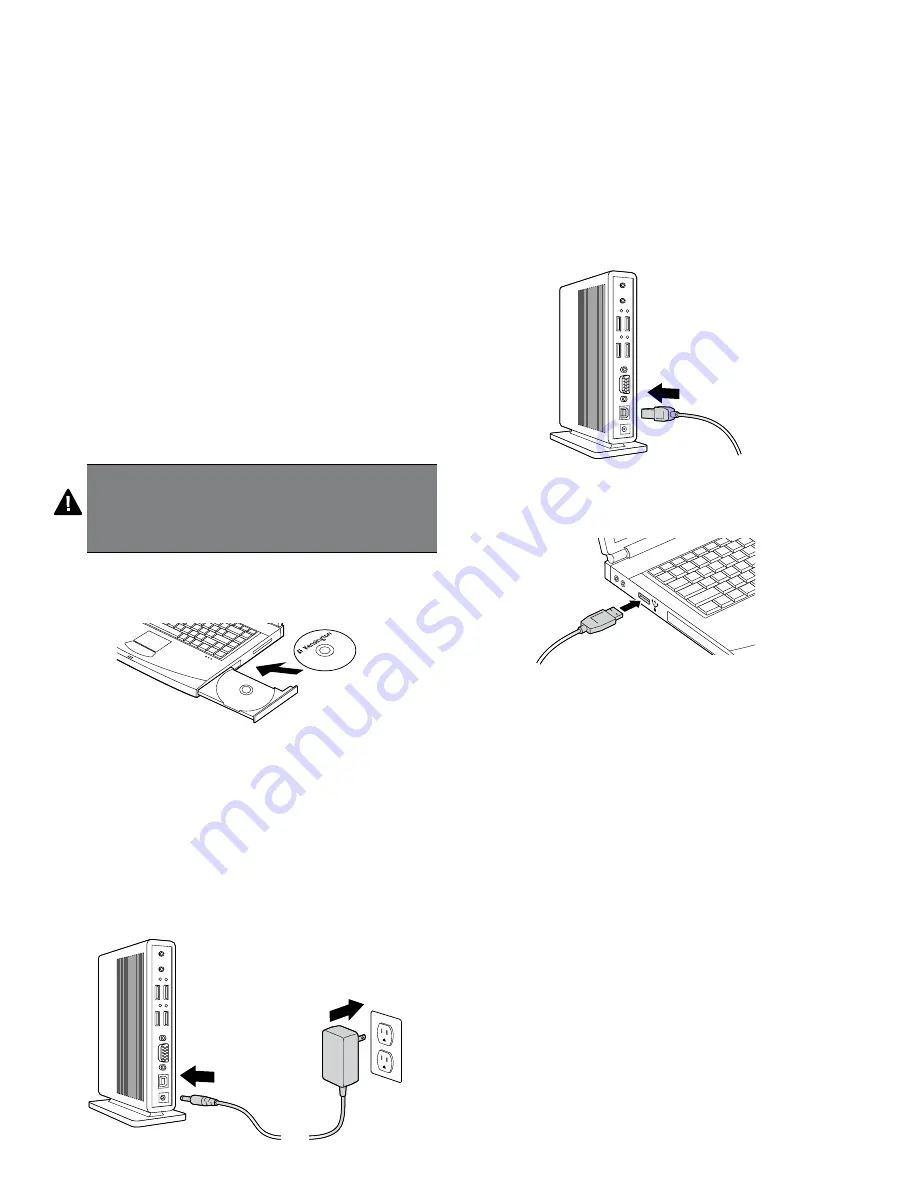
  Insert the Software Installation CD into your notebook’s CD/DVD 

drive. The installation application opens automatically.

2

  Follow the onscreen instructions to install the software drivers.

Note:

 During the installation of the video drivers, your notebook screen 

may occasionally go blank for a few seconds. This is a normal part of the 

installation process.

3

  If prompted on notebook screen, reboot your notebook.

Note:

 The Found New Hardware wizard will appear if you connect the 

docking station without previously installing the driver. 
It is recommended to Cancel the installation through the Found New 

Hardware wizard and follow the instructions provided in this chapter.

Connecting Your Docking Station and Your Notebook

1

  Plug the power adapter into the power adapter jack on the Docking 

Station. Then plug the power adapter into a working electrical outlet. 

Note:

 The power indicator light on the front of the Docking Station glows 

amber when the Docking Station is powered but is not connected to your 

notebook.

Note:

 Always keep the Docking Station connected to the power adapter 

supplied with the product. Video capabilities are NOT supported without 

the power adapter connected to the Docking Station. The performance 

of other devices connected to the ports of the Docking Station may also 

be limited without the power adapter connected. Note also that your 

Docking Station does not power your notebook when they are connected.

2

  Attach the USB .0 Cable to the USB Upstream Connector on your 

Docking Station.

3

  Attach the USB .0 Cable to a USB port on your notebook. The system 

will identify the new device connected to your system and will 

configure it automatically. Wait until this process is completed in 

order to have the video output of the Docking Station activated.

Using Your Docking Station

You may connect devices to the appropriate port on the Docking Station 

while your notebook is running. A slight delay is normal before the 

notebook recognizes the new device.

USB 2.0 Ports

Connect any USB device to any of the Docking Station’s five USB ports. 

Each port has a status indicator light that shows the status of that port:
•  When no device is connected to the port, the indicator light is off.
•  If a device is connected to the port and the connection works properly, 

the indicator light glows green.

Note:

 If a USB device is connected to the Docking Station and does not 

work as expected, test the device by connecting it directly to one of your 

notebook’s available USB ports.

Video Port

Connect a VGA cable (sold separately) to the VGA video output port on 

the Docking Station and to an external monitor. The VGA cable can be 

connected and disconnected any time without disconnecting the Docking 

Station from your notebook.
You can adjust video settings to customize your use of the Docking 

Station with Video; see “Adjusting Video Settings,” below, for 

information. 

Note:

 We recommend that you auto-adjust the external monitor once 

in a while to realign its settings with the video output of the Docking 

Station. Refer to your monitor’s user manual for instructions on how to do 

the auto-adjust procedure.

Summary of Contents for sd200v

Page 1: ...sd200v Notebook docking station with video INSTRUCTION GUIDE GUIDE D INSTRUCTIONS BEDIENUNGSANLEITUNG HANDLEIDING MANUALE DI ISTRUZIONI MANUAL DE INSTRUCCIONES 2 1...

Page 2: ...sd200v Notebook docking station with video English 2 Fran ais 9 Deutsch 16 Nederlands 24 Italiano 31 Espa ol 38...

Page 3: ...orts with status indicator lights I VGA video output J USB upstream connector K Power adapter jack D Software installation CD and Instruction Guide E Quick Start Guide L Power connection indicator lig...

Page 4: ...into the power adapter jack on the Docking Station Then plug the power adapter into a working electrical outlet Note The power indicator light on the front of the Docking Station glows amber when the...

Page 5: ...ch a DVD on your notebook screen Clone mode Clone mode clones creates an identical display from your notebook screen to the external monitor In Clone mode the Docking Station automatically selects the...

Page 6: ...esolution of the laptop use the Display Properties interface of the operating system Click Advanced to activate this interface When you want to switch from Clone mode to Extended dualview mode you can...

Page 7: ...ny adapters other than the one supplied with the Docking Station My notebook will not connect to the Docking Station and the light of the power connection indicator light is amber Unplug the USB 2 0 c...

Page 8: ...does not affect any other legal rights you may have by operation of law Contact Kensington at www support kensington com or at one of the technical numbers listed above for warranty servcie procedures...

Page 9: ...liance Documentation link at www support kensington com Information for EU Member States Only The use of the symbol indicates that this product may not be treated as household waste By ensuring this p...

Page 10: ...yants lumineux d tat I Sortie vid o VGA J Connecteur USB K Prise pour alimentation D CD d installation du logiciel et Guide d instructions E Guide de d marrage rapide L Voyant lumineux de fonctionneme...

Page 11: ...se de courant Remarque Le voyant lumineux d alimentation situ l avant de la station d accueil s allume de couleur ambre lorsque la station d accueil est sous tension mais qu elle n est pas connect e v...

Page 12: ...l cran de votre ordinateur portable Mode Dupliqu Le mode Dupliqu duplique cr e un affichage identique l cran de votre ordinateur portable sur l cran externe En mode Dupliqu la station d accueil s lect...

Page 13: ...ion d cran du portable utilisez l interface d affichage des propri t s du syst me d exploitation Cliquez sur Avanc pour activer cette interface Lorsque vous souhaitez basculer du mode Dupliqu au mode...

Page 14: ...dre le probl me Si le probl me persiste veuillez contacter l assistance technique de Kensington Vous trouverez les informations permettant de nous contacter dans la section Assistance technique ci des...

Page 15: ...appelez l assistance technique Les informations suivantes vous seront demand es Nom adresse et num ro de t l phone Nom du produit Kensington Fabricant et mod le de votre ordinateur Logiciel et version...

Page 16: ...ngendrer d interf rences nuisibles et 2 ce p riph rique doit accepter toute interf rence re ue y compris des interf rences pouvant entra ner des op rations non souhait es Conform ment ce qui est d fin...

Page 17: ...eigen I VGA Videoausgang J Vorgeschalteter USB Anschluss K Netzteilbuchse D Software Installations CD und Bedienungsanleitung E Kurzanleitung L Strom Verbindungs Indikatoranzeige M Display Indikatoran...

Page 18: ...llationsprogramm wird daraufhin automatisch ge ffnet 2 Folgen Sie den Anweisungen auf dem Bildschirm um die Softwaretreiber zu installieren Hinweis W hrend der Installation der Videotreiber ist auf de...

Page 19: ...n Bildschirm angezeigt wurden werden jedoch nicht wieder auf den sekund ren Bildschirm bertragen Videomodi Es gibt zwei Modi f r die Videoausgabe der Dockingstation Erweitert dualview Klon HINWEISE F...

Page 20: ...Bildschirm angezeigt werden k nnen Je intensiver die Farbtiefe desto besser die Bildqualit t Die Aktualisierungsrate auch Vertikalfrequenz genannt misst die Geschwindigkeit mit der der gesamte Bildsc...

Page 21: ...Weise k nnen Sie an Ihrer Dockingstation in der Arbeit den erweiterten dualview Modus einrichten w hrend Ihre Dockingstation zuhause im Klonmodus konfiguriert ist Diese Einstellungen werden jedes Mal...

Page 22: ...m diese Webseiten anzuzeigen verschieben Sie eine Seite auf den Bildschirm des Notebooks und die andere auf den externen Bildschirm Ich kann unter Microsoft Vista keine Videoclips abspielen wenn der e...

Page 23: ...GEWINNEINBUSSEN EINSCHR NKUNGEN BEI DER VERWENDUNG DER SOFTWARE VERLUST ODER WIEDERHERSTELLUNG VON DATEN KOSTEN F R ERSATZEINRICHTUNGEN AUSFALLZEITEN SACHSCH DEN UND FORDERUNGEN DRITTER INFOLGE VON U...

Page 24: ...lten Sie bei den rtlichen Beh rden bei dem f r Ihren Wohnsitz zust ndigen Wertstoffverwerter bzw dem Gesch ft in dem Sie dieses Produkt erworben haben Kensington und ACCO sind registrierte Handelsmark...

Page 25: ...en met statusindicatielampjes I VGA video uitgang J USB upstreamconnector K Aansluiting voedingsadapter D Software installatie cd en handleiding E Snelstartgids L Voedings verbindingsindicatielampje M...

Page 26: ...tietoepassing wordt automatisch gestart 2 Volg de aanwijzingen op het scherm om de stuurprogrammasoftware te installeren Opmerking tijdens de installatie van de videostuurprogramma s wordt het scherm...

Page 27: ...onitor werden weergegeven worden echter niet terug naar de secondaire monitor verplaatst Videomodi De video uitgang van het dockingstation werkt in twee modi Uitgebreid dualview Kloon OPMERKINGEN VOOR...

Page 28: ...e frequentie genoemd meet de snelheid waarmee het gehele scherm opnieuw wordt gevuld Hogere frequenties verminderen flikkeringen omdat de pixels frequenter worden belicht waardoor het afzwakken dat de...

Page 29: ...ingstation op kantoor instellen op Uitgebreid dualview terwijl uw dockingstation thuis is geconfigureerd voor de Kloonmodus telkens wanneer u uw dockingstation gebruikt in combinatie met uw notebook b...

Page 30: ...oepassing te verplaatsen naar de monitor van uw laptop Ondersteuning van het afspelen van video in de Uitgebreide modus dualview wordt regelmatig bijgewerkt met nieuwe stuurprogramma s controleer de K...

Page 31: ...rwerking van huishoudelijk afval of de winkel waar u dit product hebt aangeschaft Kensington en ACCO zijn gedeponeerde handelsmerken van ACCO Brands Windows is een gedeponeerd handelsmerk van Microsof...

Page 32: ...eo VGA J Connettore upstream USB K Jack dell alimentatore di corrente L Spia di alimentazione connessione D CD di installazione del software e Manuale di istruzioni E Guida di riferimento rapido M Spi...

Page 33: ...rrente prima all apposito jack sulla docking station quindi a una presa elettrica funzionante Nota se la docking station collegata all alimentazione ma non al notebook la spia ambra di alimentazione s...

Page 34: ...book Modalit di clonazione La modalit di clonazione crea sul monitor esterno una visualizzazione identica del contenuto dello schermo del notebook In modalit di clonazione la docking station seleziona...

Page 35: ...ione dello schermo del laptop usare l interfaccia Propriet Schermo disponibile sul sistema operativo Per l attivazione di questa interfaccia fare clic su Avanzate Per passare dalla modalit di clonazio...

Page 36: ...r contattare l assistenza tecnica Problemi generali La spia di alimentazione della docking station non accesa ambra o verde Verificare che l alimentatore di corrente fornito insieme alla docking stati...

Page 37: ...rway 22 70 82 01 sterreich 01 790 855 701 Portugal 800 831 438 Schweiz Suisse 01 730 3830 Sweden 08 5792 9009 United Kingdom 0207 949 0119 United States 1 800 535 4242 International Toll 31 53 484 913...

Page 38: ...T CE DoC Il modello n 33415 della docking station sd200v con video per notebook di Kensington stato testato in base ai requisiti essenziali per l applicazione del contrassegno CE Kensington pertanto c...

Page 39: ...s de estado I Salida de v deo VGA J Conector de la fuente de datos USB K Clavija del adaptador de alimentaci n D CD de instalaci n de software y Manual de instrucciones E Gu a de inicio r pido L Indic...

Page 40: ...nstrucciones que se indican en pantalla para instalar los controladores de software Nota Durante la instalaci n de los controladores de v deo es posible que se vaya la imagen de la pantalla de vez en...

Page 41: ...do extendido dualview con el monitor externo No obstante las ventanas que estaban previamente en el monitor externo no volver n a este monitor Modos de v deo El replicador de puertos con salida de v d...

Page 42: ...l color mejor ser la calidad de la imagen La frecuencia de actualizaci n tambi n llamada frecuencia vertical mide la velocidad a que se escanea la pantalla completa Las frecuencias superiores reducen...

Page 43: ...mo afectan los modos de reposo y de hibernaci n a los dispositivos conectados al replicador de puertos Monitores externos Si el replicador de puertos est conectado a un port til y a un monitor externo...

Page 44: ...l cerrarse la tapa Para cambiar esta configuraci n realice estas operaciones 1 Abra el Panel de control y seleccione Opciones de energ a 2 Realice una de las operaciones siguientes seg n el sistema op...

Page 45: ...anada 1 800 268 3447 Denmark 35 25 87 62 Deutschland 0211 6579 1159 Espa a 91 662 38 33 Finland 09 2290 6004 France 01 70 20 00 41 Hungary 20 9430 612 Ireland 01 601 1163 Italia 02 4827 1154 M xico 55...

Page 46: ...CA 94065 Designed in California U S A by Kensington Made in China ACCO Brands Europe Oxford Road Aylesbury Bucks HP21 8SZ United Kingdom ACCO Canada Inc 5 Precidio Court Brampton Ontario L6S 6B7 Cana...

Reviews: