Model 2430
Digital Multimeter
Input LO
Amps
2430 1KW PULSE SourceMeter
250V
PEAK
5V
PEAK
HI
LO
OUTPUT
125V
PEAK
125V
PEAK
EDIT
TOGGLE
POWER
RANGE
INPUT/
OUTPUT
4- WIRE
SENSE
DISPLAY
ON/OFF
TERMINALS
FRONT/
REAR
AUTO
RANGE
!
®
EXIT
ENTER
CONFIG MENU
SWEEP
TRIG
REL
LOCAL
FILTER
LIMIT
DIGITS SPEED
V
Ω
MEAS
I
FCTN
V
I
SOURCE
2
3
0
1
6
7
8
9
4
+/-
5
STORE RECALL
EDIT
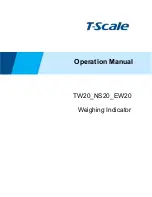
Figure 1-2
Connections for 10
μ
A
to 1A range current
verification tests
Performance Verification 1-11
2.
Select the multimeter DC current measuring function.
3.
Press the Model 2430 SOURCE I key to source current, and make sure the source output
is turned on.
4.
Verify output current accuracy for the 10
μ
A-1A range currents listed in Table 1-5. For
each test point:
•
Select the correct source range.
•
Set the Model 2430 output current to the correct value.
•
Verify that the multimeter reading is within the limits given in the table.
5.
Repeat the procedure for negative output currents with the same magnitudes as those
listed in Table 1-5.
6.
Repeat the entire procedure using the rear panel INPUT/OUTPUT jacks. Be sure to
select the rear panel jacks with the front panel TERMINALS key.
3A and 10A pulse range accuracy
NOTE
Verification of the 3A range confirms 10A pulse range accuracy.
1.
With the power off, connect the digital multimeter and the 1
Ω
resistor to the Model 2430
INPUT/OUTPUT jacks, as shown in Figure 1-3.
2.
Select the multimeter DC volts measuring function.
3.
Press the Model 2430 SOURCE I key to source current, and make sure the source output
is turned on.
Summary of Contents for SourceMeter 2430
Page 3: ...TAIWAN 1FL 85 Po Ai Street Hsinchu Taiwan R O C 886 3 572 9077 Fax 886 3 572 9031 ...
Page 6: ...Other brand names are trademarks or registered trademarks of their respective holders ...
Page 16: ......
Page 17: ...1 Performance Verification ...
Page 33: ...2 Calibration ...
Page 56: ...2 24 Calibration ...
Page 57: ...3 Routine Maintenance ...
Page 60: ...3 4 Routine Maintenance ...
Page 61: ...4 Troubleshooting ...
Page 75: ...5 Disassembly ...
Page 82: ...5 8 Disassembly ...
Page 83: ...6 Replaceable Parts ...
Page 104: ...6 22 Replaceable Parts ...
Page 105: ...A Specifications Section A pgs 1 5 qxd 11 7 2005 1 35 PM Page 1 ...
Page 116: ...A 12 Specifications ...
Page 117: ...B Command Reference ...
Page 128: ...B 12 Command Reference ...
Page 129: ...C Calibration Programs ...
Page 140: ......