10
English
When unpacking the product, make sure that no
accessories are missing and that none of the
package contents have been damaged. If you
detect any transport damages please contact
your dealer.
Î
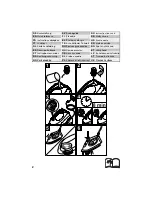
Illustrations on fold-out page!
Î
Illustrations on Page 2
1
Fill the steam ironing station with 1.2 liters of
water.
2
Screw in safety cap.
3
Plug in the main plug.
The green and orange indicator lamps light
up.
4
Wait (8 minutes) until the orange indicator
light goes out.
5
Set the temperature regulator on the iron to
“Max”.
6
Once the indicator lamp on the steam iron
has switched itself off, the steam iron is
ready for use.
Dear Customer,
Please read and comply with these
instructions prior to the initial opera-
tion of your appliance. Retain these operating in-
structions for future reference or for subsequent
possessors.
This appliance is designed for domestic use on-
ly.
Danger
Immediate danger that can cause severe injury
or even death.
몇
Warning
Possible hazardous situation that could lead to
severe injury or even death.
Caution
Possible hazardous situation that could lead to
mild injury to persons or damage to property.
The packaging material can be recycled.
Please do not place the packaging into the
ordinary refuse for disposal, but arrange
for the proper recycling.
Old appliances contain valuable materials
that can be recycled. Please arrange for
the proper recycling of old appliances.
Please dispose your old appliances using
appropriate collection systems.
Steam
CAUTION - Danger of scalding
The warranty terms published by our competent
sales company are applicable in each country.
We will repair potential failures of your appliance
within the warranty period free of charge, provid-
ed that such failure is caused by faulty material
or defects in fabrication. In the event of a warran-
ty claim please contact your dealer or the near-
est authorized Customer Service center. Please
submit the proof of purchase.
(See address on the reverse)
Contents
Description of the Appliance
A1 Control light (orange) – line voltage is on
A2 Indicator lamp (orange) - heating
A3 Safety cap
A4 Mains cable with mains plug
B1 Steam iron
B2 Indicator lamp - steam iron heating
B3 Steam button with lock
B4 Temperature controller
B5 Steam hose
C Rubber pads
Quick Reference
General information
Hazard levels
Environmental protection
Symbols on the machine
Warranty
Summary of Contents for SC 1020 B
Page 3: ...3...
Page 4: ...4...
Page 60: ...60 2 1 1 2 2 3 4 8 5 Max 6 60 60 60 61 62 63 64 64 A1 A2 A3 A4 B1 B2 B3 B4 B5 C...
Page 61: ...61 IEC 60364 FI 3x1 mm 3 5 bar KARCHER KARCHER...
Page 62: ...62 K RCHER 2 884 933 0 K RCHER 4 1 2 8 MAX...
Page 70: ...70 cc 2 1 1 2 2 3 4 8 5 Max 6 70 70 70 71 72 74 75 75 A1 2 3 4 B1 B2 B3 B4 B5 C...
Page 71: ...cc 71 IEC 60364 FI 3x1 2...
Page 72: ...72 cc KARCHER KARCHER K RCHER 2 884 933 0 K RCHER 4 1 2...
Page 73: ...cc 73 8 MAX 1 2 8...
Page 75: ...cc 75 73 C KARCHER 220 240 1 50 60 V Hz IPX4 2200 0 32 7 65 1 2 3 250 381 260...
Page 116: ...116 2 1 1 2 2 3 4 8 5 Max 6 116 116 116 117 118 119 120 120 A1 A2 A3 A4 B1 B2 B3 B4 B5 C...
Page 117: ...117 IEC 60364 3x1 2 KARCHER KARCHER...
Page 118: ...118 K RCHER 2 884 933 0 K RCHER 4 1 2 8 MAX k...
Page 120: ...120 8 119 KARCHER 220 240 1 50 60 V Hz I IPX4 2200 W 0 32 MPa 7 65 1 2 3 250 381 260...
Page 136: ...136 2 1 1 2 2 3 4 8 5 Max 6 136 136 136 137 138 139 140 140 A1 A2 A3 A4 B1 B2 B3 B4 B5 C...
Page 137: ...137 IEC 60364 F 3x1 2 KARCHER...
Page 138: ...138 KARCHER K RCHER 2 884 933 0 K RCHER 4 1 2 8 MAX...
Page 140: ...140 8 8 2 3 138 KARCHER 220 240 1 50 60 V Hz I IPX4 2200 0 32 7 65 1 2 3 250 381 260...
Page 141: ......
Page 142: ......
Page 143: ......
Page 144: ...I IPX4...
Page 145: ...dH 6 295 206...
Page 146: ...2 884 933 0...
Page 147: ...IEC 60364 K RCHER...
Page 148: ......
Page 149: ...149...


