background image

Country-
spec. Set-
tings

Level Display/

settings

Action in this menu/meaning

4

1

2

3

4

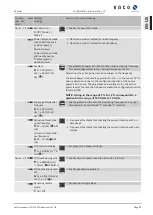
Dead time

 0 -10,000 [ms] /   0

[ms] /   1

F

Set the intentional delay for the start of the Q(U) function.

4

1

2

3

4

Output gradient limita-
tion increase & Output
gradient limitation de-
crease

 1 – 65534 [% Slim /

min] /   65534 [%
Slim / min] /   1

1. Maximum change in the reactive power in the event of a change to

over-excited mode.

2. Maximum change in the reactive power in the event of a change to

under-excited mode.

4

1

2

3

4

Settling time

 1,000 – 120,000

[ms] /   1,000 [ms] 
10

F

Set the response speed of the control.

4

1

2

3

4

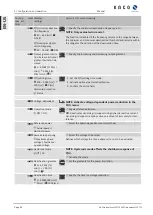
Minimum cos-phi Q1 
- Minimum cos-phi Q4

 0 – 1 /   0 / 

0.001

F

Enter the minimum cos ϕ factor for quadrants 1 and 4.

4

1

2

3

4

Q(U) active curve

 1 - 4

F

Select the active curve.

NOTE: Up to 4 characteristic curves can be configured inde-
pendently and one of them can be activated for regulation
each time.

4

1

2

3

4

Priority mode

 Q-Priority | P-Prior-

ity

F

Set priority for reactive power - Q or active power - P.

NOTE: When it comes to P priority, the reactive power adjust-
ment range is limited subject to the active power that is cur-
rently available and fed in.

4

1

2

3

4

Number of nodes

 2 - 10

NOTE: The maximum number of configurable nodes depends
on the selected grid type.

F

Specify the number of nodes.

4

1

2

3

4

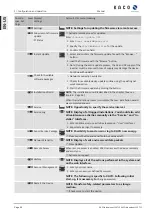
Node 1- Node 10

 Power / Excitation /

Voltage

 0 – 100 [% Slim] / 

43.6 [% Slim] /   0.1

F

Set the reactive power of the node as a percentage of the maximum
power.

 Over-excited | un-

der-excited

F

Art der Phasenverschiebung auswählen.

NOTE: Übererregt entspricht einer kapazitiven Last, unter-
erregt entspricht einer induktiven Last.

 0 – 125.0 [%

Unom] /   90 … 110.0
[% Unom] /   0.1 [%
Unom]

F

Enter the voltage of the node in volts..

NOTE: The voltage values of the nodes must increase continu-
ously. At voltages below the 1st node and voltages above the
last node, the reactive power value of the 1st or last node is
used each time.

4

1

2

3

4

Frequency dependent
power reduction

NOTE: Activate frequency-dependent power reduction in the
P(f) menu.

9 | Configuration and operation

Manual

KACO blueplanet 110 TL3 KACO blueplanet 125 TL3

Page 62

EN-US

Summary of Contents for blueplanet 110 TL3

Page 1: ...KACO blueplanet 110 TL3 KACO blueplanet 125 TL3 These instructions form part of the product and must be carefully read observed and stored in a place which is freely accessible at all times Authorize...

Page 2: ...ce for ease of reading Trademarks All brand and product names used in this document are trademarks or registered trademarks A lack of identifi cation does not mean that a product or designation logo i...

Page 3: ...faces 30 7 10 Sealing the connection area 33 8 Start up 34 8 1 Conditions 34 8 2 Preconditions relating to standards 34 8 3 Network topologies 35 8 4 Start up options 36 9 Configuration and operation...

Page 4: ...4 1001897 KACO blueplanet 92 0 TL3 M1 WM OD IIG0 KACO blueplanet 92 0 TL3 M1 WM OD IIGX 1001785 1001898 KACO blueplanet 105 TL3 M1 WM OD IIG0 KACO blueplanet 105 TL3 M1 WM OD IIGX 1001941 1001951 KACO...

Page 5: ...nger Failure to observe this warning may lead to serious bodily injury or death CAUTION Low risk hazard Failure to observe this warning will lead to minor or moderate bodily injury CAUTION Risk of dam...

Page 6: ...ic requirements details see manual Grid Support Interactive Inverter Max Backfeed Current 0 A Conf to UL 1741 UL 62109 1 Cert to CSA C22 2 No 107 1 CAN CSA Std C22 2 No 62019 1 CAN CSA Std C22 2 No 62...

Page 7: ...the electrical connections Remove all jewellery from wrists and fingers Ensure that the testing equipment is in safe operating condition Modifications to the surroundings of the device must comply wi...

Page 8: ...cifications See section 4 3 Page 14 Operation outside the specifications prescribed by the manufacturer Overvoltage of more than at the DC connection 1500 V Device modification Standalone mode 2 2 Pro...

Page 9: ...feed through 4 Status indicator 9 DC isolator switch not present in S version 5 AC connection cable feed through 3 2 1 Mechanical components DC isolator switch not present in S version The DC isolator...

Page 10: ...ensive configurations are also possible via the web interface Inverter Off input DRM 0 for Australia In addition to the safety functions the internal interface switches can also be actuated via the In...

Page 11: ...DC isolator switch enables disconnection on the DC side Switch box A switch box with integrated DC isolator switch enables dis connection from the inverter on the DC side Inverter with circuit breake...

Page 12: ...ed overvoltage pro tection will work correctly if the ambient temperature is 40 C 4 The Max input current is the maximal theoretical value for operation with full power when the feed in power is low T...

Page 13: ...25 TL3 US Max efficiency 99 1 98 98 European efficiency 98 8 98 73 CEC efficiency 98 8 98 70 Self consumption Standby 10 W Infeed from 200 W Protection class over voltage category I III AC II DC Trans...

Page 14: ...Bending box 1001917 absolutely mandatory for UL market Accessory articles KACO order no Bending box 1001917 AC inverter input plate kit 1001882 double row 1001906 M63 32 AC inverter overvoltage pro te...

Page 15: ...u if necessary 5 2 Transporting the unit CAUTION Hazard due to impact risk of breakage to the device 1 Pack the device securely for transport 2 Transport the device using the intended carrying handles...

Page 16: ...ion 5 Immediately remove dirt especially on vents 6 Failure to observe these instructions may result in damage to the device which is not covered by the warranty NOTE Access by maintenance personnel f...

Page 17: ...he body is overloaded Lifting the device for transportation to change location and during installation can lead to injuries e g spinal injuries 1 Only lift the device using the openings provided 2 The...

Page 18: ...e device may be seriously injured 1 Use only fixing materials that are suitable for the mounting base The fastening materials supplied are only to be used for masonry and concrete 2 Only install the d...

Page 19: ...ise the device vertically using the openings provided 2 Use a climbing aid for the chosen installation height 3 Wear safety gloves and safety shoes when lifting and lowering the device NOTE Power redu...

Page 20: ...tection against theft The device is installed Proceed with the electrical installation CAUTION Damage to property due to condensation build up If the device is pre assembled moisture can get into the...

Page 21: ...d on the mount Wipe any moisture off the frame of the housing cover using a cloth 1 Undo the 6 screws 2 and carefully remove the housing cover 1 T_25 2 Be careful not to damage or soil the seals or op...

Page 22: ...DC side Max cable cross section 450 kcmil Min cable cross section in accordance with local installation standards Diameter of cable for cable fitting 0 63 1 10 inch Cable lug dimension b width max 1 6...

Page 23: ...the insulation from the AC cables 6 Strip the insulation from individual wires for L1 L2 L3 ABC and PE ground so that the strand and insulation can be pressed into the cable lug shaft CAUTION Risk of...

Page 24: ...lectricity grid If the residual current monitoring unit malfunctions the device is immediately disconnected from the public grid on all poles The functionality of integrated RCMU shall be observed in...

Page 25: ...as to the location of this fault 3 Rectify any faults before taking further measurements 4 Measure the electrical resistance between the protective earth PE and the positive cable of the PV generator...

Page 26: ...is intended exclusively for PV generators Other sources fall within the scope of im proper operation e g batteries 3 Only touch the PV generator cables on the insulation Do not touch the exposed ends...

Page 27: ...bing over the uninsulated crimping point and a maximum of 0 79 0 0 08 inch over the cable insulation and shrink fit using manual shrink fit ting equipment 9 Secure the input plate using the 4 screws T...

Page 28: ...C surge protec tion device F Position and secure intermediate plug in frame onto AC surge protection socket NOTE Different AC surge protection modules are used The designation on the PCB must match th...

Page 29: ...ix the output cable to the cable guide 8 Insert the RS485 overvoltage protection module into the base 9 Ensure that the protective elements are properly secured Proceed with the installation of the pr...

Page 30: ...e device from electrostatic discharge Components inside the unit can be damaged beyond repair by static discharge 1 Observe the ESD protective measures 2 Earth yourself before touching a component by...

Page 31: ...through the sealing insert NOTE Use a suitable category 7 network cable The maximum distance between two devices is 100 m 328 ft The Ethernet switch allows for the repeater function and supports auto...

Page 32: ...must be connected to all inverters and to the data monitor unit in the same way Wire A to wire A and wire B to wire B GND to GND 5 Tighten the cable fittings W_20 13 27 In Ibs NOTE When using the RS48...

Page 33: ...Loosen the cable fittings W_20 2 Thread the connection cables through the cable fittings 3 Connect wire A from COM 11 on the terminal of the protective device to the terminal marked INV OFF on the fir...

Page 34: ...ce into operation The following functions are only available via the WEB interface 1 Initial start up 2 Parameterization 3 Resetting the device to its factory defaults NOTE We recommend using an up to...

Page 35: ...ver Database Server App Server XMPP Service User HTTP S 1 2 5 3 4 6 7 8 9 10 Fig 42 Segmentation of a plant 1 Gateway VPN 3G 4G router 6 Network segment switch 2 Main network switch 7 Inverter 3 FO sw...

Page 36: ...r actively Option 2 Local start up with pre arranged configuration Installation technician uses a USB memory stick that contains a pre prepared device configuration The device imports these settings a...

Page 37: ...us SC BP125 Ethernet Port 1 DHCP Ethernet Notebook Ethernet Notebook Ethernet Port 0 Static IP Inverter Notebook Notebook Ethernet Ethernet Fig 44 Start up via Ethernet Application The planned network...

Page 38: ...tion 9 2 Page 43 2 Bei g ltiger Konfiguration werden die Parameter bertragen Once the parameters have been adopted and the device has been restarted the device is put into opera tion 8 4 4 Starting u...

Page 39: ...ure provides an example of the structure of a plant segment consisting of a Segment Controller and a certain number of KACO devices with string combiner SC combinations MOD BUS RTU RS485 DC DC MOD BUS...

Page 40: ...devices in the segments can be reached via Ether net using the Segment Controller assigned to them All Segment Controllers are monitored by a central Plant Controller Required components Notebook with...

Page 41: ...y configuration A language has been selected 1 Select Country and Grid type from the dropdown menu 2 Confirm the action field Pressing the Next button will take you to the next installation step Fig 4...

Page 42: ...models If there are concerns over security write access can be deac tivated 1 Specify the Modbus port and determine Read write access 2 Confirm the action field Pressing the Next button will take you...

Page 43: ...operating states The LEDs can display the following states LED illuminated LED flashing LED not illuminated Operating status LED Icon Description Start The green Operation lights up when AC and DC vo...

Page 44: ...remains inactive until the USB stick is removed or then performs a reset and restarts Procedure has com menced initialisa tion The green Operating LED and the green Feed in LED are flashing quickly y...

Page 45: ...AC Export Current meassurements Language Main Menu cumulative yield Selected meassurements String Combiner Opitonal Operation mode Previous page Current power Status history Activity indicators for co...

Page 46: ...action Yield Monitor Configuration Info Collapse all Expand all Parameters Overview Parameters Grid Parameters Interfaces Power Control Power Limitation Internal External System Maintenance Reactive...

Page 47: ...ce you have entered the password protection will be disabled for all protected grid parameters including the password protection setting for 15 minutes Protection is reactivated automatically after th...

Page 48: ...y F Select a week The web interface shows the selected data 4 1 2 3 4 Month display Displays the recorded operating data graphically F Select a month The web interface shows the selected data 4 1 2 3...

Page 49: ...ected to the device are entered in the segment controller Baud rate number of data acquisition units 9600 8n1 1 Specify transmission and detection intervals 2 Enter the number of data acquisition unit...

Page 50: ...Ride Through NOTE The device supports dynamic grid stabilization Fault Ride Through NOTICE More detailed information at See sec tion 10 3 Page 88 4 1 2 3 4 Operating mode On Off F Select a control pr...

Page 51: ...hreshold for zero current mode If one or more phase phase or phase neutral conductor voltages move below or above the configured threshold the inverter changes to zero current mode The total current i...

Page 52: ...F 4 1 2 3 4 ROCOF proportionality factor 5000 5000 0 00 Hz s 1 Status 1 Define the proportionality factor 2 Confirm the action field 4 1 2 3 4 Ramp Rate Limitation NOTE Opportunity to limit power in t...

Page 53: ...m 0 1 Max conn voltage af ter grid failure 90 125 Unom 0 1 F Specify switch on voltage range after grid error 4 1 2 3 4 Min conn frequency after grid failure 45 65 Hz 0 01 Max conn frequency after gri...

Page 54: ...quency or voltage 4 1 2 3 4 Generic parameters NOTE Opportunity to activate standard protective shutdown 4 1 2 3 4 Trip with intentional delay Status 1 If necessary activate delayed trip off 2 Activat...

Page 55: ...65 Hz 47 5 Hz 0 01 Trip underfrequency time level 2 5 0 1000000 ms 100 1 4 1 2 3 4 Trip overfrequency monitoring Status F Activate if necessary 4 1 2 3 4 Number of trip overfre quency levels 1 5 2 1...

Page 56: ...100 Unom 45 Unom 0 1 Trip undervoltage time level 2 5 0 120000 ms 1 4 1 2 3 4 Trip overvoltage moni toring Status F Activate if necessary 4 1 2 3 4 Number of trip over voltage levels 1 5 2 1 F Specif...

Page 57: ...ntioned menu items are filled in Off Apply settings manually 4 1 2 3 4 IP Address F Allocate a unique IPv4 address in the network 4 1 2 3 4 Subnet Mask F Assign a subnet mask 4 1 2 3 4 Default gateway...

Page 58: ...ger F Assign a unique RS485 bus address to the device Bus termination is carried out on the HMI board by means of a dip switch F Confirm the action field 4 1 2 3 4 Power Control Input screens for powe...

Page 59: ...cos phi constant Q con stant or fallback power NOTE If the fallback time is set to 0s external settings for cos phi Q and P are not reset operation continues with the last received setpoint 4 1 2 3 4...

Page 60: ...an abrupt change in the reactive power target value e g caused by a voltage jump 2 Activate optional password protection 3 Confirm the action field 4 1 2 3 4 Q constant NOTE Define the Q constant 4 1...

Page 61: ...th node as a percentage of the maximum power NOTE For the 1st node the power must be 0 for the last node the power must be 100 The power values of the nodes must increase continuously 0 3 1 ind cap 1...

Page 62: ...reactive power Q or active power P NOTE When it comes to P priority the reactive power adjust ment range is limited subject to the active power that is cur rently available and fed in 4 1 2 3 4 Number...

Page 63: ...cy exceeds the configured activation threshold PM NOTE A drop in the range of 2 to 12 corresponds to a gradient in the range of 100 Hz to 16 Hz 4 1 2 3 4 Steigung bei fallender Frequenz 0 200 Pref Hz...

Page 64: ...the action field 4 1 2 3 4 Voltage dependent NOTE Activate voltage dependent power reduction in the P U menu 4 1 2 3 4 Operation mode OFF ON F Regelverfahren aktivieren Off Deactivates dynamic grid s...

Page 65: ...tection 3 Confirm the action field 4 1 2 3 4 Features Functions NOTE Input screens for advanced device functions 4 1 2 3 4 External grid protection disconnection NOTE Option to detect the external gri...

Page 66: ...interface Page 49 4 1 2 3 4 Night Shutdown Check to activate 1 Q on Demand is activated by deactivating the night shutdown 2 Transfer selection to memory 3 Observe the information window and activate...

Page 67: ...e selected measurement data to the storage device or move the data selectively 4 1 2 3 4 Parameter Manage ment NOTE Option to reset configured values and the import and export of specific parameters 4...

Page 68: ...tion wizard was completed appears 4 1 2 3 4 Service NOTE Opportunity to specify the service interval 4 1 2 3 4 Service Log NOTE Display of all logged installations You should also add all maintenance...

Page 69: ...Assign a subnet mask 6 Assign a gateway 7 Assign DNS server 8 Save your settings 9 6 Carry out firmware update NOTE The DC power supply must be guaranteed during initial start up 12 The sequence of t...

Page 70: ...successfully completed Device with multifunction buttons Ensure power supply 1 Insert USB stick into the USB socket of the device 2 Use multifunction buttons to load a firmware See section 9 8 Page 7...

Page 71: ...are flashing slowly and in tandem 1 sec this indicates that a function has been completed successfully If the Fault LED is flashing slowly 1 sec this indicates that a function has not been completed s...

Page 72: ...USB stick has been removed the device reboots and features the updated data NOTE If a button is not pressed within 15 secs no valid file found Procedure is aborted USB stick can be re moved NOTE Proc...

Page 73: ...e grid NOTE If a button is not pressed within 15 secs Procedure aborted Disconnecting the device from the grid using the multi function buttons Action step sequence LB RB Notifications function F Pres...

Page 74: ...or various devices bp 87 0 TL3 Voltage UN 380V bp 92 0 TL3 Voltage UN 400V bp 105 TL3 Voltage UN 400V bp 125 TL3 Voltage UN 600V bp 137 TL3 Voltage UN 600V bp 150 TL3 Voltage UN 660V bp 155 TL3 Voltag...

Page 75: ...R T Over load capability Fig 68 Apparent power subject to the grid voltage for bp 125 TL3 1 P p u Q P u 0 6 0 4 0 2 0 1 0 8 1 2 0 6 0 6 1 0 0 UN 600V at 600V at 570V at 540V at 510V underexcited over...

Page 76: ...range for bp 110 TL3 US Qmax Smax 580 S p u Snom U V 0 6 0 4 0 2 0 1 0 8 1 2 380 500 340 300 420 460 540 Nominal capability OVRT Under voltage derating U V R T Fig 78 Apparent power subject to the gri...

Page 77: ...er than the configured Tau 200 ms by way of a defined gradient or settling time this gradient or settling time must be implemented in the system control Parameter Setting Refer ence Description cos ph...

Page 78: ...creasing gradient Timeout VArPcT_RvrtTms 0 1000 s Sets the time after which the inverter if it does not receive a new reactive power specification falls back to the previously valid reactive power pro...

Page 79: ...wer factor Over excited un der excited Reactive power mode Under excited relates to inductive load over ex cited relates to capacitive load Power gradient in creasing power gra dient decreasing 1 65 5...

Page 80: ...vent of a change in the cos set value With a change of the active power or the lock in and lock out voltage the cos is changed according to a PT 1 characteristic curve with a settling time of 5 Tau Nu...

Page 81: ...In the event of a significant voltage deviation the maximum reactive power adjustment range can be limited by a minimum cos in order to prevent an excessive reactive power supply and as a result a si...

Page 82: ...hods described below the specified target value at the inverter s connection terminals is adjusted using a stationary deviation of the reactive power of maximum 2 N SN The transient response of the co...

Page 83: ...econd solution must be applied for all other inverters 10 2 3 Voltage dependent power reduction P U If it is not possible to compensate adequately for voltage increase in the upstream distribution net...

Page 84: ...ing volt age Deactivation gradient 0 65 534 min 100 min 1 If the available power is above the actual output at the time of deactiva tion the power increase back to the maximum power is limited The lim...

Page 85: ...erters must assist with frequency stability in the grid If the grid frequency leaves the normal toler ance range e g 200 mHz the grid is in a critical state In the event of overfrequency there is a ge...

Page 86: ...n mandatory conges tion management of the grid operator and market control this needs to be implemented in the site specific plant control infrastructure 52 0 51 5 51 0 50 5 50 2 100 PM 60 PM Pref PM...

Page 87: ...abled if the frequency returns to the range between the minimum and maximum deactivation threshold and remains within this range for the duration of the deactivation time P f intentional delay 0 5 000...

Page 88: ...e grid or not Protective settings take the upper hand over the capacity of immunity to interference 10 3 1 Dynamic grid support by way of immunity to interference Interference immunity against undervo...

Page 89: ...inci dent has occurred Responses to changes in the voltage during the incident or to the voltage recovery at the end of the incident take place with the same dynamic The formula for calculating the dy...

Page 90: ...continuous cur rent Zero current undervolt age threshold Zero current threshold over voltage 0 80 Unom 10 Unom 0 1 108 129 Unom 125 Unom 0 1 If one or more phase phase or phase neutral conductor volt...

Page 91: ...of residual current is limited to permit a defined proportion of active power components Minimum support time 1 000 15 000 ms 5 000 ms 10 If due to a voltage jump in accordance with formula 1 and the...

Page 92: ...the ramp time WMaxLimPct_RvrtTms in the SunSpec model is specified as 0 s then the internal output gradient is used Otherwise the set value will be used Irrespective of the communication protocol use...

Page 93: ...ls simultaneously after they have been switched off by grid protection a soft start up is usually only required for start up after a device has been switched off by grid protection The soft start up i...

Page 94: ...sure is used in a distribution grid and the deactivated part of the grid remains live as an is land reclosure will likely happen during phase displacement which might cause damage to rotating ma chine...

Page 95: ...the ROCOF of the grid exceeds the configured disconnection threshold of stage 1 for the configured dis connection time the device switches to zero current mode If the ROCOF of the grid exceeds the con...

Page 96: ...f feed in operation renewed use of the Q on Demand function is only possible after proper feed in operation with sufficient DC supply The existing deactivated night shutdown also remains active The fo...

Page 97: ...t in touch with our customer service team Only carry out maintenance activities that are described here 2 Log each maintenance activity in the Service menu item Service log exception User interface Se...

Page 98: ...aning agents and ensure that no other components come into contact with fluids Cleaning completed if necessary remount the fans 1 2 mm 2 3x Fig 99 Cleaning the cooling fins from above 1 2 4x Fig 100 C...

Page 99: ...and carefully press it in 2 Insert the fastening screws into the cover on both sides and tighten them _T20 17 70 In Ibs You may now start up the device See section 8 Page 34 2 Fig 103 Fitting the cov...

Page 100: ...1 DC base 2 DC overvoltage protection module 3 slots 3 Jumper 11 5 Shutting down for maintenance troubleshooting Shutdown sequence 1 Switch off the grid voltage by turning off the external circuit bre...

Page 101: ...tion section E Contact the grid operator if the grid failure continues to oc cur E The grid fuse trips Damage to the device s hardware If the grid fuse trips immediately when the device goes into feed...

Page 102: ...messages Fault LED red Status Explanation LED FS fault status The fault relay has switched On Feed in was ended due to a fault OS operating status The fault relay releases again Off The device feeds...

Page 103: ...g grid feed Should only be re garded as an error if one of the self test rou tines gets stuck If the device re mains in this status continuously de spite adequate DC voltage this indi cates a device f...

Page 104: ...tiva tion time is I Check PE cabling the cause is gener ally faulty cabling to earth Often occurs during rainfall in the case of faulty ca bling Measure the insulation resistance of the system E 20 Po...

Page 105: ...the DC generator is too high The PV generator is configured incorrectly Check PV voltage using suitable mea suring equipment Are strings con nected in series in stead of in parallel E 41 Grid failure...

Page 106: ...heck connection cabling E 49 Grid failure overfrequency Measured value for grid frequency is below the permitted limit This limit is country spe cific See action in the event of a fault 48 E 50 Grid f...

Page 107: ...dication on display behaves in the same way as normal feed in mode status 4 therefore no flashing This is a require ment from the grid operator 64 Output current limitation Power limitation as the max...

Page 108: ...ps once the 5th fault is triggered within 24h If the fault tends to occur in the event of precipitation or high levels of hu midity this indi cates the presence of an insulation fault on the DC side o...

Page 109: ...1 See action in the event of an error 81 E 84 Protection shutdown DC link undervoltage This message appears if the minimum value of the DC link voltage is not reached If the device stops feeding in th...

Page 110: ...contact the ser vice department B E 101 Temperature plausibility er ror The individual temperatures in the device are compared with one another This fault occurs if a certain limit value is exceeded...

Page 111: ...PV mod ules Contact your authorised electri cian E 119 DC overvoltage 2 PV voltage above permissible limit values Re wire PV mod ules Contact your authorised electri cian E 125 Relay control fault Th...

Page 112: ...or is demagnetised prior to feed in If this is not possible this error message ap pears Device error de tected 180 Pre synchronisation not pos sible Adequate voltage pre synchronization with the AC gr...

Page 113: ...n in the event of a fault 189 See action in the event of a fault 189 193 Semiconductor module 2 in channel B defective See description in the event of a fault 189 See action in the event of a fault 18...

Page 114: ...and TripZone shutdown Disconnect the AC and DC supply Wait 1 minute and switch back on B 224 External limitation This is a relative specification of the desired active power adjustment Check EMS Redu...

Page 115: ...ection It has been ensured that there is no AC DC voltage present Remove the housing cover and put it aside 1 Detach cables L1 L2 L3 from the AC connection terminal W_17 2 Detach the PE line from the...

Page 116: ...ice from being lifted off the mount 2 Use the lateral openings and lift the device off the mount The device has been removed Proceed with packaging 12 5 Packaging the device The device has been uninst...

Page 117: ...kaging are made from recyclable raw materials Device Do not dispose of faulty devices or accessories together with household waste Ensure that the old de vice and any accessories are disposed of in a...

Page 118: ...ring circuit Consignment identification Delivery address Contact person with telephone number Information about the accessibility of the installation site You can find the following items and other in...

Page 119: ...nt technical state at the time of printing Subject to technical changes No liability for printing errors Werner von Siemens Allee 1 74172 Neckarsulm Germany Tel 49 7132 896 0 info kaco newenergy de ww...

Reviews: