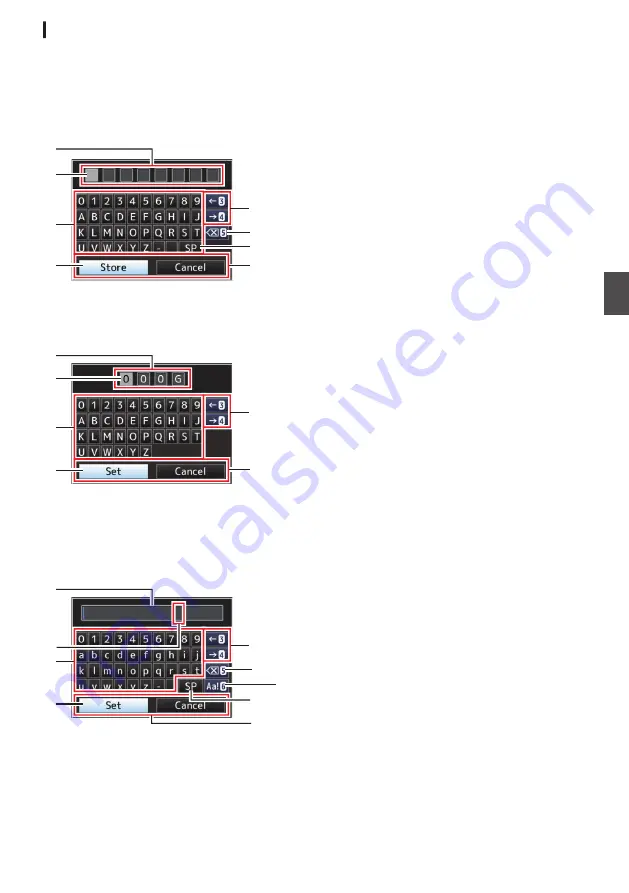
Text Input with Software Keyboard
Use the software keyboard to enter the [Setup
File] subname, [Clip Name Prefix], and the settings
under [Network]
B
[Settings].
Entering a subname
P150 [Configuring Setup Files] )
.
G
A
E
H
C
B
D
F
Entering the [Clip Name Prefix]
.
A
E
H
C
B
D
Settings under [Network]
B
[Settings]
n
The keyboard displayed varies according to the
settings.
.
A
H
C
G
D
B
E
F
I
A
Character Entry Field
0
Field for entering the title.
0
You can enter up to 8 characters for the
[Setup File] subname or up to 4 characters
for the [Clip Name Prefix].
B
Character Cursor
Select a character using the key cursor
D
, and
press the Set button (
R
) to input the selected
character at the position of the character cursor.
The character cursor moves to the next position
on the right each time a character is input.
The cursor can be moved using the arrow keys
H
.
C
Character Keys
Use the cross-shaped button (
JKHI
) to move
the key cursor
D
to the character you want to
enter.
D
Key Cursor
Indicates the currently selected character or
item. Use the cross-shaped button (
JKHI
) to
move the cursor.
E
Confirmation Buttons
0
Select [Set]/[Store] and press the Set button
(
R
) to confirm the title.
0
Select [Cancel] and press the Set button (
R
)
on the side control panel of the camera
recorder to abort character input and return
to the previous screen.
F
[SP] Space Key
Select [SP] and press the Set button (
R
) on the
side control panel of the camera recorder to
enter a space at the current position of the
character cursor
B
.
G
[
3
] Backspace Key
Select [
3
] and press the Set button (
R
) on the
side control panel of the camera recorder to
delete the character on the left of the character
cursor
B
.
Even when the ZEBRA/5 button is pressed, the
character on the left of the cursor can be
deleted.
H
Arrow Keys
Moves the position of the character cursor
B
.
Press the LOLUX/3 button to move the
character cursor to the left. Press the C
REVIEW/4 button to move the character cursor
to the right.
I
Character Switch Button
Switches the character buttons
C
to the upper
case, lower case, and symbols. Switching is
possible even when the OIS/6 button is
pressed.
Basic Operations in Menu Screen
99
Menu Display and Detailed Settings
Summary of Contents for GY-HM170E
Page 2: ...2 ...
Page 211: ...211 ...


