background image

46

JO

NIX

mate

..................................................................................................................................................

..................................................................................................................................................

..................................................................................................................................................

..................................................................................................................................................

..................................................................................................................................................

..................................................................................................................................................

..................................................................................................................................................

..................................................................................................................................................

..................................................................................................................................................

..................................................................................................................................................

..................................................................................................................................................

..................................................................................................................................................

..................................................................................................................................................

Summary of Contents for 70MATEWHITE

Page 1: ...MADE IN ITALY JONIX mate AIR PURIFICATION DEVICE WITH ADVANCED COLD PLASMA TECHNOLOGY USE AND MAINTENANCE MANUAL ...

Page 2: ...NIX S p A reserves every right concerning this manual including the right to make any necessary change or improvement to its products and to the manual at any time and without notice It is forbidden to reproduce in full or in part this manual without JONIX S p A s consent ...

Page 3: ...G 11 6 2 HANDLING AND TRANSPORT 11 6 3 INSPECTION UPON RECEPTION 11 6 4 STORAGE 11 6 5 HANDLING DEVICE IN OPERATING CONDITIONS 11 6 INSTALLATION AND COMMISSIONING 12 7 1 SAFETY STANDARDS 12 7 2 GETTING STARTED 13 7 3 CHOOSING THE INSTALLATION SITE 14 7 4 ELECTRICAL CONNECTIONS 14 7 5 ELECTRIC POWER SUPPLY 15 7 6 USING THE DEVICE 15 7 7 DEFAULT SETTINGS 15 7 8 USER INTERFACE AND MENU NAVIGATION 16 ...

Page 4: ...mproper installation of the device and or failure to comply with the instructions in this manual may invalidate the warranty that the Manufacturer issues for its products The Manufacturer is not liable for any direct and or indirect damage caused by incorrect installation or damage caused by the units installed by inexperienced and or unauthorised staff At the time of purchase check that the devic...

Page 5: ...s designed and made to sanitise the air in residential environments that are incompatible with toxic and flammable gases It is therefore strictly forbidden to use the device in environments where the air is mixed with and or altered by other gaseous compounds and or solid particles Using the device for purposes other than those intended and that do not comply with those described in this manual wi...

Page 6: ...any that sold you the device 2 WARNINGS AND GENERAL PROHIBITIONS HAZARD It refers to dangerous situations that may result from the use of the device in order to ensure personal safety WARNING It refers to integrations or suggestions concerning the proper use of the device FORBIDDEN This symbol refers to operations that must be avoided under any circumstances and hence forbidden HIGH VOLTAGE HAZARD...

Page 7: ...f the device Please note that the use of products that require electricity involves the observance of some crucial safety rules such as When installing commissioning and operating this product it is mandatory to observe the requirements and instructions specified in this manual JONIX S p A disclaims any liability for damage caused to people animals or property due to installation adjustment and ma...

Page 8: ...occus Aureus Abatement 98 Aspergillus Niger Abatement 96 Saccharomyces Cerevisiae Abatement 99 neutral molecule O2 CO2 H2 O gas molecule O2 O3 NO NO2 stable negative ion O O2 O3 The JONIX mate mobile filtering and sanitation module is the ideal solution for purifying and decontaminating air in environments at risk such as hospitals clean rooms food processing and packaging rooms and clinics It is ...

Page 9: ...lug centrifugal EC fan 13 Filter access panel closing panel 06 Thin particulate filter F7 14 Power cable 07 Prefilter particulate coarse G4 15 Swivel casters 08 Connection for overpressure duct 16 Swivel casters with brake 4 1 COMPONENT DESCRIPTION JONIX mate Model Dimensions WxDxH mm Power Supply Max power absorption W Air flow rate m3 h Weight Kg JONIX mate 678 x 700 x 1941 230 V 1 50Hz 800 from...

Page 10: ... box which houses the electrical part and of ionising tubes exposed to the air flow To turn the device on press the On Off switch 04 moving it to position I The switch lights up indicating that the device is on and a slight hissing sound indicates that the condensers have started running The alarm connector 09 enables to check the module status normal operation maintenance required or failure by t...

Page 11: ...f complaint must be sent in writing within eight days from receiving the goods When you receive the device please check all its parts in order to make sure that it has not been damaged during transport Any damage must be reported to the carrier by filling in the relevant section on the delivery note and specifying the type of damage 6 3 INSPECTION UPON RECEPTION The Manufacturer disclaims any liab...

Page 12: ...roducts used for cleaning and servicing the device you should also observe the recommendations given by the manufacturer of such products Before switching the device on check the integrity of the various components and of the electrical mains to which it is connected making sure that it is fitted with a circuit breaker upstream of the power line as shown in this manual Never insert objects of any ...

Page 13: ...nce work on the device except where specified in this manual Opening or removing the outer casing may expose you to dangerous live parts or may involve other risks All maintenance work must be carried out by authorised staff except where specified in this manual Unplug the device from the mains and contact qualified staff for assistance in one of the following cases The device has come into contac...

Page 14: ...ck the weight on Chapter Technical data WARNING Using power supply that does not meet the requirements requested by the device could resolve in damaging the device or part of it The electrical connections must be carried out following the instructions provided in this manual Make sure that voltage and frequency of the electric line correspond to those provided on the name plate The electrical main...

Page 15: ...ll take some minutes for the display to load the software correctly When the device is turned on the display might appear to be turned off Fig 01 Connect the device to the mains using the power cable provided Fig 02 Once connected to the mains supply the JONIX mate module is ready to work In order to turn on the device act on the red switch 0 I present on the upper rear panel turning it to I 7 6 U...

Page 16: ...ars show the wear status of the ionisers left or right When the cleaning of the ionizing tubes will be needed or once the bars will be filled to indicate that the ionizing tube has to be replaced an alarm notification will appear on the icon The LED next to the corresponding bar indicates whether the module is on green LED or off grey LED b Filters the bars show the level of filth of the correspon...

Page 17: ...ntervention is needed this alert state will be shown with the appearance of a notification on the icon of the device part that has caused the alarm Touching the alarm notification the user will be sent to the active alarms screen to see the notification detail Alarm To solve the problem displayed read the chap MAINTENANCE or OPERATIONAL CHECK AND TROUBLESHOOTING of this manual Touch the RESET butt...

Page 18: ...rresponding module c Maintenance menu quick key to access the module maintenance screen and record the maintenance operation performed 7 8 3 Filters screen replacement becomes necessary ATTENTION this number could not be equal to zero even when the filter is new Air volume treated m3 total air volume filtered from the last component replacement Last replacement date shows the last time that the co...

Page 19: ...ime bands b Fan status summary Measured air flow m3 h it is the real time measurement of the air flow of the fan from the appropriate sensor Pressure drop Pa it is the real time measurement of the pressure drop on the fan from the appropriate sensor 7 8 5 Settings screen It shows all the sets of parameters of the device 7 8 5 1 Date and time Date and time can be setted by touching the buttons and ...

Page 20: ...s that can be protected with password are Device On Off Ionising modules On Off Increase decrease of the fan speed The screens that are protected with password regardless the protection level set are Protection Time slots Maintenance If the user wants to logout before the 10 minutes have elapsed he can touch the logout button that will pop up in the settings screen after the login The password of ...

Page 21: ...for each day of the week it is possible to set up to 4 time slots When time slots are enabled it is not possible change the operating status of the ionising modules or the air flow rate of the fan in their corresponding screens 7 8 2 and 7 8 4 k Save button when the user begin to modify a time slot this button appears to apprise that a modification to the previous settings is occurring and needs t...

Page 22: ...sent the maintenance of the components but only the recording of the system of the intervention carried out by the user The maintenance procedures are explained in the chapter Maintenance of this manual Ionisers Maintenance Allows to record the date when a maintenance operation was done on the ionising modules a Cleaning records the cleaning operation b Replacement records the substitution operati...

Page 23: ... procedures are explained in the chapter Maintenance of this manual Filters Maintenance Maintenance operations on the corresponding filter can be recorded in the system from this menu a Filter H13 b Filter F7 c Filter G4 After pressing one of the buttons a message of confirmation of the record by the system of the maintenance operation that was done will appear 7 8 5 8 Info Shows the device identi...

Page 24: ...r manual directly from the display b Video allows to view video contents NOTE if multimedia content is not present the icons are obscured User manual Enables to display an extract of the user manual directly from the display a Key to return to the multimedia menu Chapter screen appear as follows a Quick key to return to the chapter index b Navigation keys inside the current chapter c Link to the m...

Page 25: ... the need of maintenance of the modules through an alarm viewed on the display every 1000 hours of operation Filters do not need to be cleaned periodically but will need to be changed when they reach saturation However when operating in highly contaminated environments the electronics of the device could intervene even if this time has not yet elapsed 8 2 ROUTINE MAINTENANCE The frequency of the o...

Page 26: ...nising tubes every time it is shown on the display Fig 04 Use a screwdriver to open the rear panel Fig 05 Switch the JONIX duct module off by turning the luminous On Off switch to O Disconnect the power supply plug and the other plugs from the JONIX duct module Fig 06 Unscrew the four screws of the box with which it is anchored to the cabinet and pull it out by the specific handle ...

Page 27: ...r the like Check that the tube is in good conditions there must not be any cracks or other damage otherwise it must be replaced As soon as you notice a whitish layer on the perforated metal plate inside the glass it means that the ionising tube needs replacing The tubes must usually be replaced within 18 months of use Fig 10 Wash the mesh under running hot water and dry it thoroughly with a cloth ...

Page 28: ...f the operation is difficult to perform pull slightly the earthing spring so that it is not in contact with the surface of the tube ATTENTION do not overtighten the screw after reaching its end stop Check that the earthing spring is in contact with the outer mesh once the ionising tubes have been screwed back into place Otherwise contact the manufacturer Fig 13 Reposition the JONIX duct module ins...

Page 29: ...g 14 Reinsert the power supply plug and all other plugs into the specific sockets of the JONIX duct module Switch the module on by turning the On Off switch to I Fig 16 Reinsert the power supply plug Switch the device on by turning the On Off switch to I ...

Page 30: ...ins and contact qualified staff Failure to clean the ionising tubes when indicated by the device leads to a drop in system performance Clean the outside of the device with a damp cloth 8 2 2 External cleaning of the equipment Do not use liquid cleaners or sprays soap or the like Register the maintenance operation done using the display Reset the alarm launched by the device in the alarm screen ...

Page 31: ...rier and they tend to saturate so that eventually they will obstruct the air flow The detection devices internal to JONIX mate signal how necessary is an operation of replacement in order to maintain a smooth functioning of the device 8 3 SPECIAL MAINTENANCE 8 3 1 Replacing the ionising tubes Replace the ionising tubes every time it is notified on the display Fig 17 Switch the device off by turnin...

Page 32: ...ct with the surface of the tube ATTENTION do not overtighten the screw after reaching its end stop Check that the earthing spring is in contact with the outer mesh once the ionising tubes have been screwed back into place Otherwise contact the manufacturer Fig 20 Unscrew the four screws of the box with which it is anchored to the cabinet and pull it out by the specific handle If the operation is d...

Page 33: ...ndle and tighten the 4 fixing screws Fig 24 Reinsert the power supply plug and all other plugs into the specific sockets of the JONIX duct module Switch the module on by turning the On Off switch to I Fig 25 Close the rear panel Fig 26 Reinsert the power supply plug Switch the device on by turning the On Off switch to I ...

Page 34: ...ds to commands Should a malfunction persist unplug the device from the mains and contact qualified staff Failure to clean the ionising tubes when indicated by the device leads to a drop in system performance Register the maintenance operation done using the display Reset the alarm launched by the device in the alarm screen ...

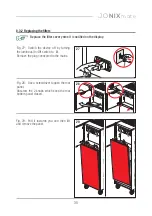
Page 35: ... on the display Fig 27 Switch the device off by turning the luminous On Off switch to O Remove the plug connected to the mains Fig 28 Use a screwdriver to open the rear panel Unscrew the 2 knobs which keep the rear bottom panel closed Fig 29 Pull it towards you and then lift and remove the panel ...

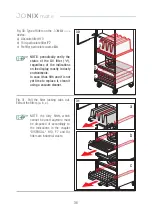
Page 36: ...ean it using a vacuum cleaner Fig 30 Type of filters on the JONIX mate device a Absolute filter H13 b Thin particulate filter F7 c Prefilter particulate coarse G4 Fig 31 Pull the filter locking tabs out Extract the filters a b c NOTE the dirty filters which cannot be used anymore must be disposed of accordingly to the indications in the chapter DISPOSAL H13 F7 and G4 filters are industrial waste a...

Page 37: ... 32 33 34 Fig 32 Put the new clean filters back in place Push the filter locking tabs towards the device until they click Fig 33 Put the cover panel back in place Screw the knobs back on Fig 34 Close the rear panel ...

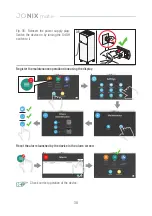
Page 38: ...peration of the device Register the maintenance operation done using the display Reset the alarm launched by the device in the alarm screen Fig 35 Reinsert the power supply plug Switch the device on by turning the On Off switch to I ...

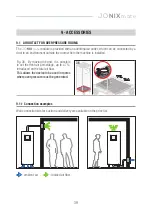
Page 39: ...vice to be used in rooms where overpressure must be generated 9 ACCESSORIES The JONIX mate module is provided with an additional air outlet which can be connected by a duct to an environment outside the room where the machine is installed Wall connection kits for suction and delivery are available on the price list 9 1 AIR OUTLET FOR OVERPRESSURE ROOMS 9 1 1 Connection examples ...

Page 40: ...tem detects the need of replacing the tubes for the ionising module The tubes in the ionising module related to the alarm must be replaced Follow the replacement of the ionising tubes procedure in paragraph 8 3 1 Alarm ionising module The system detects an irregularity in the operation of the ionising module The tubes of the ionising module related to the alarm must be cleaned or replaced Follow t...

Page 41: ...at special facilities Please inquire through your municipal authorities as to the location of the eco friendly waste management sites where waste can be received for disposal and its subsequent recycling as recommended Furthermore please note that when an equivalent appliance is purchased the seller is expected to collect free of charge the old product to be disposed of The product is not potentia...

Page 42: ...42 JONIXmate ATTACHMENTS EXPLODED JONIX mate ...

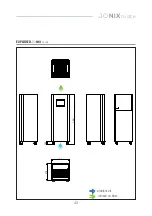
Page 43: ...43 JONIXmate 1941 135 678 700 EXPLODED JONIX mate ambient air ionised air flow ...

Page 44: ...44 JONIXmate NOTES ...

Page 45: ...45 JONIXmate ...

Page 46: ...46 JONIXmate ...

Page 47: ......

Page 48: ...arters info jonixair com Certified mail jonixsrl legalmail it web www jonixair com Via Tegulaia 10 b 56121 Pisa Italy tel 39 050 985165 Via dell Artigianato 1 35020 San Pietro Viminario PD Italy Tel 39 0429 760311 Viale Spagna 31 33 35020 Tribano PD Italy tel 39 049 9588511 fax 39 049 9588522 JX61GR0005 ...

Reviews: