14 | BA-40100-02-V17
TOPAX
®
DX
Multichannel controller
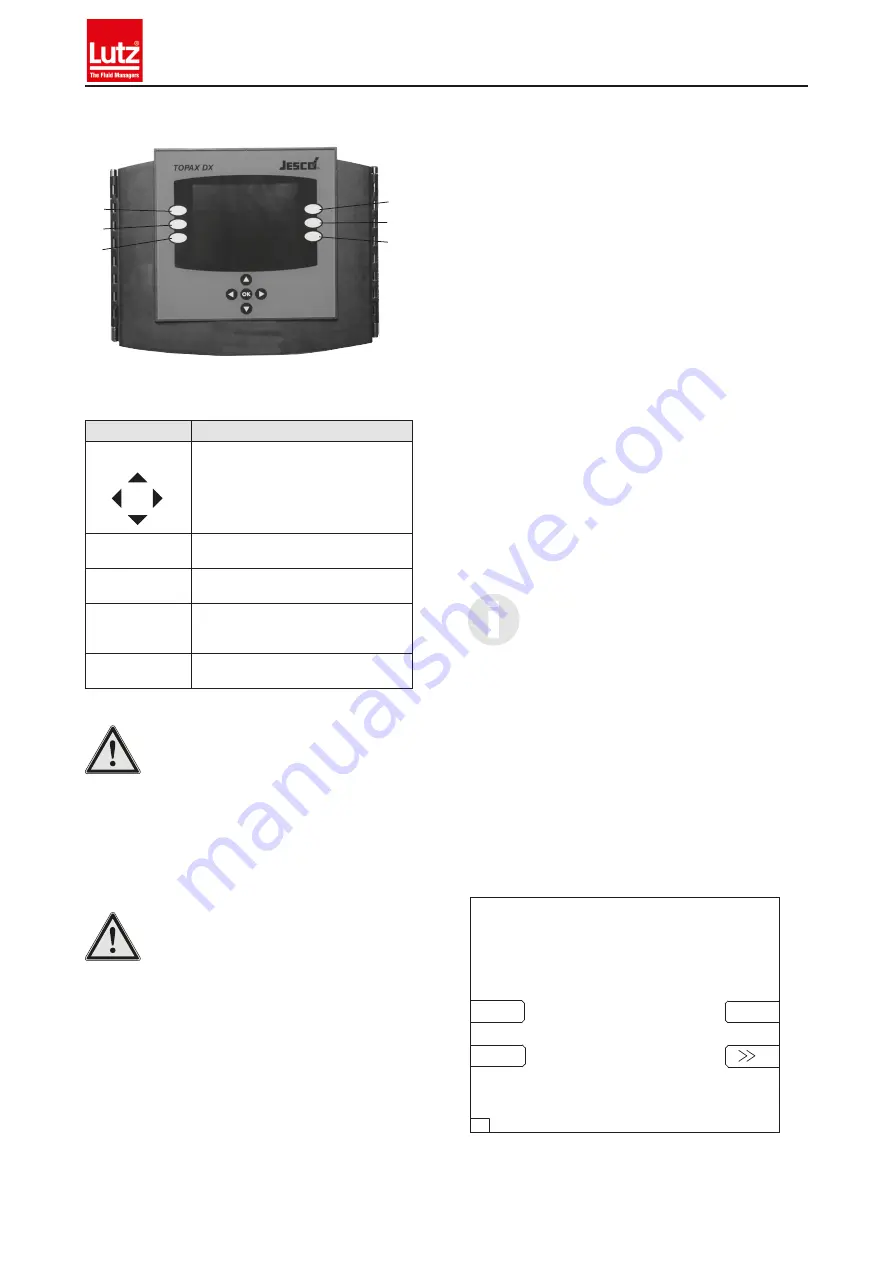
4.8 Operation and keyboard layout
①
②
③
④
⑤
⑥
Fig. 13: Housing of the TOPAX DX with operating panel. The keys are integrated
in a keyboard and react to contact.
Keys
Functions
Arrow key cross
• Menu change in the "Service" menu
• Change between individual numbers
• Change numerical values, adjust parameters
Press the key to change from one menu item
to the other. Numeric values are entered and
modified continuously.
"OK" key between the
arrow keys
Accept and store inputs
Saving is confirmed by a long beep noise.
Key
①
: „ESC“
Exit the menu, one level back
Terminate input without saving
Key
①
: „ESC“
(press down for 5
seconds)
Return to the main menu
Keys
②
-
⑥
The functions of the keys vary according to the
menu and are displayed respectively.
Tab.: Key layout of the TOPAX DX
NOTE
The glass keyboard of the TOPAX DX is delivered
with a protective transparent foil that must be re-
moved after installation.
If the device is not operated for approx. five minutes, the controller re-
turns automatically to measuring mode. Changed parameters not con-
firmed with the OK key are not saved.
Exception: this time restriction does not apply during calibration and
configuration.
NOTE
If no values or settings are to be changed,
press "ESC" to exit the selected menus at any
time. The controller uses the inital settings.
Values and settings are confirmed
and saved with the "OK" button.
The exception to this rule are the "clock" and "timer"
functions. They can be modified without confirma-
tion.
General input rules:
• All values can only be changed within the permissible range.
• The function of the keys is indicated by a sound.
• A 60-second keyboard lock allows for cleaning of the glass
surface. To activate the keyboard lock in the main menu, press the
"Up" arrow key and confirm with the "OK" key.
• Some functions can be protected by a password against unauthor-
ized access (see “19.1.24 Menus 5.9 and 5.10: Code und service
password” on page 37).
4.9 First set-up and programming guidelines
After correct installation, switch on the power supply.
The TOPAX DX is programmed by the manufacturer based on custom-
ers specs before shipment and is supplied along with a terminal con-
nection diagram. Failure of the customer to supply instructions on his
purchase order, TOPAX DX shall be programmed by the manufacturer
to the standard default settings (see chapter “22 Default settings” on
page 53).
For the initial start-up the operator has to configure the TOPAX DX and
set its sensors and the installed actuating elements as well as set spe-
cial functions. TOPAX DX will automatically assign the right inputs and
outputs based on these data and the corresponding terminals will be
indicated. Ineffective or impossible configurations (for instance double
assignment of the outputs) are not admissible.
After a successful configuration the TOPAX DX starts up with a standard
display (see chapter “19.1.1 Standard display” on page 30). A sub-
sequent renewed configuration can be carried out via the Service-Menu
(see chapter “19.1.13 Menu 0.4.0: Configuration” on page 36).
IMPORTANT!
All menus of TOPAX DX are shown a ID-number
marked in the bottom line on the left display corner.
4.9.1 Back-lighting
The backlighting of the TOPAX DX controller automatically dims after c.
10 minutes; a blue LED illuminates under the arrow key cross.
Once any key is pressed, the LED goes out and the backlight turns on
again.
4.9.2 Choice of Language
After a short hardware test the during initial start-up, the TOPAX DX
displays the start page for configuration. This screen is shown until one
of the following buttons has been pressed to select the language
②
(German),
③
(English),
⑤
(French) or
⑥
(further languages “>>”).
Lutz-Jesco GmbH
Am Bostelberge 19
30900 Wedemark
Deutsch
English
Francais
0.1
Software Version: ...........
TOPAX DX Start
Fig. 14: Home page for the configuration of language choice


