


9
07610-003-61-42-U
INSTRUCTIONS
INSTALLATION
Take care not to confuse
static pressure with
flow pressure!
CHEMICAL
DISPENSING
EQUIPMENT
STEAM LINE
CONNECTION
PLUMBING CHECK
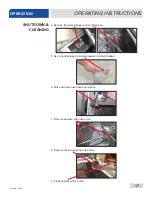
NOTE:
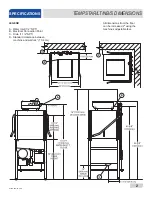
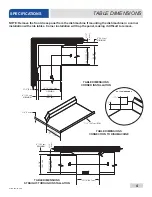
Ensure that you've read the Plumbing section before proceeding.
Install the water supply line (1/2” ID minimum) to the dishmachine line strainer using
copper pipe. A water shut-off valve should be installed in the water line between the
main supply and the machine to allow access for service. For units equipped with the
Drain Quench Option, see the Drain Quench Assembly section of this manual.
The water supply line is to be capable of 10
± 2 pounds per square inch (PSI) “flow”
pressure at the recommended temperature indicated on the data plate.
The manufacturer recommends the installation of a water pressure regulator* in the
incoming water line of all TempStar models to ensure proper flowrate at all times and
offers these devices as options.
Do not confuse static pressure with flow pressure. Static pressure is the line pressure
in a “no flow” condition (all valves and services are closed). Flow pressure is the
pressure in the fill line when the fill valve is opened during the cycle.
The manufacturer also recommends the installation of a shock absorber* in the
incoming water line of all models and offers these devices as options. This prevents
line hammer/hydraulic shock—induced by the solenoid valve as it operates—from
causing damage to the equipment.
*See the Plumbing Options page and contact your dealer with any questions you
might have.
The steam machines come with lines to connect the source steam. Connect all steam
lines to the machine as all applicable codes provide. See machine data plate for
information concerning steam flow pressure.
The LT machine requires that a separate chemical feeder be connected to it to provide
the required detergent and sanitizer. This feeder needs to be able to operate against a
head of 25 PSI and provide 1.79 ml of a 10% Chlorine sanitizer per minute.
Slowly turn on the water supply to the machine after the incoming fill line and the drain
line have been installed. Check for any leaks and repair as required. All leaks must be
repaired before operating the machine.
WATER SUPPLY
CONNECTIONS
i
i
NOTICE
Summary of Contents for TEMPSTAR LT
Page 35: ...07610 003 61 42 U 28 26 1 29 28 30 33 34 36 CONTROL BOX ASSEMBLY PARTS ...
Page 67: ...07610 003 61 42 U 60 PARTS VENTLESS SYSTEM ASSEMBLY ...
Page 75: ...07610 003 61 42 U 68 SCHEMATICS 208 230 V 50 60 HZ 1 PHASE ...
Page 76: ...69 07610 003 61 42 U SCHEMATICS 460 V 50 60 HZ 3 PHASE ...
Page 77: ...07610 003 61 42 U 70 SCHEMATICS LT NB 208 230 V 50 60 HZ 1 PHASE ...
Page 78: ...71 07610 003 61 42 U SCHEMATICS LT NB 460 V 50 60 HZ 3 PHASE ...
Page 79: ...07610 003 61 42 U 72 SCHEMATICS STEAM 208 230 V 50 60 HZ 1 3 PHASE ...
Page 80: ...73 07610 003 61 42 U SCHEMATICS SDI OPTIONS ...
Page 81: ...07610 003 61 42 U 74 SCHEMATICS DRAIN QUENCH OPTION ...