background image

Web UI functions 

-


38

 - 


View Logs 


Log Se 

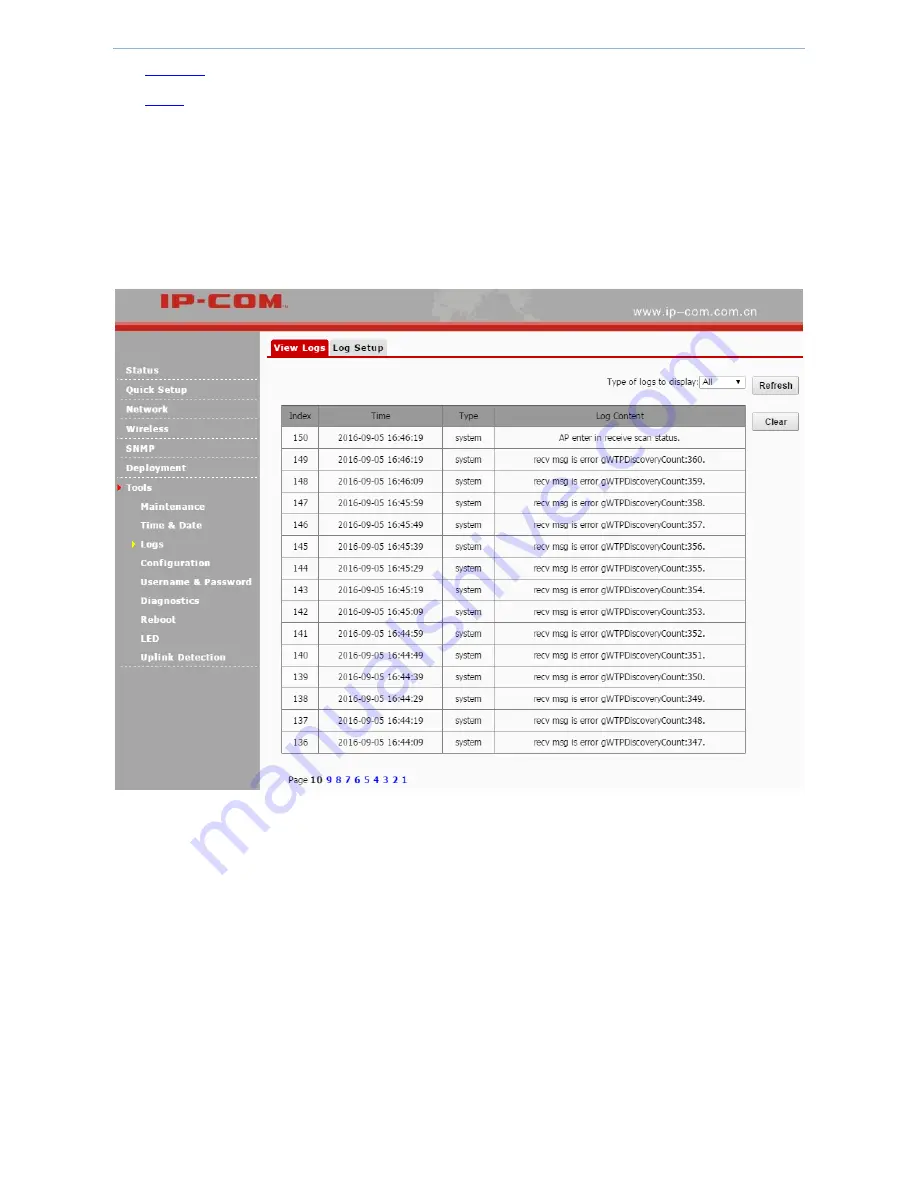
View Logs 

On this page, you can view the device’s system logs.   

Refresh

: If you want to see the latest logs, click 

Refresh

Clear

: If you think that the logs displayed are not helpful, click 

Clear


Log Setup 

On this page, you can add log servers to receive the logs. In this way, you can see the logs on the log server instead 
of on the web UI. 

Number of Logs

: It is used to set up how many pieces of logs can be displayed on page 

View Logs

To add a log server

1.


Log in to the device’s web UI.


2.


Go to 

Tools > Logs > Log Setup

3.


Enable: Check this box to enable log server function. 

4.


Click 

Save

Summary of Contents for AP255_US

Page 1: ......

Page 2: ...prior written permission of IP COM Networks Co Ltd Disclaimer Pictures images and product specifications herein are for references only To improve internal design operational function and or reliabil...

Page 3: ...used to highlight information of importance or special interest Ignoring this type of note may result in ineffective configurations loss of data or damage to device Tip This format is used to highlig...

Page 4: ...l box 3 2 2 Connect your device to a network 4 03 Web UI login 5 3 1 Web UI login 5 3 2 Web UI layout 7 04 Web UI functions 8 4 1 Status 8 4 2 Quick Setup 8 4 2 1 AP mode 9 4 2 2 APClient mode 10 4 3...

Page 5: ...3 Logs 37 4 6 4 Configuration Backup Restore 39 4 6 5 Configuration Restore to Factory Default 40 4 6 6 Username Password 41 4 6 7 Diagnostics Ping 42 4 6 8 Reboot 43 4 6 9 Time Reboot 44 4 6 10 LED 4...

Page 6: ...villa university dormitories hospital wards hotel rooms and other sites with densely divided rooms 1 1 Main Features 2 4GHz 300Mbps 120mm US Type Wall Jack Design Compliant with PoE 802 3af Two 10 100...

Page 7: ...Get to know the device 2 1 3 Hardware descriptions...

Page 8: ...e device s cover plate using a screw driver 2 Connect the Ethernet cable in the wall box to the LAN port on the rear panel of the device 3 Install the device in the wall box and verity that the Ethern...

Page 9: ...er end of the Ethernet cable in the wall box to a PoE switch that is connected to the internet One end of the Ethernet cable in the wall box is connected to the device see Install your device to a wal...

Page 10: ...efault Setting IP Address 192 168 0 254 Username and Password admin To log in to this device Assume that the device is in factory default state and ensure that your PC is connected to the device 1 Man...

Page 11: ...254 in the address bar and press Enter We recommend that you use the browser of IE8 or higher or Google Chrome 3 In the login page enter admin case sensitive in both Username and Password box 4 Click...

Page 12: ...f a navigation tree You can choose the function menu from the navigation bar with selection result shown in the configuration area Secondary Navigation bar Configuration area The area is used to confi...

Page 13: ...tatus Wireless Status Traffic Statistics and Client List If you have questions about some parameters click on the upper right corner of each page 4 2 Quick Setup This device supports the following ope...

Page 14: ...nd transmits wireless signals As a result the device s wireless clients can access the remote network 4 2 1 AP mode In this mode the device connects to a network such as the internet using an Ethernet...

Page 15: ...ake effect 4 2 2 APClient mode In this mode the device can wirelessly connect to a remote device such as an AP to extend the remote wireless network and transmits wireless signals As a result the devi...

Page 16: ...configure APClient mode 1 Log in to the device s web UI 2 Go to Quick Setup select APClient Mode and set up the parameters 1 Click 2 In the scanned list select IP COM_610220 The SSID Security Mode Ci...

Page 17: ...ork This device supports two methods to set up your LAN IP address Static IP Set up LAN IP address manually In this method you need to manually set up LAN IP address If you modified LAN IP address whe...

Page 18: ...ps the device find a network route to connect to the internet or other networks Primary DNS Server Domain names such as www google com are easier to remember than IP addresses such as 93 46 8 89 A cor...

Page 19: ...e device so that the device can find a network route to connect to the internet or other networks Usually it s the uplink router s LAN IP address 5 Primary DNS Server Enter the primary DNS server addr...

Page 20: ...om a DHCP server of an uplink router and you don t know the IP address you can log in to the uplink router s web UI to check the obtained IP address To obtain LAN IP address from another DHCP server 1...

Page 21: ...names instead of IP addresses Secondary DNS Server It is a backup DNS server address Lease Time When a DHCP client obtains IP address the DHCP server will assign a certain lease time to the client s...

Page 22: ...rver DHCP Client 4 4 Wireless Wireless settings contain the following Basic On this page you can set up basic wireless parameters of this device such as SSID broadcast SSID encryption type and so on R...

Page 23: ...cast SSID Enable or disable broadcast SSID function Enable the device broadcasts its SSID and the SSID is displayed in the network list of clients that support 5G Disable the device does not broadcast...

Page 24: ...tication the WLAN client need not provide its credentials to the Access Point during authentication Any client can authenticate with the Access Point and then attempt to associate In effect no authent...

Page 25: ...tocol Wireless rate can only reach 54Mbps with this algorithm TKIP AES Compatible with TKIP and AES The wireless client can use either AES or TKIP algorithm to connect to the WiFi Key Enter a security...

Page 26: ...information please refer to Security Method Description 3 Other parameters If not specified you can keep the default value 4 Click Save to make these settings take effect 4 4 2 Radio On this page you...

Page 27: ...0MHz bandwidth Extension Channel It is used to determine the AP s channel range when bandwidth is 40 Channel Lockout If you check this box you can t modify country network mode channel channel bandwid...

Page 28: ...you can modify the country 2 Country Select a country that your device is operating 3 Channel Click the dropdown list and select a wireless channel To avoid channel conflict please select a channel th...

Page 29: ...at is less used for your device To start scanning signals 1 Log in to the device s web UI 2 Go to Wireless Site Survey 3 Click Wait a moment and the results will be displayed on the page as shown in t...

Page 30: ...t threshold to increase frame transmission reliability In a WLAN network with no interference we recommend that you increase the Fragment Threshold to improve the data transmission throughput by decre...

Page 31: ...X Power Preamble Mainly used for preamble synchronization It is advisable to keep the default value unchanged Configure advanced wireless parameters To configure advanced wireless parameters 1 Log in...

Page 32: ...dden or permitted click this button to add the entered MAC address to the following list Configure access control function There are three commonly used situations When you want to forbid or permit so...

Page 33: ...a SSID to perform this function 2 MAC Filter Mode Select an option For example if you want to forbid certain wireless users to connect to this device please select Deny 3 In the first table if you wan...

Page 34: ...on the front panel Wired LAN Port Set up VLAN ID of the available wired LAN port s When a port is set to a trunk port it is not available to be set a certain VLAN ID 2 4G SSID Set up VLAN ID of the l...

Page 35: ...er and VLAN 30 for the administrator the server and the router Note that the server and the router in this application must support QVLAN function If not you need to add a layer 3 switch to achieve th...

Page 36: ...rs 1 Enable Check the box to enable QVLAN function 2 PVID Keep the default value 1 3 Management VLAN Keep the default value 1 4 Trunk Port Only select port0 5 LAN1 Port Enter 30 6 IP COM_1 Enter 10 7...

Page 37: ...SNMP agents including monitoring network status modifying network device receiving network alarm events and so on Regardless of different devices physical feature SNMP can achieve automation managemen...

Page 38: ...re the device to factory default you can restore your device to a previous working configuration Configuration Restore to Factory Default When you forget the login username password or IP address or w...

Page 39: ...tact our technical support see Technical support 1 Go to http www ip com com cn to download the latest version of the firmware of the device 2 Decompress the downloaded file using a decompress softwar...

Page 40: ...he device is started and connected to the internet it will resynchronize correct time from the internet Synchronize system time with the internet The method for getting AP system time is synchronized...

Page 41: ...ed to the internet you can use this method Make sure your PC s time is correct To manually set up system time 1 Log in to the device s web UI 2 Go to Tools Time Date 3 Uncheck the box of Sync with Int...

Page 42: ...hich if you don t have any configuration on the web UI you need to login again 4 6 3 Logs Through this section you can view the device s logs and add log servers to receive the logs To make this funct...

Page 43: ...helpful click Clear Log Setup On this page you can add log servers to receive the logs In this way you can see the logs on the log server instead of on the web UI Number of Logs It is used to set up h...

Page 44: ...enable the added log server 4 Click Save 4 6 4 Configuration Backup Restore On this page you can backup and restore the existing configurations so that when your device s performance goes down because...

Page 45: ...rget the login username password or IP address or when you have problems of accessing the internet but can t find a solution you can restore the device to factory default Note Reset to Factory Default...

Page 46: ...inistrator or common user s login username and password and can delete the common user account To prevent others from using the default login information to enter the web UI to modify configurations w...

Page 47: ...ly used diagnosis and troubleshooting command It can detect whether the device is reachable to a specified IP address or domain name If it is reachable the destination IP address returns response pack...

Page 48: ...t When your device has worked for a long time we recommend that you reboot the device to make it work faster To reboot the device 1 Log in to the device s web UI 2 Go to Tools Reboot 3 Click Reboot an...

Page 49: ...TO Reboot Type Select As Interval 3 Reboot Interval Enter an interval during which the device reboots automatically 4 Click Save to make these settings take effect To reboot the device regularly 1 Log...

Page 50: ...the LED light disturbs you you can disable the LED on this page To disable the device s LED 1 Log in to the device s web UI 2 Go to Tools LED 3 Click Disable all LEDs After you disable the device s L...

Page 51: ...disabling SSID broadcast function To enable uplink detection 1 Log in to the device s web UI 2 Go to Tools Uplink Detection 3 Set up the parameters 1 Uplink Detection Check the box to enable this fun...

Page 52: ...on the bottom right corner of your desktop Step 2 Click Open Network and Sharing Center Tips If you cannot find the icon on the bottom right corner of your desktop follow steps below Click Start Cont...

Page 53: ...et Protocol Version 4 TCP IPv4 Step 5 Select Use the following IP address type in the IP address 192 168 2 x 2 253 Subnet mask 255 255 255 0 and click OK Step 6 Click OK on the Local Area Connection P...

Page 54: ...radio equipment type AP255_US is in compliance with Directive 2014 53 EU The full text of the EU declaration of conformity is available at the following internet address http www ip com com cn en ce...

Page 55: ...to try to correct the interference by one of the following measures Reorient or relocate the receiving antenna Increase the separation between the equipment and receiver Connect the equipment into an...

Reviews: