29
This Procedure Includes the Following:
Installing/Adjusting the Anti-Tippers
Using/Adjusting the Patient Operated Wheel Locks
WARNING
After making adjustments, always make sure that
parts are properly tightened BEFORE using the
wheelchair.
INSTALLING/ADJUSTING THE ANTI-TIPPERS
WARNING
Inasmuch as the anti-tippers are an option on this
wheelchair (You may order with or without the anti-
tippers), Invacare strongly recommends ordering
the anti-tippers as an additional safeguard for the
wheelchair user.
Anti-tippers MUST be fully engaged and spring but-
tons fully protruding out of adjustment holes.
NOTE: The procedures in this section apply to NON-
RECLINER models only EXCEPT where noted. For
9000XT RECLINER, refer to PROCEDURE 10 of this
manual.
NOTE: Refer to Procedure 1 - General Guidelines
which include GENERAL WARNINGS for the 9000SL,
9000XT, 9000XDT, and 9000XT RECLINER.
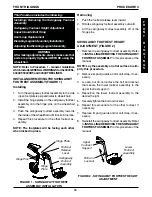
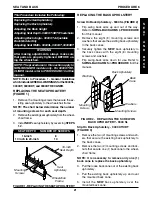
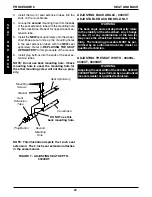
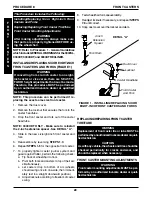
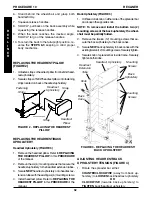
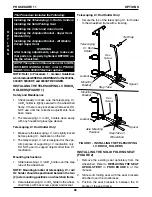
Installing (FIGURE 1)
1. Press the release buttons IN and insert the anti-tip-
pers with the anti-tipper wheels pointing toward the
ground/floor into the rear frame tubing until the bot-
tom release button locks in place.
2. Measure the distance between the bottom of the
anti-tipper wheels and the ground/floor.
NOTE: A 1-1/2 to 2-inch clearance between the bot-
tom of the anti-tipper wheels and the ground/floor
MUST be maintained at all times.
W
H
E
E
L
L
O
C
K
S
A
N
T
I
T
I
P
P
E
R
S
3. If the distance between the bottom of anti-tip-
per wheels and the ground/floor is not 1/1/2 to
2-inches, adjust anti-tippers. Refer to
ADJUST-
ING THE ANTI-TIPPERS
in this procedure of
the manual.
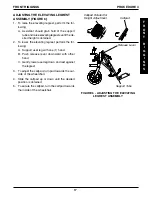
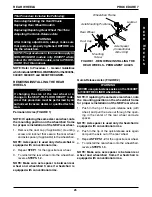
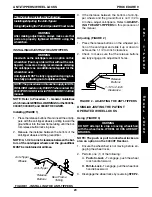
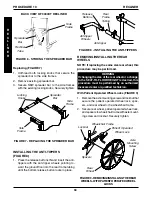
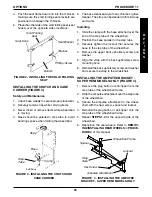
Adjusting (FIGURE 2)
1. Press the release buttons on the wheeled por-
tion of the anti-tipper and slide it up or down to
achieve the 1-1/2 to 2-inch clearance.
2. Check to make sure that the release buttons
are fully engaged in adjustment holes.
1-1/2 to 2-inch
Clearance
FIGURE 2 - ADJUSTING THE ANTI-TIPPERS
Release
Buttons
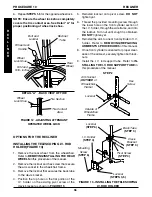
USING/ADJUSTING THE PATIENT
OPERATED WHEEL LOCKS
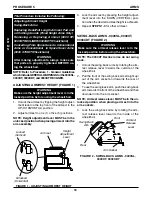
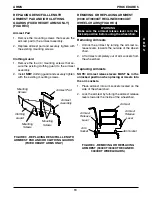
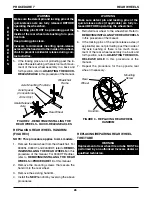
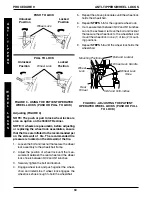
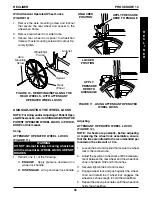
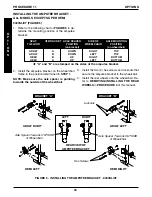
Using (FIGURE 3)
WARNING
DO NOT attempt to stop a moving wheelchair
with the wheel locks. WHEEL LOCKS ARE NOT
BRAKES.
NOTE: The push or pull to lock wheel locks are
also an option on the 9000XT Recliner.
1. Ensure the wheelchair is not moving before en-
gaging the wheel locks.
2. Perform one (1) of the following:
A.
Push-to-Lock -
To engage, push the wheel
lock handle forward.
B.
Pull-to-Lock -
To engage, pull the wheel lock
handle backward.
3. Disengage the wheel locks by reversing
STEP 2.
ANTI-TIPPERS/WHEEL LOCKS
PROCEDURE 9
FIGURE 1 - INSTALLING THE ANTI-TIPPERS
Anti-Tipper
Release
Buttons
Rear Frame
Tubing
Anti-Tipper
Wheels
Summary of Contents for 9000 SL
Page 42: ...42 NOTES N O T E S NOTES...

