background image

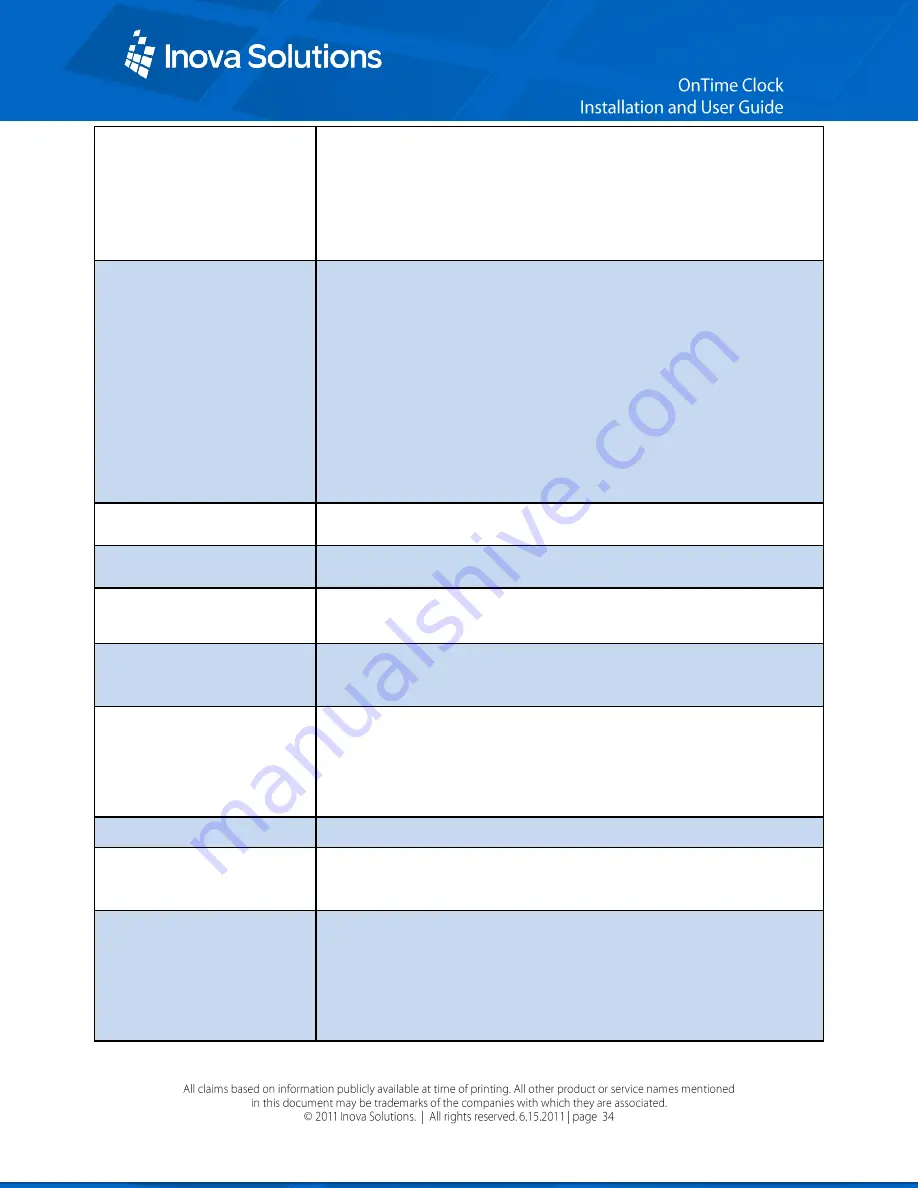
View current SNTP settings 
or Change Time Server 
setting  
 

sntp

  To view the current time server and other SNTP settings  

sntp -h xxx.xxx.xxx.xxx

 - To change the time server with which the 

the clock synchronizes, where 

xxx.xxx.xxx.xxx

 is the hostname or 

IP address of the desired time server 

sntp


-s

 To trigger an immediate SNTP time synchronization.  

Change the Time Zone  

timezone

 - To view the clock‟s current time zone setting.   

timezone –N or timezone N

 - To change the clock‟s time zone 

setting, (don‟t use a + sign for positive values) where N = the 
desired time zone offset in the range -11 to 12.  
For example, to set the time zone for (GMT -5) Eastern Time (US & 
Canada), you would use:   

timezone -5


Note:

 If you‟re not sure what time zone offset to use, check the 

time zone value used on a Windows PC on your network; double-
click on the time in the Windows service tray (in the lower-right 
corner of your screen) and choose the Time Zone tab.     

Specifying a Time Server 

sntp –h  hostname 

where 

hostname

 is the hostname of the time 

server 

Testing the Time Server 
Synchronization  

sntp -s 


Verifying DHCP 
Configuration settings 

dhcpconfig – 

To list the option settings received from a DHCP 

Server (for verification purposes only). 

Display all Address 
Resolution Protocol (ARP) 
cache entries  


arp 


View log on session screen 
or enable/disable logging  

Log 

- To view the log on the session screen.   

log on

|

off

 - To enable/disable logging.   

When logging is enabled by typing “log on”, the idle session time 
out feature is disabled. 

List all TCP connections  

netstat 


Display info to diagnose 
DNS problem with SNTP 
server  

nslookup SNTPServerName

 where 

SNTPServerName

 is the 

hostname or IP address of an SNTP server.  

Configuring the 12/24 
Time  Format 
 

Note:

  These commands are 

ignored by the analog 
clock. 

display –t 24

 - Sets 24 hour display.  

Note:

 the space before and 

after –t   


display –t 12

 -


Sets 12 hour display.  

Note:

 the space before and 

after –t     


Summary of Contents for OnTime 4-Digit Digital Clocks

Page 1: ......

Page 2: ......

Page 3: ......

Page 4: ......

Page 5: ...plate for 4 Digit Clocks 13 Figure 12 Template for 6 Digit Clocks 14 Figure 13 Data Cable Installation 15 Figure 14 Clock Flush Mount Assembly 15 Figure 15 Power Up Sequence 16 Table 1 Technical Speci...

Page 6: ...both data and power over one set of wires simplifies installation saves space and eliminates the need for electrical outlets at the clock mounting locations Additionally the option of centralized Unin...

Page 7: ...or electrical wiring in wet locations unless the equipment is specifically designed for that purpose Be sure that mounting hardware is suitable for the mounting surface and sufficient to support the w...

Page 8: ...eel Accuracy 1 Second 0 200 milliseconds 0 200 milliseconds Power Consumption PoE IEEE 802 3af compliant 3W actual consumption PoE IEEE 802 3af compliant 8W actual consumption PoE IEEE 802 3af complia...

Page 9: ...er in compliance with IEEE 802 3af PoE power is commonly used to power devices such as wireless Access Points and IP telephones it is usually injected into the LAN using either PoE enabled Ethernet sw...

Page 10: ...e power from a PoE enabled switch that conforms to the IEEE 802 3af standard If the site plan calls for a significant number of clocks to be powered from a single piece of network equipment it may be...

Page 11: ...her PoE enabled Ethernet switches or Mid Span power injectors Consult with your IT Group to make sure that the required PoE equipment is in place The following is a recommended procedure for surface m...

Page 12: ...Mounting Template 1 Determine mounting location There should be a solid stud or post for mounting the junction box 2 Cut a 4 1 8 x 4 104 7mm x 101 6mm hole in the drywall See Figure 3 Figure 3 Analog...

Page 13: ...Figure 4 6 Attach the adapter plate to the junction box using the 4 screws part 3 in Figure 4 provided 7 Route the cable through the holes in the housing and then through the washers part 5 in Figure...

Page 14: ...ure for surface mounting the digital clock No mounting kit is required 1 Determine the clock mounting location 2 Mark two points 10 25 4 cm apart which are level and centered on the data cable outlet...

Page 15: ...7 Mounting Template for 6 Digit Clocks 3 Insert two flat head fasteners suitable for the wall surface at the marked points and tighten 4 Withdraw the fasteners until there is a 1 16 16cm gap between t...

Page 16: ...the mounting kit with two suitable locknuts and a length of 1 9 cm pipe or conduit 2 Mark the location where the clock assembly is to be mounted making sure that the mounting means is located beneath...

Page 17: ...8 wrench Make sure that the two washers are fitted between the Clock Mount and the Cantilever Wall Mount Refer to Figure 10 Figure 10 Digital Clock Mounting Kits 4 Insert 10 to 12 inches 30 cm of dat...

Page 18: ...n appropriately sized opening into the wall Refer to Table 2 for appropriate dimensions for the opening Model Vertical Dimension Horizontal Dimension 4 Digit 12 3 8 or 31 4 cm 6 or 16 5 cm 6 Digit 17...

Page 19: ...4 Drill two 5 16 holes 5 Once holes for the bolts have been made install 6 molly anchors in the holes tighten until they expand and then withdraw the screws 6 Cut out the shaded area indicated on the...

Page 20: ...Figure 14 Figure 14 Clock Flush Mount Assembly Once the installation is complete power up the units by connecting them to a PoE enabled Ethernet LAN Both the analog and digital clocks will follow the...

Page 21: ...Figure 15 Power Up Sequence...

Page 22: ...u can confirm or change on a clock you should concentrate on four configuration items initially These include An IP address so that the clock can communicate on the network A network time server so th...

Page 23: ...telnet commands Section 7 The third method is to assign an IP address and individual configuration options via a telnet session Use telnet commands to assign both a static IP address and the appropria...

Page 24: ...This means that DHCP servers will not pre assign them in the way that options in the range of 1 to 223 are pre assigned i e Option 3 Router Private options are intended for whatever site specific use...

Page 25: ...tions The recommended practice is to load the configuration string into the DHCP Server and then try it with one clock by re booting the clock Once you are confident that the one clock is properly con...

Page 26: ...cation Daylight Saving Time dst command Establishes the Daylight Saving Time rule none Disable the Daylight Saving Time adjustment Other values are parsed based on the DST rule format The format is 8...

Page 27: ...one 5 dst 1 8 2 2 1 1 10 2 Sets the time server to IP Address 10 1 128 1 Enables the colon display and sets the clock to 24 hour mode Sets the time zone to Eastern Standard Time 5 Enables DST for US 2...

Page 28: ...ntp inovasolutions com Time Zone 5 DST Rule 1 8 2 2 1 1 10 2 Notes A clock must be re booted to request a new configuration string from the DHCP Server The clock does not automatically request a new...

Page 29: ...r the DHCP served IP Address If an IP Address appears use this address in the steps below If the letters dhcp remain on the display then either temporarily move the clock to a network segment with DHC...

Page 30: ...y Default Static IP Address The factory default is DHCP Refer to Section 6 for more information on DHCP Refer to Appendix A for help changing from a Static IP Address to DHCP Note Your IT staff must a...

Page 31: ...as easy as possible Inova recommends that you record the IP Address for each clock in a table similar to the one below particularly if you have elected to set a static IP Address Clock Name or Locatio...

Page 32: ...Host Name or IP Address of the time server 5 Press the Enter key It is always a good idea to test the synchronization between the clock and the time server To do that perform these steps 1 At the pro...

Page 33: ...ing daylight saving time DST Setting Command No Daylight Saving Time Type the command to disable DST dst none Press the Enter key In the U S and Canada Type dst rule 1 8 2 2 1 1 10 2 Press the Enter k...

Page 34: ...fy the Time Zone and Daylight Saving Time settings For Digital Clocks check if the Service Light is illuminated see below For Analog Clocks check the time on the small rear display The Analog Clock se...

Page 35: ...s Verify that time appears on the display Determine the IP Address of a Clock Lift up gently on the unit to free the keyholes at the rear of the clock from the mounting hardware Disconnect the network...

Page 36: ...ental or consequential damages from the sale or use of this product This disclaimer applies both during and after the term of the warranty Inova Solutions disclaims liability for any implied warrantie...

Page 37: ...standard Host Name Unique identifier for a device on a TCP IP network For example 3rdFlrConfRm IP Address Unique identifier for a device on a TCP IP network For example 11 15 55 233 NTP Network Time P...

Page 38: ...Press the Enter key European Type dst rule 1 1 2 1 1 1 9 1 Press the Enter key Other Locations The support web site at Inova OnTime Support contains a DST calculator which can compute the correct DST...

Page 39: ...tray in the lower right corner of your screen and choose the Time Zone tab Specifying a Time Server sntp h hostname where hostname is the hostname of the time server Testing the Time Server Synchroni...

Page 40: ...m indicator Note the space before and after p Configuring Colons On Off Note These commands are ignored by the analog clock display c off Turns off colons Note the space before and after c display c o...

Page 41: ...e specific options that you may encounter 1 Launch the DHCP Management Console 2 Select the DHCP Server to configure 3 Choose the Action Set Predefined Options 4 Choose Add a new option 5 Set the Data...

Page 42: ...8 Select the Option in the list and select the checkbox to enable it 9 Enter the configuration string you ve developed for your unique operating environment and geographic location...

Reviews: