background image

EonNAS Pro 500 / 800 Hardware Manual 

22 

3 Powering-on EonNAS, 

Initialization & LCD Menus 

3.1  Powering On EonNAS Pro for the First Time 

The initialization process only occurs if it is the first time you power on your EonNAS 

Pro  system.  Before  you  power  on  the  EonNAS  Pro,  make  sure  you  have  done  the 

following: 

1.  Install at least two (2) hard drives into the enclosure hard drive slots 1 and 2, 

respectively for the initialization process. 

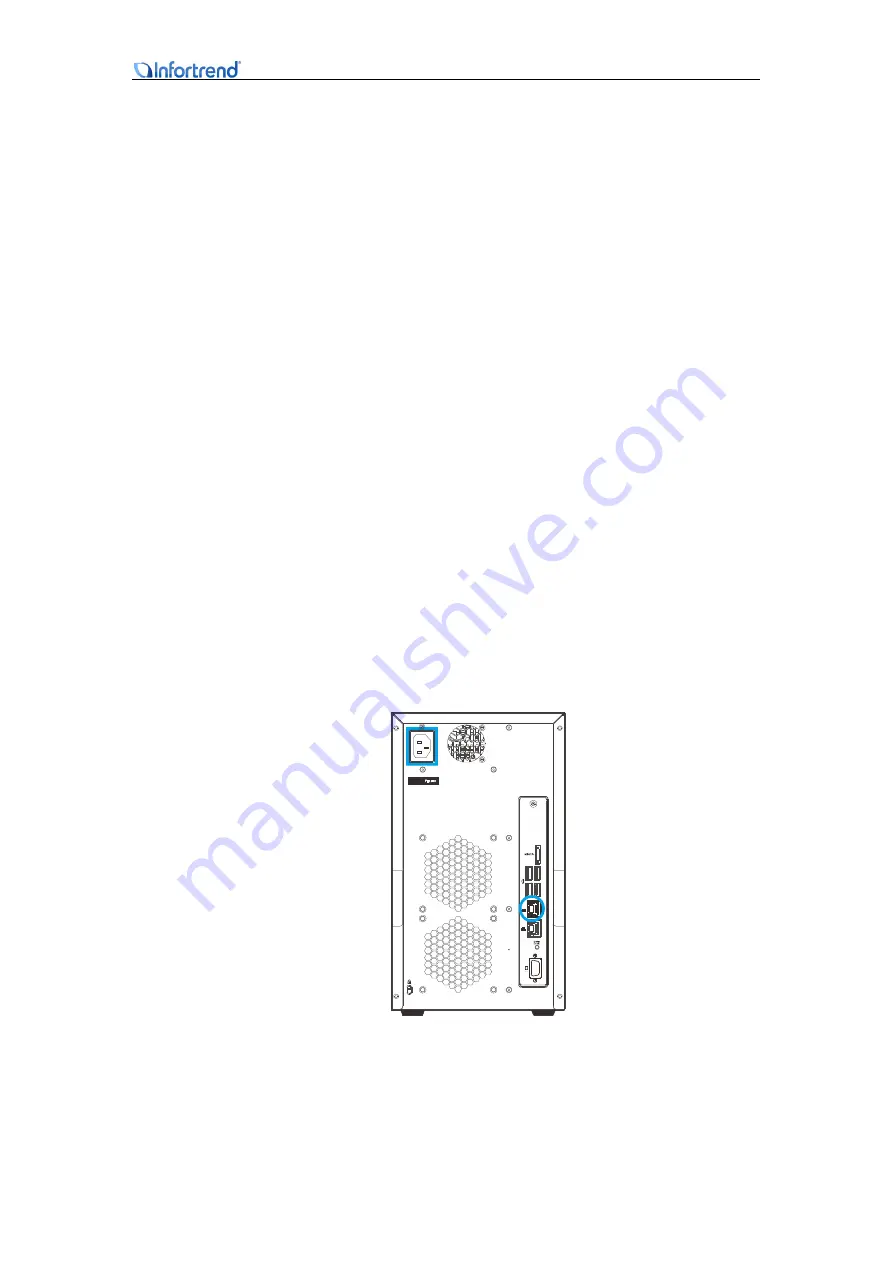
2.  Make sure you have connected the following: 


One end of the Ethernet cable to Ethernet port 1 (indicated by the 

blue 

circle

) and the other end into a switch. 


The molded end of the power cable to the power socket (indicated by the 

blue rectangle

) and the other end into a power outlet. 

EonNA S  

1

2

EonNAS 500/800


Please power on the peripheral devices first (eg. switches, routers, servers, PCs, etc.). 

Summary of Contents for EonNAS Pro 500

Page 1: ...SELE CT EN TE R EonNAS EonNAS_Pro_500 SELEC T EN T ER EonNAS EonNAS_Pro_800 Infortrend Hardware Manual EonNAS Pro 500 800 Series Version 1 1...

Page 2: ...urthermore Infortrend Technology reserves the right to revise this publication and to make changes from time to time in the content hereof without obligation to notify any person of such revisions or...

Page 3: ...rive tray out of the enclosure at the same time Secure each hard disk drive using its retaining screws Put the power cords and other cables away from foot traffic Do not place things over the power co...

Page 4: ...styrofoam in your work area Do not remove the hard disk drive from its anti static bag before installation takes place Hard drives must not be stacked on top of each other without their protective dr...

Page 5: ...liquid or sprayed detergent When replacing hard drives insert the hard drive cage as gently as possible while assuring full engagement Vibration and shock can easily damage hard drives Contact servic...

Page 6: ...Hard Drives 18 2 2 1 Hard Disk Drive Prerequisites 18 2 2 2 Drive Tray Numbering Sequence 19 2 2 3 Inserting the Drive into the Drive Tray 20 3 Powering on EonNAS Initialization LCD Menus 22 3 1 Power...

Page 7: ...3 Restore Default Settings 51 6 Appendix 52 6 1 Technical Specifications 52 6 1 1 Hardware 52 6 1 2 Operating Environment 53 6 1 3 Host Port Pinouts 53 6 1 4 1Gbps Ethernet Host Port 1Gbps iSCSI Host...

Page 8: ...stration purposes Where necessary EonNAS Pro 500 illustrations will be used to indicate differences For the following subjects please consult other resources for more information Components that are n...

Page 9: ...n storage devices that perform dedicated file serving tasks The EonNAS Pro is a dedicated high performance storage solution for providing files or shares for access from numerous clients The advantage...

Page 10: ...sers with performance and or data backup functionalities The LCD screen offers users ease of accessibility to NAS Pro functionalities and monitor system statuses The EonNAS Pro series are the perfect...

Page 11: ...tion 1 LCD screen The LCD displays system statuses and offer users quick access system menus for system configurations 2 Enter button The Enter button is used for making a selection while browsing sys...

Page 12: ...pansion purposes intended for high speed external hard disk drive storage expansion 3 USB ports The USB ports are for external expansion purposes CD DVD USB flash drives printers etc or to supply powe...

Page 13: ...l 13 1 4 Hard Drive Designation The hard drives are placed in numeric order from top to bottom for EonNAS Pro 500 and 800 When installing hard drives always start installing to the top empty tray and...

Page 14: ...cates the system has powered off 2 System status LED Off indicates the system is operating normally Red indicates system failure 3 Ethernet 1 LED 4 Ethernet 2 LED Steady Green indicates the connection...

Page 15: ...indicators to find the exact failed drive 1 2 No LED LED Color Status 1 Drive Busy LED FLASHING blue indicates data is being written to or read from the drive The drive is busy OFF indicates that the...

Page 16: ...B and iSCSI Port LEDs EonNAS 500 800 No LED LED Color Status 1 Link Status LED Steady green indicates connection established Off indicates connection not established 2 Activity LED Blinking amber indi...

Page 17: ...tails and the maintenance section of this manual on how to replace hard drives RAID 5 configuration allows 1 hard drive to fail at any given time without data lost RAID 6 configuration allows 2 hard d...

Page 18: ...ive Profile The enclosure drive bays are designed for 3 5 inch wide x 1 inch pitch hard drives Drive Interface Type The enclosure accommodates SATA II 3Gbps and SATA III 6Gbps hard drives up to 3TB in...

Page 19: ...be able to identify the location of a faulty drive Below is a list of the level of fault tolerance for different RAID levels RAID Level Minimum disk requirement Max No of Failed Drives without Data Lo...

Page 20: ...ezel panel should open automatically and gently pull out the hard drive tray 3 Place the hard drive into the drive tray Make sure the hard drive s interface connector is facing the open side of the dr...

Page 21: ...crewdriver to turn the bezel lock from the unlock to lock position 7 Repeat steps 2 6 to install other hard drives 8 Always close the system front panel when you are done installing hard drives NOTE W...

Page 22: ...stall at least two 2 hard drives into the enclosure hard drive slots 1 and 2 respectively for the initialization process 2 Make sure you have connected the following One end of the Ethernet cable to E...

Page 23: ...ts 1 is connected When DHCP fails to obtain a valid IP address resulting in the NAS server unable to access the network users can log into the NAS server using its default IP address 10 0 0 2 for Ethe...

Page 24: ...nection has been established SELECT ENTER EonNAS System booting Approx 3 minutes later a Quick Initialize screen will appear with the arrow pointed at Yes You may press the SELECT button to bring the...

Page 25: ...of the initialization process the following Reboot screen will appear SELECT ENTER EonNAS Reboot Approximately 2 minutes after seeing the above screen you will hear 2 beeps and see the EonNAS model n...

Page 26: ...n on the LCD module and how to setup and change the settings within Due to the limited menus and sub menus that are available on the LCD module it is recommended that users NOT use the LCD module to s...

Page 27: ...ers log into the web user interface to configure their EonNAS Pro There are seven 7 sub menu selections TCP IP Physical Disk Pool System Shut Down Reboot and Back SEL ECT EN T ER EonNAS Main Me nu Poo...

Page 28: ...ting s S ELEC T E NT E R EonNAS M ain M en u S yste m S EL EC T E N TE R EonNAS TCP IP DNS SEL ECT E N TER EonNAS LAN 1 Ba ck SE LECT E NTER EonNAS M ain Men u T CP IP S ELEC T E NTE R EonNAS TCP I P...

Page 29: ...CT E NT ER EonNAS LAN 1 IP 0 0 0 0 SE LECT E NT ER EonNAS LAN 1 Ent er S etti ngs SELE CT EN TER EonNAS LAN 1 Ba ck When LAN 1 has established a connection menus will appear with IP addresses SELECT E...

Page 30: ...s N o SELECT ENT ER EonNAS LA N 1 En te r Se tt ing s SELECT ENT ER EonNAS Ne tw or k Se tti ng s Di sa bl e SELECT ENT ER EonNAS Ar e yo u su re Ye s N o SELECT ENT ER EonNAS B ac k SELECT ENTER To c...

Page 31: ...l show an IP address SELECT ENTER SELECT ENTER EonNAS Main Menu TCP IP SELECT ENTER EonNAS Gateway 1 172 188 0 1 SELECT ENTER EonNAS Gateway 2 Local host SELECT ENTER EonNAS TCP IP LAN 1 SELECT ENTER...

Page 32: ...S et De st i na ti on 00 0 00 00 0 00 0 0 SE LECT EN T ER EonNAS S et Ma sk 2 55 2 55 25 5 00 0 SE LECT EN T ER EonNAS S et Ga te w ay 00 0 00 00 0 00 0 0 SE LECT EN T ER EonNAS A re yo u su re Y es...

Page 33: ...ation IP Addres s SEL ECT ENT ER EonNAS Mask IP addres s SEL ECT ENT ER EonNAS Gateway Local host SEL ECT ENT ER EonNAS Config Delete G at eway SEL ECT EonNAS ENT ER Back SEL ECT ENT ER EonNAS G atew...

Page 34: ...R EonNAS TCP IP LAN 2 SELECT ENTER EonNAS TCP IP Gateway SELECT ENTER EonNAS TCP IP DNS SELECT ENTER EonNAS TCP IP Back To access the DNS settings the path is shown below SELECT ENTER EonNAS Main Menu...

Page 35: ...DNS Back SELECT ENTER EonNAS DNS Add New DNS SELECT ENTER EonNAS Sure to delete Yes No SELECT ENTER EonNAS Sure to delete Yes No SELECT ENTER EonNAS Add New DNS 000 000 000 000 SELECT E NTER EonNAS Ar...

Page 36: ...Menu System SELECT ENTE R EonNAS Main Menu Shut Down SELECT ENTE R EonNAS Main Menu Reboot SELECT ENTE R EonNAS Main Menu Back SELECT ENTER EonNAS Ma in Me nu Ph ys ical D is k SELECT ENTER EonNAS Ma...

Page 37: ...city configured in RAID 1 utilizing disks 4 and 5 SELECT ENTE R EonNAS Main Menu Pool SELECT E NTER EonNAS Main Menu System SELECT ENTE R EonNAS M ain Menu S hut Down SELECT ENTE R EonNAS Main Menu Re...

Page 38: ...n Menu Pool SELECT ENTER EonNAS Main Menu System SELECT ENTER EonNAS Main Menu Shut Down SELECT EN TER EonNAS Main Menu Reboot SELECT E NTER EonNAS Main Menu Back SELECT EN TER EonNAS Ma in Me nu Ph y...

Page 39: ...n Menu System SELECT EN TER EonNAS Main Menu Shut Down SELECT E NTE R EonNAS Main Menu Reboot SELEC T E NTE R EonNAS Main Menu Back SELE CT E NTER EonNAS Ma in Me nu Ph ys ica l Dis k SELEC T E NTER E...

Page 40: ...e previous menu Once you have configured all your EonNAS Pro settings you may begin to create pool s for network storage SE LECT ENTER EonNAS M ai n Menu P oo l SE LECT ENTER EonNAS Main Menu Syst em...

Page 41: ...ce to setup specific settings Users can trunk black dotted circle Ethernet ports 1 and 2 to boost the bandwidth Users can also create pools and folders to share over the network Please refer to the We...

Page 42: ...l hard drive expansion connecting to eSATA capable enclosures or other eSATA capable devices Most eSATA devices gain operating power from USB ports It is essential to plug in the eSATA connector to th...

Page 43: ...d for external storage expansion purposes or peripheral devices For USB expansion or peripheral device details please refer to the manual that came with your USB device The USB ports can also be used...

Page 44: ...to the EonNAS Software Manual You can find the One Touch Copy settings under the following directory Backup One Touch Copy in the web interface Simply plug in a USB flash drive to the front USB port a...

Page 45: ...y function has NOT been setup and a USB flash drive is plugged into the front USB port it will show the following menu SELECT ENTER EonNAS Ext Disk Ready Followed by this prompt SELECT ENTER EonNAS St...

Page 46: ...ime Should you suffer multiple hard drive failures always replace one hard drive at a time User replaceable components Hard drive 5 1 Replacing the Hard Drive The easiest way to find out if your hard...

Page 47: ...ch away from the drive bay Wait for at least 30 seconds for the hard drive to spin down and then gently and carefully remove the drive tray from the chassis 5 Remove the four 4 retention screws that s...

Page 48: ...possible triggering events and simple countermeasures 1 CPU or system temperature exceeded the threshold limit When you have determined the CPU or system temperature is the cause of the system error p...

Page 49: ...of the system and replace it with a new one please refer to replacing the hard drive NOTE When hot swapping while system is in operation a beep will sound to indicate the hard drive has been detected...

Page 50: ...ENTER S EL EC T EN T E R EonNAS Mu te Buzz er Yes N o SELEC T E N TE R EonNAS Ma in Me nu Po ol SELEC T EN TE R EonNAS Ma in Me nu Sy st em SE LEC T EN T E R EonNAS Main Me nu Shut Do wn SE LEC T EN...

Page 51: ...to its default settings should be your last option The restore default function will reset the Basic Settings in network configuration and the Admin user account back to default account name admin pa...

Page 52: ...Pro 500 RAID levels 0 1 5 6 0 1 1 0 5 0 5 1 EonNAS Pro 800 RAID levels 0 1 5 6 0 1 1 0 5 0 5 1 5 5 6 0 6 1 6 6 Note There are minimum disk number requirements for certain RAID configuration Please re...

Page 53: ...perating Environment Temperature Operating 5 to 40 C 32 F to 104 F Humidity Operating 5 to 80 non condensing 6 1 3 Host Port Pinouts Interface EonNAS Pro 500 EonNAS Pro 800 1Gbps iSCSI Host Port V V 1...

Page 54: ...ost Port 1Gbps iSCSI Host Port EonNAS 500 800 Pin Name Pin Name 1 BI_DA 5 BI_DC 2 BI_DA 6 BI_DB 3 BI_DB 7 BI_DD 4 BI_DC 8 BI_DD NOTE Automatic MDI MDI X Crossover Crossover can be implemented internal...

Page 55: ...to comply with the limits for a Class A digital device pursuant to Part 15 of the FCC Rules These limits are designed to provide reasonable protection against harmful interference when the equipment i...

Page 56: ...d void your authority to operate the equipment This device is in conformity with the EMC CB Certified Worldwide This device meets the requirements of the CB standard for electrical equipment with rega...

Page 57: ...ompliance with the above regulations Disposal of Old Electrical Electronic Equipment Applicable in the European Union and other European countries with separate collection systems This symbol on the p...

Page 58: ...Jose CA 95131 USA Tel 1 408 988 5088 Fax 1 408 988 6288 Email Technical Support Website US East Coast Office 4 Northeastern Blvd Suite 21B Nashua NH 03062 USA Tel 1 603 610 6398 Fax 1 603 610 6383 Ema...

Reviews: