29
"Start time" to "End time" to backup.
3
.
Record type
: backup the specific type of data, 3 types are
optional, scheduled, manual and alarm recording. The default is
"All".
After finishing setting, press "Forward" button to open the
recording file list. Select the desired file by moving
Ǐ
ǐ
and
Ǐ
ǐ
key, and exit the list via
Ǐ
ǐ
and
Ǐ
ǐ
key, then the cursor
moves to previous or next control button.
The following parts will introduce the way of backup to U-disk and
CD/DVD writer.
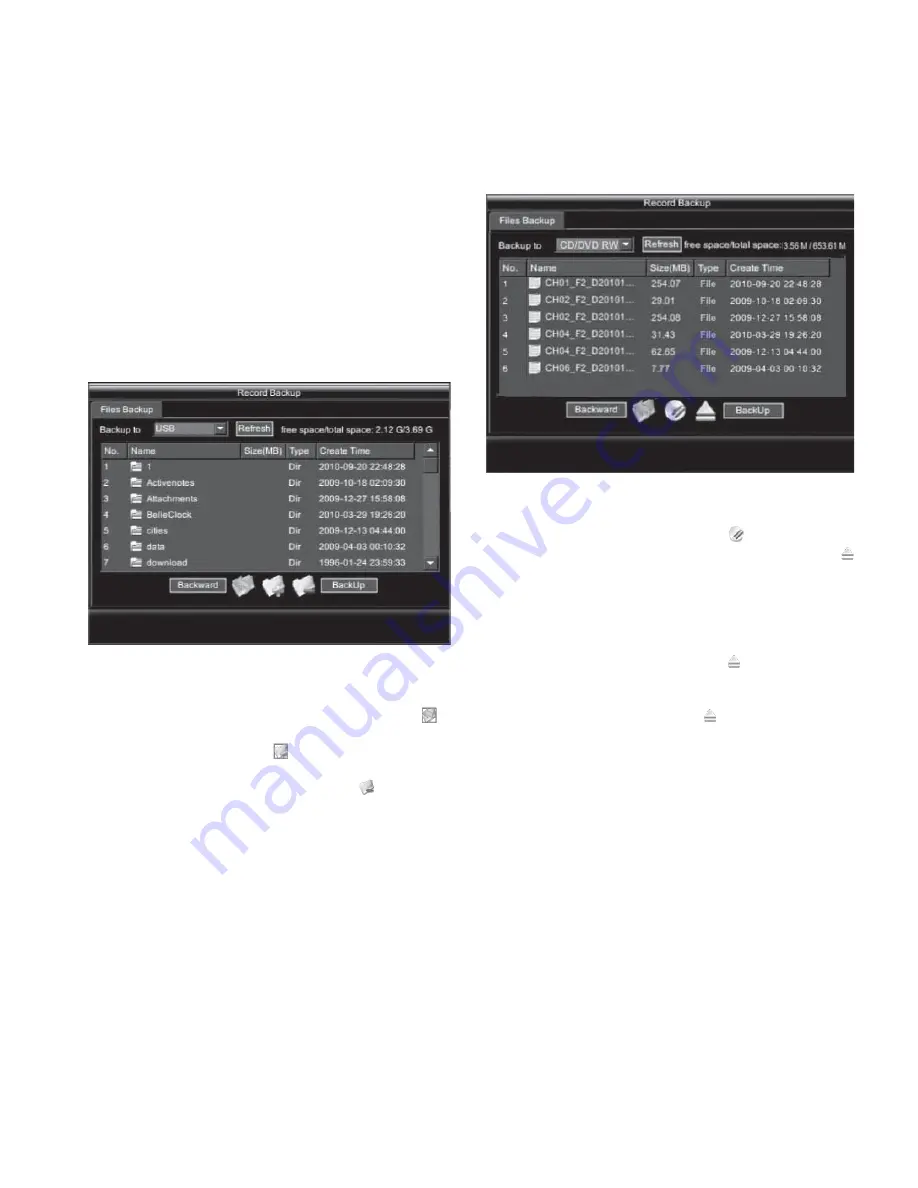
(1). Backup the file to U-disk
Note
: Make sure the U disk is compatible with the DVR. Plug the
U-disk to the USB port at the rear panel or connect the disk with a
USB cable before backup. Some USB devices maybe not be
identified for incompatibility.
Figure 5-16
Enter the selected directory by double-click on the directory or
move the cursor to the directory and press
Ǐ
ENT
ǐ
key. Press
to
return to superior directory to check the file. This button is invalid
in top level directory. Press icon
to pop out the dialog box of
new-added file folder. After input the file name press "Confirm" to
add the new folder to current directory. Press icon
, and a prompt
of deleting the current file or directory will pop out, press
"Confirm" to delete the file or directory.
Press "Backup" button, and the selected file starts to convert to AVI
format, and save to the designated directory with saving progress
prompt.
Note
:
(1)
Do not break up the backup process after starting the backup;
(2)
Press "Backward" button to return to the file selection
interface if want to change the file or exit the backup;
(3)
If you want to change the U-disk, pull out the old one and plug
a new one and then click "Refresh". If the disk is still
unidentifiable, choose formatting to continue. If the problem
remains unsolved, there might be an incompatibility and the
U-disk should be substituted by another one.
(2). Backup recording file to writer.
Note
: Make sure the writer has been installed and the disk is placed
in writer before backup. (Refer to writer installation in section 2.7.)
Move the cursor to "Backup" button, and press
Ǐ
ENT
ǐ
key to enter
backup interface, select backup to "CD/DVD RW", as shown in
Figure below.
Figure 5-17
Press "Backup", the system starts to create buffer storage file, and
write to the CD/DVD once finishing. Press
to erase the data in
disk, and the button is invalid if the disk is not erasable. Press
to pop up the driver.
Note
:
(1)
Do not break up the backup process after starting the backup;
(2)
The disk can't be popped up if press the pop-up key of the
writer during backup. It needs to press
to pop-up the disk;
(3)
Press "Backward" button to return to the file selection
interface if want to change the file or exit the backup;
(4)
If want to change the disk, press
to pop-up the disk, and
place another disk, and press "refresh" to check the new disk.
4. Exit
Press
Ǐ
ESC
ǐ
key to exit the System interface and return to the
Main menu interface after all of the operations.
5.5.6 Advanced Settings
The advanced settings include software upgrade mode, reboot and
shutdown. Restore the system to default setting if the system runs
abnormally.
In the preview mode, press
Ǐ
MENU
ǐ
key to enter the interface as
shown in Figure 5-1. Select "System" and press
Ǐ
ENT
ǐ
key or
number key
Ǐ
9
ǐ
to enter the setting interface, and press
Ǐ
WIDE
ǐ
key to switch to "Advanced Settings" option, as shown in Figure
below.
Summary of Contents for V3060 Series
Page 6: ......


