4.1 Phantomspeisung für einzelne Kanäle ab-
schalten (Mono-Kanäle) bzw. einschalten
(Stereo-Kanäle)
Die 48-V-Phantomspeisung für die Mono-Kanäle
1 – 12 ist zentral mit dem Schalter „PHANTOM PO-
WER +48 V“ (25) zuschaltbar. Sie kann jedoch für
jeden dieser Kanäle einzeln abgeschaltet werden,
wenn sowohl asymmetrische als auch phantomge-
speiste Mikrofone angeschlossen werden sollen.
Dazu auf der Platine des betreffenden Kanals die
Steckbrücke „CONN3“ im Beschriftungsfeld „+48V“
so umstecken, dass sie auf Pin 1 und Pin 2 des
Steckkontaktes sitzt.
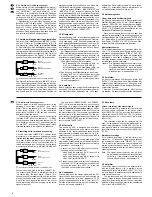
➂
Steckbrücke „CONN3“ für die Phantomspeisung eines
Mono-Kanals
Die Mikrofoneingänge der Stereo-Kanäle 13 – 16
werden in der Grundeinstellung nicht mit der 48-V-
Phantomspeisung versorgt, wenn der Schalter
„PHANTOM POWER +48 V“ gedrückt ist. Um sie
für einen Kanal einzuschalten, am Steckkontakt
„CONN4“ im Beschriftungsfeld „+48V“ die Pins 2
und 3 überbrücken.
➃
Steckkontakt „CONN4“ für die Phantom-
speisung eines Stereo-Kanals
4.2 Signalabgriffspunkte für die Ausspielwege
„AUX“ und „MON“ ändern
Für den Post-fader-Ausspielweg „AUX“ kann der
Signalabgriffspunkt für jeden Kanal getrennt auf pre-
fader umgestellt werden. Dazu auf der Platine des
betreffenden Kanals die Steckbrücke „JP1“ (bei dem
Beschriftungsfeld „A1“) entsprechend umstecken.
➄
Steckbrücke „JP1“ für den Ausspielweg „AUX“
Für den Pre-fader-Ausspielweg „MON“ kann der
Signalabgriffspunkt für jeden Kanal getrennt auf pre-
equalizer oder post-fader umgestellt werden. Dazu
auf der Platine des betreffenden Kanals die Steck-
brücke „JP2“ (bei dem Beschriftungsfeld „A2“) ent-
sprechend umstecken.
➅
Steckbrücke „JP2“ für den Ausspielweg „MON“
4.3 Signalabgriffspunkte für die
Direktausgänge ändern
Für jeden einzelnen Direktausgang der Mono-Ka-
näle 1 – 12 kann der Signalabgriffspunkt von post-
fader (Grundeinstellung) auf pre-equalizer geändert
werden. Dazu auf der Platine des betreffenden Ka-
nals die Steckbrücke „JP3“ (bei dem Beschriftungs-
feld „DO“) entsprechend umstecken.
➆
Steckbrücke „JP3“ für den Direktausgang
5
Geräte anschließen
Vor dem Anschließen von Geräten bzw. Ändern be-
stehender Anschlüsse das Mischpult und alle ande-
ren Audiogeräte ausschalten.
5.1 Tonquellen
An die Eingangskanäle 1 – 16 lassen sich sowohl
Mikrofone als auch Geräte mit Line-Ausgangspegel
anschließen. Da zwischen den Mikrofon- und Line-
Eingängen nicht umgeschaltet werden kann, beide
Eingänge nicht gleichzeitig nutzen: Pro Kanal ent-
weder den Mikrofoneingang oder den Line-Eingang
anschließen.
5.1.1 Mikrofone
Mikrofone bzw. andere niederohmige Mono-Signal-
quellen mit geringen Ausgangspegeln an die sym-
metrischen XLR-Buchsen „MIC“ (29) anschließen.
Für den Betrieb von Kondensator- oder Elektret-
mikrofonen, die mit einer 48-V-Phantomspeisung ar-
beiten, kann für alle Mikrofoneingänge der Mono-
Kanäle 1 – 12 die Phantomspeisung eingeschaltet
werden: Dazu den versenkten Schalter „PHANTOM
POWER +48 V“ (25) mit einem schmalen Gegen-
stand (z. B. Kugelschreiber) herunterdrücken. Alle
Mikrofoneingänge der Mono-Kanäle werden dann
mit einer 48-V-Phantomspeisung versorgt und die
gelbe LED „PHANTOM POWER +48 V“ (12) auf der
Frontplatte leuchtet.
Hinweis: Die Phantomspeisung kann intern für ein-
zelne Mono-Kanäle abgeschaltet bzw. für
einzelne Stereo-Kanäle eingeschaltet wer-
den. Siehe dazu Kap. 4.1.
Vorsicht!
●
Die Phantomspeisung nur bei ausgeschaltetem
Mischpult ein- oder abschalten, sonst entstehen
laute Schaltgeräusche.
●
Die Phantomspeisung nicht einschalten, wenn
asymmetrische Mikrofone angeschlossen sind!
Diese Mikrofone könnten beschädigt werden.
PRE-EQ
JP3
POST-FADER
POST-FADER
JP2
PRE-FADER
PRE-EQ
PRE-FADER
JP1
POST-FADER
1
3
ON
CONN4
CONN3
1
3
OFF
1
3
ON
CONN3
3) Unscrew the plate of the connection panel
(44 screws) and remove it.
4) Remove all operating elements and also the nuts
below the operating elements at the channel to
be modified. Also unscrew the fader, if required.
5) It is now possible to carefully remove the PCB.
Take care not to tear off any connection cable.
6) Perform the desired modifications for the channel
according to chapters 4.1 to 4.3.
7) Reassemble the mixer. Prior to fastening the
screws to join the front panel and the bottom part
of the housing, make sure to connect the two
parts again via the 4-pole cable.
4.1 Switching off the phantom power for
individual channels (mono channels) or
switching it on (stereo channels)
The 48 V phantom power for the mono channels
1 – 12 can be centrally connected by the switch
“PHANTOM POWER +48 V” (25), however, it can be
individually disconnected for each of these channels
for connecting both unbalanced and phantom-pow-
ered microphones. For this purpose, rearrange the
jumper “CONN3” in the field “+48V” on the PCB of
the corresponding channel in such a way that it links
pin 1 and pin 2 of the plug contact.
➂
Jumper “CONN3” for phantom power supply of a mono
channel
In the basic adjustment, the microphone inputs of
the stereo channels 13 – 16 are not supplied with
the 48 V phantom power if the switch “PHANTOM
POWER +48 V” has been pressed. To switch it on
for a channel, bridge the pins 2 and 3 of the contact
“CONN4” in the field “+48V”.
➃
Plug contact “CONN4” for phantom
power supply of a stereo channel
4.2 Modifying the signal take-off points for
the send ways “AUX” and “MON”
For the post-fader send way “AUX”, the signal
take-off point for each channel can be separately
modified to pre-fader. For this purpose, rearrange
the jumper “JP1” (close to the field “A1”) on the PCB
of the corresponding channel accordingly.
➄
Jumper “JP1” for the send way “AUX”
For the pre-fader send way “MON”, the signal take-
off point for each channel can be separately modi-
fied to pre-equalizer or post-fader. For this purpose,
rearrange the jumper “JP2” (close to the field “A2”)
on the PCB of the corresponding channel accord-
ingly.
➅
Jumper “JP2” for the send way “MON”
4.3 Modifying the signal take-off points for
the direct outputs
For each individual direct output of the mono chan-
nels 1 –12, the signal take-off point can be modified
from post-fader (basic adjustment) to pre-equalizer.
For this purpose, rearrange the jumper “JP3” (close
to the field “DO”) on the PCB of the corresponding
channel accordingly.
➆
Jumper “JP3” for the direct output
5
Connection of Units
Prior to connecting any units or to changing any ex-
isting connections, switch off the mixer and all other
audio units.
5.1 Audio sources
The input channels 1 – 16 allow both connection of
microphones and of units with line output level. As it
is impossible to switch between microphone inputs
and line inputs, do not use both inputs simulta-
neously: Either connect the microphone input or the
line input of the channel.
5.1.1 Microphones
Connect microphones or other low-impedance
mono signal sources with low output levels to the
balanced XLR jacks “MIC” (29).
For operating capacitor or electret microphones
using a 48 V phantom power, the phantom power
can be switched on for all microphone inputs of the
mono channels 1 – 12: Press the recessed switch
“PHANTOM POWER +48 V” (25) by means of a thin
object (e. g. ball point pen). All microphone inputs of
the mono channels will be supplied with a 48 V
phantom power and the yellow LED “PHANTOM
POWER +48 V” (12) on the front panel will light up.
Note: The phantom power can be switched off
internally for individual mono channels or
switched on for individual stereo channels.
See chapter 4.1.
Caution!
●
Only switch on or off the phantom power with the
mixer switched off, otherwise loud switching
noise will result.
●
Do not switch on the phantom power if unbal-
anced microphones are connected! These mi-
crophones might be damaged.
PRE-EQ
JP3
POST-FADER
POST-FADER
JP2
PRE-FADER
PRE-EQ
PRE-FADER
JP1
POST-FADER
1
3
ON
CONN4
CONN3
1
3
OFF
1
3
ON
CONN3
7
GB
D
A
CH


