17
G
OVEN CLEANING AND CARE
It is advised to clean the o ven after each use. The dirt comes off more easily , preventing it from being burnt
repeatedly at high temper atures. Wait until the chamber is luk ewarm. Remove all the extr actable parts and
wash them separately in hot water and non abrasive detergent. The cooking chamber can be cleaned with a soft
cloth soaked in a solution of lukewarm water and ammonia; then rinse and dry. Do not use abrasive or corrosive
detergents as they may damage the oven. Do not use steam appliances for cleaning, as there is a risk of short
circuit.
Dismantling the oven door
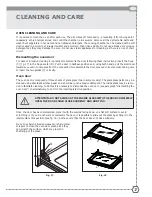
For ease of intensive cleaning it is practical to dismantle the door following these instructions: insert the hook
(C) (f g. 17) in the hinge sector (D). Put the door in half-open position and, using both hands, pull the small door
towards you until it uncouples from the connection. To reassemble the door, proceed in inverse order, taking care
to insert the two guides (F) correctly.
Oven door
The oven door is composed of three sheets of plate glass (two in some models). The plate glass parts ma y be
cleaned using absorbent kitchen paper and an ordinary non abrasive detergent. The inside glass may be remo-
ved to facilitate cleaning. To do this it is necessary to dismantle the oven door (see paragraph “Dismantling the
oven door”) or, alternatively, to set it in the intermediate click position.
ATTENTION: DO NOT SLIDE OUT THE INSIDE GLASS WITH THE DOOR COMPLETELY
OPEN. THE DOOR COULD CLOSE SUDDENLY AND HURT YOU.
Once the door has been dismantled, place it with the outside facing down on a flat soft surface to avoid
scratching it. If you do not want to dismantle the door, it is possible to slide out the glass by setting it in the
intermediate click position (see fig. 18), but take care that the door does not close suddenly.
Do not use harsh abrasive cleaners or sharp metal
scrapers to clean the oven door glass, since they
can scratch the surface, which may result in
shattering of the glass.
D
C
F
Fig. 17
A
A
B
C
B
Fig. 18
CLEANING AND CARE


