This document is property of NIIGATA POWER SYSTEMS CO., LTD. It must be neither reproduced nor communicated nor published without permission.
SECTION
4
- DISASSEMBLY AND REASSEMBLY
4.4 FUEL INJECTION VALVES AND FUEL INJECTION
PUMPS
4-4-04
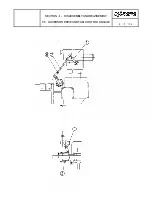
- Disassembly and Inspection - Fuel Injection Valve
- Clamp the injection valve in a vice with the nozzle at the bottom.
- Remove the locknut
⑧
, the adjusting screw
④
, spring
⑥
, and spindle
⑦
.
- Turn the valve in the vice so the nozzle is at the top, unscrew nut
⑤
and remove the nozzle
③
.
- Carbon deposits can be removed from the nozzle tip with a soft metal brush and the nozzle
holes can be cleaned with the wire cleaners mentioned above. Needle seats can be lapped
with lube oil only - lapping compound should never be used. If lapping with oil fails
to correct a leakage problem, a new nozzle should be installed.
Reassembly
- Reinstall the nozzle with a new o-ring and torque the nut
⑤
(Refer Tightening Torque Table).
- Reinstall the spindle
⑦
, spring
⑥
, and adjusting screw
④
.
- Set the valve opening pressure, as outlined above.
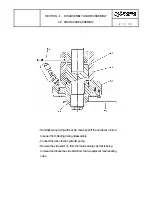
- You should clean up the surface of FV sleeve before setting the gasket on it,
and pay attention to putting the gasket
⑩
on the surface with watching
the projection of it, and please refer to the following figure.
- Insert the injection valve into the cylinder head and align the locating
mark with the corresponding mark on the cylinder head.
- Install the retainer
②
, and hand-tighten the nuts.
- Install the fuel inlet tube and union.
- Torque the injection valve nuts to 44 N
・
m.
Summary of Contents for NIIGATA MG(L)26HLX
Page 2: ......
Page 34: ......
Page 38: ......
Page 40: ......
Page 60: ......
Page 66: ......
Page 68: ......
Page 80: ......
Page 82: ......
Page 86: ......
Page 88: ......
Page 94: ......
Page 107: ......
Page 108: ......
Page 110: ......
Page 130: ......
Page 132: ......
Page 170: ......
Page 174: ......
Page 186: ......
Page 188: ......
Page 192: ......


