


38
Response FF80
- Installation
SER
VICING
SERVICING
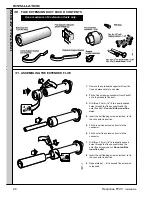
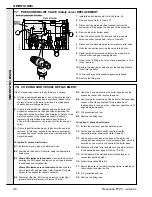
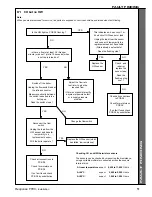
1.
Remove front and sealing panels. Refer to Frame 48.
2.
Remove the fan assembly. Refer to Frame 49.
3.
Remove the burner assembly. Refer to Frame 50.
4.
Undo the electrode securing bracket screws, as required.
5.
Fit new electrodes as necessary, ensuring that the gaskets
are in good condition and sealing correctly - renew as
necessary.
6.
Check the spark / detection gaps. Refer to Frame 50.
7.
Re-assemble in reverse order.
8.
Check the ignition and operation of the burner.
Note.
The spark electrodes are replaced as a pair;
the detection electrode is a single probe.
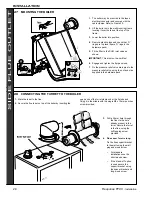
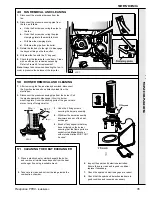
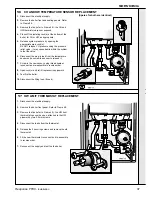
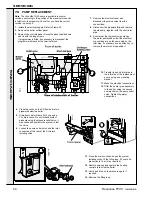
58 OVERHEAT THERMOSTAT REPLACEMENT
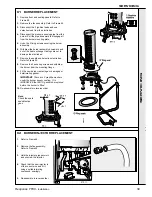
59 SPARK AND DETECTION ELECTRODE REPLACEMENT
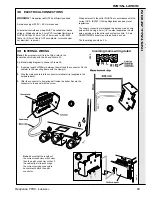
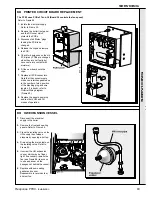
60 SPARK GENERATOR REPLACEMENT
1.
Remove the front and sealing
panels. Refer to Frame 48.
2.
Disconnect the leads from the
spark electrodes
3.
Disconnect the electrical leads
from the spark generator.
4.
Slide out the spark generator
in the direction of the arrow.
5.
Fit the new spark generator
and re-assemble in reverse
order.
6.
Check the ignition and
operation of the burner.
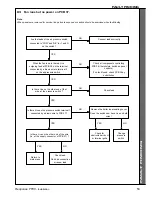
1.
Disconnect the electrical supply to the boiler.
Remove the electrical connector (secured by 1
screw) from the boiler base.
2.
Remove the controls panel. Swing the panel
upside down and fix with the long screws.
Remove the bottom panel.
3.
Release the screws securing the pressure gauge
subpanel and allow the panel to move to one
side.
4.
Disconnect the leads from the overheat 'stat.
Undo the clamping nut to release the 'stat head.
5.
Undo the screw and clamp securing the pancake
sensing end of the thermostat to the pipe
6.
Replace with new thermostat. Re-assemble and
rewire in reverse order (electrical polarity is
immaterial).