


35
Response FF80
- Installation
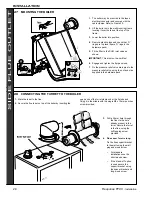
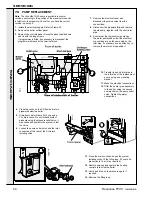
1.
Place a plastic sheet or similar beneath the boiler
and remove all visible loose deposits from the heat
exchanger fins, using a suitable brush.
2.
Take care to clean debris from the ledge inside the
combustion chamber.
SERVICING
SER
VICING
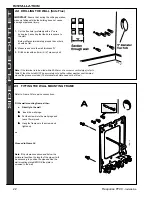
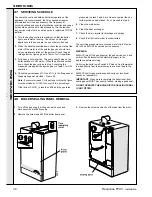
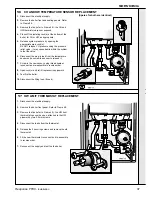
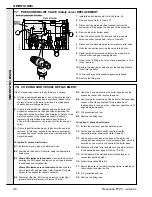
49 FAN REMOVAL AND CLEANING
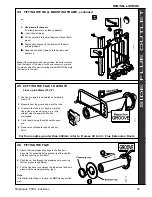
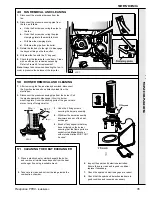
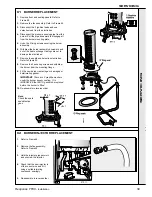
50 BURNER REMOVAL AND CLEANING
51 CLEANING THE HEAT EXCHANGER
1.
After removing the fan, as already described, disconnect
the 2 ignition leads and one detection lead from the
electrodes.
2.
Disconnect the pressure sensing pipe from the burner. Pull
the pipe downward to disengage it from the burner
mounting plate. Cover the sensing ports of the gas valve to
prevent entry of foreign matter.
1.
Disconnect the electrical harness from the
fan.
2.
Disconnect the pressure sensing pipe from
the fan, as follows:
a.
Undo the 2 screws securing the pipe to
the fan.
b.
Undo the 2 screws securing the pipe
clamping plate to the manifold block.
c.
Withdraw the clamping plate.
d.
Withdraw the pipe from the boiler.
3.
Rotate the fan body to the right, to disengage
the bayonet fixing on the fan outlet.
4.
Withdraw the fan with the 'O' ring seal.
5.
Check that the fan impeller runs freely. Clean
with a soft brush or renew as necessary.
Refer to Frame 66 for replacement.
Note.
Always take care when handling the fan, in
order to preserve the balance of the impeller.
3.
Undo the 3 fixing screws
securing the burner assembly.
4.
Withdraw the burner assembly
downward and out of the heat
exchanger.
5.
Brush off any deposits that may
have collected on the burner,
ensuring that the flame ports are
unobstructed.
Note.
Brushes
with metallic bristles MUST NOT
be used.
6.
Inspect the spark and detection electrodes.
Ensure they are clean and in good condition -
replace if necessary.
7.
Check the spark and electrode gaps are correct.
8.
Check that the spark and detection leads are in
good condition and renew as necessary