7.
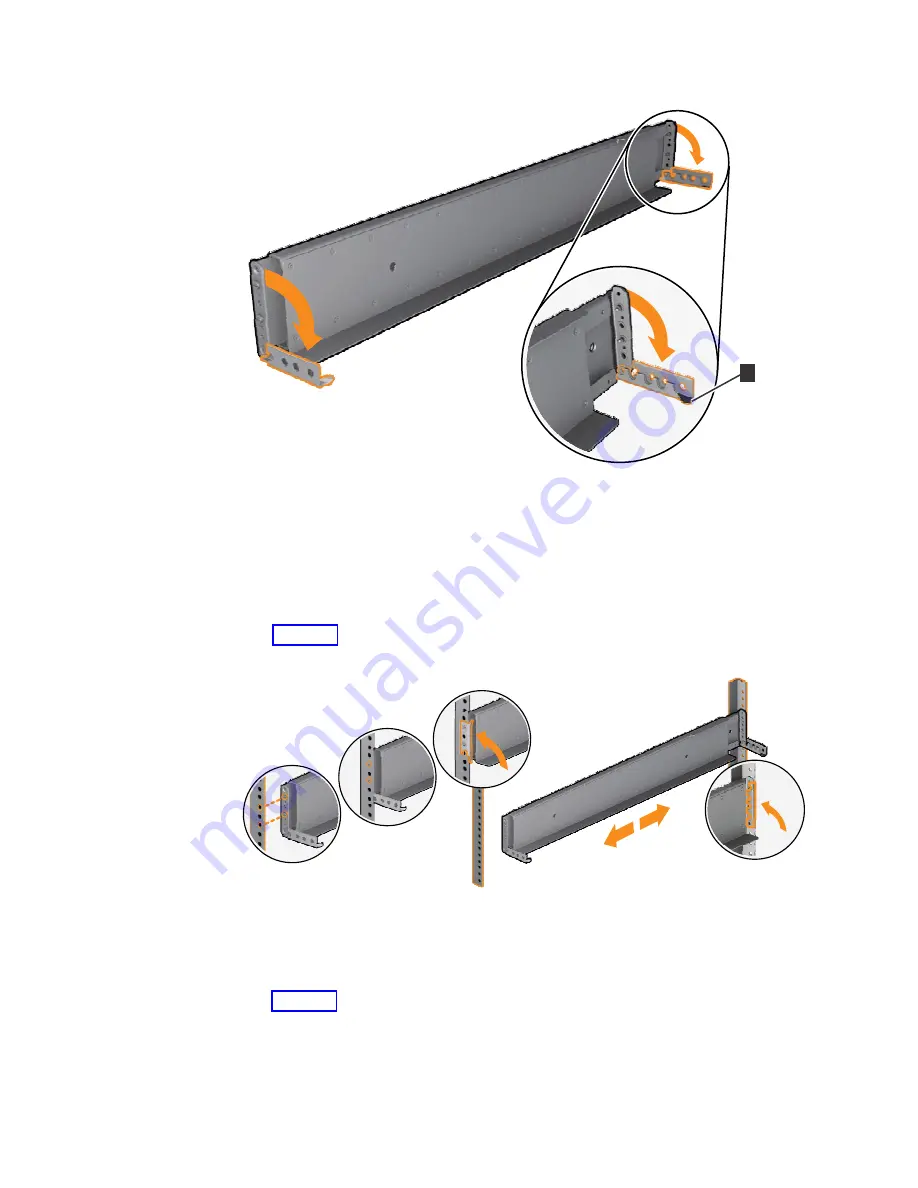
Align the holes in the rail bracket with the holes on the front and rear rack
cabinet flanges. Ensure that the rails are aligned on the inside of the rack
cabinet.
8.
On the rear of the rail, press the two bracket pins into the holes in the rack
flanges.
9.
Close the rear hinge bracket to secure the rail to the rack cabinet flange. (See
Figure 36.)
10.
On the front of the rail, press the two bracket pins into the holes in the rack
flanges.
11.
Close the front hinge bracket to secure the rail to the rack cabinet flange. (See
Figure 36.)
12.
Secure the rear of the rail to the rear rack flange with an M5 screw that is
provided with the rack kit.
13.
Repeat the steps to secure the opposite rail to the rack cabinet.
14.
Repeat the procedure to install rails for each additional expansion enclosure.
fab10018
1
Figure 35. Opening the hinge brackets
2
1
4
3
fab10019
Figure 36. Closing the hinge brackets
32
SAN Volume Controller: Model 2145-SV1 Hardware Installation Guide
Summary of Contents for MTM 2145-12F
Page 8: ...viii SAN Volume Controller Model 2145 SV1 Hardware Installation Guide...
Page 26: ...xxvi SAN Volume Controller Model 2145 SV1 Hardware Installation Guide...
Page 72: ...38 SAN Volume Controller Model 2145 SV1 Hardware Installation Guide...
Page 192: ...158 SAN Volume Controller Model 2145 SV1 Hardware Installation Guide...
Page 194: ...160 SAN Volume Controller Model 2145 SV1 Hardware Installation Guide...
Page 196: ...162 SAN Volume Controller Model 2145 SV1 Hardware Installation Guide...
Page 200: ...166 SAN Volume Controller Model 2145 SV1 Hardware Installation Guide...
Page 208: ...174 SAN Volume Controller Model 2145 SV1 Hardware Installation Guide...
Page 212: ...178 SAN Volume Controller Model 2145 SV1 Hardware Installation Guide...
Page 213: ......
Page 214: ...IBM Printed in USA GI13 4547 02...


