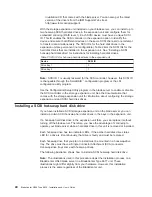
3.
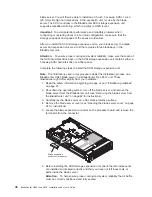
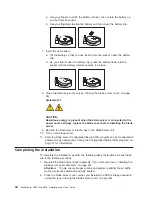
Insert
the
tabs
on
the
bottom
of
the
bezel
up
into
the
matching
holes
on
the
server
chassis;
then,
rotate
the
top
of
the
bezel
toward
the
server
until
the
tabs
at
the
top
of
the
bezel
snap
into
place.
Closing
the
blade
server
cover
Important:
The
blade
server
cannot
be
inserted
into
the
BladeCenter
unit
until
the
cover
is
installed
and
closed
or
an
expansion
unit
is
installed.
Do
not
attempt
to
override
this
protection.
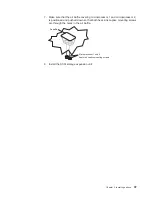
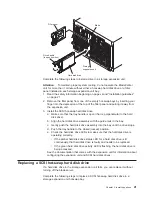
The
following
illustration
shows
how
to
close
the
blade
server
cover.
Blade cover
Cover
pins
Air baffle
Complete
the
following
steps
to
close
the
blade
server
cover:
1.
Read
the
safety
information
beginning
on
page
vii
and
“Installation
guidelines”
on
page
21.
2.
If
you
removed
the
blade
bezel
assembly,
replace
it
now.
See
“Installing
the
blade
server
bezel
assembly”
on
page
45
for
instructions.
3.
Before
closing
the
cover,
check
that
all
components
are
installed
and
seated
correctly
and
that
you
have
not
left
loose
tools
or
parts
inside
the
blade
server.
46
BladeCenter
HS40
Type
8839:
Installation
and
User’s
Guide
Summary of Contents for HS40 - BladeCenter - 8839
Page 3: ...BladeCenter HS40 Type 8839 Installation and User s Guide ERserver...
Page 8: ...vi BladeCenter HS40 Type 8839 Installation and User s Guide...
Page 76: ...62 BladeCenter HS40 Type 8839 Installation and User s Guide...
Page 90: ...76 BladeCenter HS40 Type 8839 Installation and User s Guide...
Page 114: ...100 BladeCenter HS40 Type 8839 Installation and User s Guide...
Page 118: ...104 BladeCenter HS40 Type 8839 Installation and User s Guide...
Page 119: ......
Page 120: ...Part Number 90P3102 Printed in USA 1P P N 90P3102...

