


Chapter 2. Installing options
9
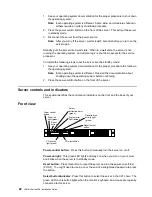
Memory considerations
Install additional DIMMs in the following order: DIMM connector 2, then 3, then 4. See
the following illustration for memory connector locations.
Installing memory modules
Complete the following steps to install a DIMM:
1.
Review the safety precautions beginning on page v.
2.
Turn off the server and peripheral devices.
3.
Remove all external cables from the server; then, remove the server cover. For
more information on removing the cover, see “Removing the cover” on page 5.
Attention: When you handle static-sensitive devices, take precautions to avoid
damage from static electricity. For details on handling these devices, see
“Handling static-sensitive devices” on page 3.
4.
If necessary, remove the PCI adapter in slot 2 for easier access to the DIMM
connectors.
5.
Touch the static-protective package containing the DIMM to any unpainted metal
surface on the server. Then, remove the DIMM from the package.
Attention: To avoid breaking the retaining clips or damaging the DIMM
connectors, handle the clips gently. Do not force the memory module into the
connector.
Notes:
a.
The DIMM has two index slots, one in the center and the other on the left half
of the DIMM connector edge.
b.
When installing a memory module, be sure that no gap exists between the
DIMM and the retaining clips. If a gap does exist between the memory
module and the retaining clips, remove the DIMM; then, reinsert the DIMM
properly. See the illustration on page 8.
6.
Turn the DIMM so that the index slots align correctly with the connector, and
insert the DIMM into the connector by pressing on both corners of the DIMM at
the same time. Be sure to press it straight into the connector.
7.
If you have other options to install, install them now. Otherwise, continue with
“Installing the cover” on page 14.
Connector 1
Connector 2
Connector 3
Connector 4
Summary of Contents for eServer 330 xSeries
Page 3: ...IBM IBM xSeries 330 Installation Guide SC06 P455 80...
Page 12: ...x IBM xSeries 330 Installation Guide...
Page 32: ...20 IBM xSeries 330 Installation Guide...
Page 42: ...30 IBM xSeries 330 Installation Guide...
Page 56: ...44 IBM xSeries 330 Installation Guide...
Page 74: ...62 IBM xSeries 330 Installation Guide...
Page 75: ......
Page 76: ...IBM Part Number 25P2567 Printed in the United States of America 25P2567...