


8
PRM
®
SECTION 5. REPAIR
HOW TO USE THIS MANUAL
The following procedures are presented in
the order in which they must be performed to
completely disassemble the unit. Each step is
provided with an exploded view showing the
parts involved.
The item reference numbers in
each illustration are for disassembly/assem
-
bly instructions only.
See pages 24-25 for
part names and descriptions. The disassembly
section is followed by the assembly procedure.
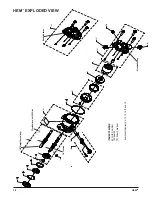
A complete exploded view and item list of the
PRM
®
is provided at the end of this section.
GENERAL INSTRUCTIONS
Parts requiring replacement must be replaced
from the appropriate kits identified in the Items
Listing, found at the end of this manual. Use
only original Hydro-Gear
®
replacement parts.
REQUIRED TOOLS
A list of tools required for the repair of the PRM
motor is provided in Table 3 below.
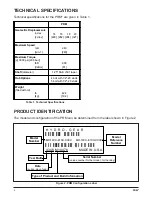
TORQUE SPECIFICATIONS
Torque specifications for fasteners used on the
PRM are provided in the assembly section of
this manual.
Table 3. Required Tools
Miscellaneous
PRM Motor Service & Repair Manual
Torque Wrench
Impact Wrench
3/8” Drive Ratchet
Scribe, Paint Pen, or Marker
Seal Hook with a Magnet
Flat Blade Screw Driver
Hub Puller Adapter (included in seal kit)
Pliers
Internal Snap Ring
External Snap Ring
Sockets
9/16”
1-5/16”
Combination Wrenches
9/16”
TOOLS
PRM MOTOR REMOVAL
It is necessary to remove the PRM motor
from the vehicle before performing the repair
procedures represented in this section. Use
the following procedure to prepare the unit for
removal from the vehicle.
1. With the vehicle wheels on the ground,
loosen the nut (55, Figure 48) Page 24, re-
taining the hub (56, Figure 48) Page 24. Use
an air impact wrench and a 1-5/16” socket
to loosen the nut.
2. Lift the vehicle wheels from the ground and
remove the nut completely.
3. Remove the wheel from the hub.
4. Using a wheel or gear puller and the hub
puller adapter located in the seal kit, remove
the hub from the shaft.
5. Disconnect the brake arm linkage at the
PRM motor.
6. Disconnect the high pressure hoses and case
drain hose at the PRM.
7. Remove the PRM motor from the vehicle.
NOTE: Anytime a hub nut and/or hub is
removed, it must be discarded and
replaced with a new hub nut and/or
hub.
Summary of Contents for HGM-H Series
Page 1: ...BLN 0043 January 2018 HGM H Series Motor Service and Repair Manual ...
Page 25: ...24 HGM H HGM H MOTOR EXPLODED VIEW ...
Page 29: ...HEMTM Series Motor Service and Repair Manual BLN 0083 January 2018 ...
Page 52: ...PRM MOTOR Service and Repair Manual ...
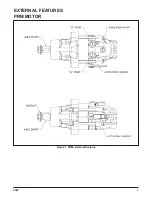
Page 56: ...PRM 3 EXTERNAL FEATURES PRM MOTOR Figure 1 PRM External Features ...
Page 77: ...24 PRM SECTION 8 PARTS LIST Figure 48 MA04K030 ...
Page 81: ...BLN 50231 January 2018 BDP 10L PL Hydrostatic Pump Service and Repair Manual ...
Page 82: ......
Page 83: ......
Page 84: ......
Page 85: ......
Page 86: ......
Page 87: ......
Page 88: ......
Page 89: ......
Page 90: ......
Page 91: ......
Page 92: ......
Page 95: ......
Page 96: ......
Page 97: ......
Page 98: ......
Page 99: ......
Page 100: ...HGM 12P LSHT Wheel Motor Service and Repair Manual BLN 52197 January 2018 ...
Page 102: ...2 Exploded view HGM P ...
Page 117: ...HGM E LSHT Wheel Motor Service and Repair Manual BLN 52198 January 2018 ...
Page 144: ...2 P Series EXTERNAL FEATURES PC SERIES Figure 1 PC Pump with Standard Charge Pump ...
Page 146: ...4 P Series EXTERNAL FEATURES PJ SERIES Figure 3 PJ Pump with Standard Charge Pump ...
Page 147: ...5 P Series Figure 4 PK Pump With Standard Charge Pump EXTERNAL FEATURES PK SERIES ...
Page 176: ...34 PC Series Figure 16 PC Pump BOXES INDICATE ITEMS INCLUDED IN Kit Number ...
Page 192: ...52 PG PE Series Figure 17 PG PE Pump BOXES INDICATE ITEMS INCLUDED IN KITS Kit Number ...
Page 208: ...70 PJ Series Figure 17 PJ Pump BOXES INDICATE ITEMS INCLUDED IN Kit Number ...
Page 224: ...88 PK Series Figure 17 PK Pump BOXES INDICATE ITEMS INCLUDED IN Kit Number ...
Page 240: ...106 PR Series Figure 17 PR Pump BOXES INDICATE ITEMS INCLUDED IN KITS Kit Number ...
Page 261: ...HGM C LSHT Wheel Motor Service and Repair Manual BLN 52690 January 2018 ...