7:8
7 Embroidery Edit
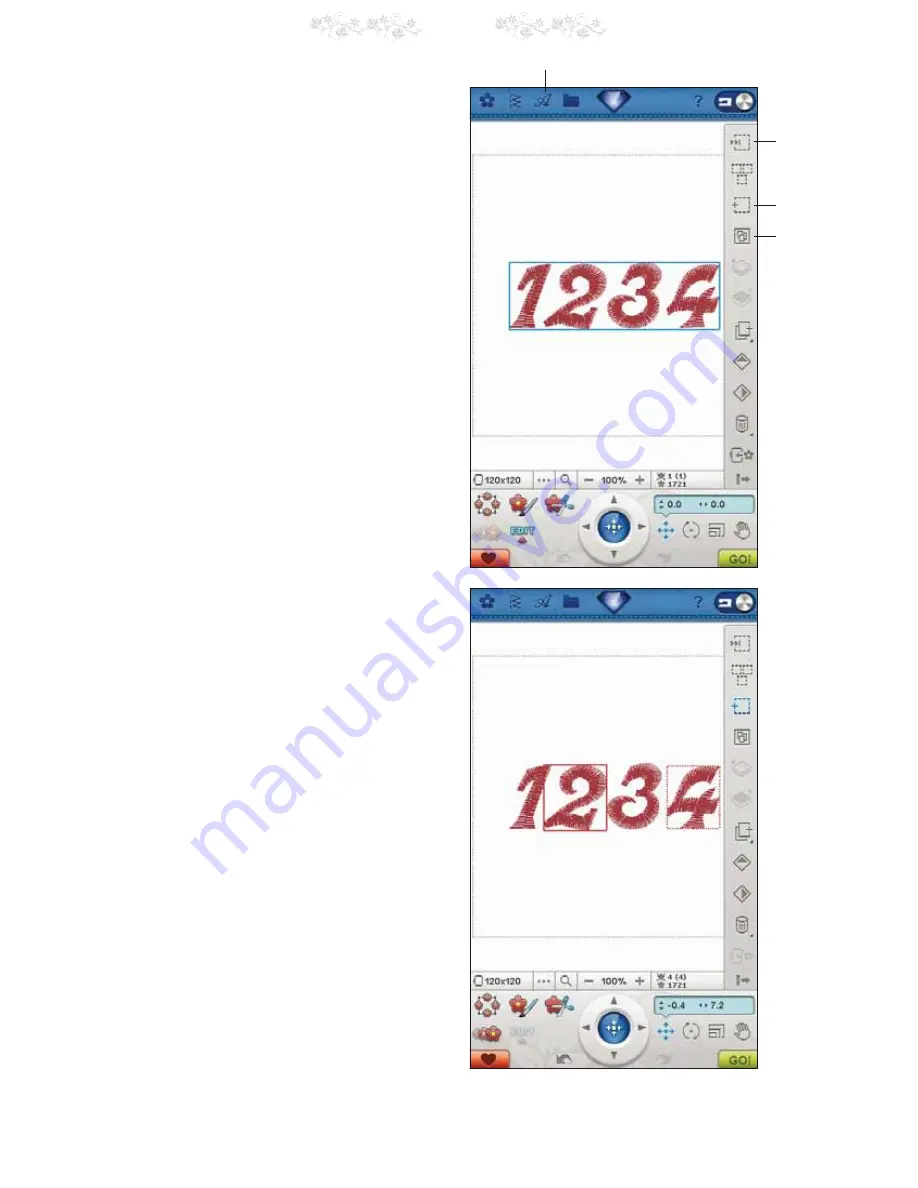
SELECT DESIGNS EXERCISE
In this exercise you will learn how to select two out of four
designs to be able to make changes to them.
*RWR\RXU)RQW0HQXRQWKHWRROEDU7RXFK
.DOOLJUDSKLD7KH)RQW(GLWZLQGRZZLOORSHQ
2. Go to your number menu and select 1, 2, 3 and 4.
7RXFK2.WRJREDFNWR(PEURLGHU\(GLW
7KH*URXS8QJURXSLFRQLVQRZDFWLYH7RXFKWKH
*URXS8QJURXSLFRQWRXQJURXSWKHGHVLJQV'HVLJQ
DQGKDYHDUHGVROLGIUDPHDURXQGWKHPZKLFK
WHOOV\RXWKDWWKH\DUHVHOHWHG'HVLJQKDVDUHG
dotted box which means that the design is marked and
selected.
4. With your stylus, touch outside the designs so that you
do not mark any particular design. Touch outside the
design again to deselect all. None of the designs are
now selected.
5. We now want to select designs 2 and 4. With your
VW\OXVWRXFKGHVLJQRUXVHWKH6WHS7KURXJK'HVLJQV
LFRQWRVHOHFWLW7RXFKWKH$GG5HPRYHVHOHFWLRQ
icon. The design will become marked and selected,
which is indicated by the red dotted box.
6. With your stylus, touch the design 4 to mark that
GHVLJQ,WZLOOKDYHDEODFNGRWWHGER[DURXQGLW7RXFK
LWDJDLQRUSUHVV$GG5HPRYH6HOHFWLRQWRPDNH
PDUNHGDQGQRWDFWLYH<RXFDQQRZPRYHPLUURU
shape, resize, scale, rotate or delete designs 2 and 4.
Group/
Ungroup
Step Through
Designs
Add/Remove
Selection
Font Menu
Summary of Contents for Royale
Page 1: ...User s Guide KEEPING THE WORLD SEWING ...
Page 4: ......
Page 7: ...GETTING TO KNOW YOUR MACHINE 1 ...
Page 21: ...SET UP 2 ...
Page 35: ...ULTIMATE INTERACTIVE SCREEN 3 ...
Page 51: ...SEWING 4 ...
Page 77: ...PROGRAM 5 ...
Page 85: ...EMBROIDERY SET UP 6 ...
Page 91: ...EMBROIDERY EDIT 7 ...
Page 111: ...8 EMBROIDERY STITCH OUT ...
Page 125: ...9 FILE MANAGER ...
Page 133: ...10 MAINTENANCE ...


