146
[Router] portal server newpt ip 192.168.0.111 key portal port 50100 url
http://192.168.0.111:8080/portal
# Configure the router as a DHCP relay agent, and enable the IP address check function.
[Router] dhcp enable
[Router] dhcp relay server-group 0 ip 192.168.0.112
[Router] interface gigabitethernet 1/0/2
[Router–Gigabitethernet1/0/2] ip address 20.20.20.1 255.255.255.0
[Router–Gigabitethernet1/0/2] ip address 10.0.0.1 255.255.255.0 sub
[Router-Gigabitethernet1/0/2] dhcp select relay
[Router-Gigabitethernet1/0/2] dhcp relay server-select 0
[Router-Gigabitethernet1/0/2] dhcp relay address-check enable
# Enable re-DHCP portal authentication on the interface connecting the host.
[Router–Gigabitethernet1/0/2] portal server newpt method redhcp
[Router–Gigabitethernet1/0/2] quit
Configuring cross-subnet portal authentication
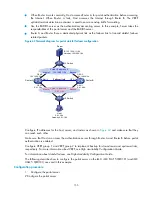
Network requirements
As shown in
:
•
Router A is configured for cross-subnet portal authentication. Before passing portal authentication, a
user can access only the portal server. After passing portal authentication, the user can access
Internet resources.
•
The host accesses Router A through Router B.
•
A RADIUS server serves as the authentication/accounting server.
Figure 58
Configure cross-subnet portal authentication
Make sure that the IP address of the portal device added on the portal server is the IP address of the
interface connecting users (20.20.20.1, in this example), and the IP address group associated with the
portal device is the network segment where the users reside (8.8.8.0/24, in this example).
Configure IP addresses for the host, routers, and servers as shown in
and make sure that they
can reach each other.
Perform configurations on the RADIUS server to ensure that the user authentication and accounting
functions can work normally.


