54 Assembly
OPTIONAL SKID SHOES
Hiniker offers an optional skid shoe package that
will help with keeping the shredder knives from
contacting the ground. The skid plates extend
approximately 1/2” below the shredder knives.
1. Break the bands securing the skid shoes
with hardware together.
2. Remove the (4) 3/4 x 1 3/4” long bolts and
3/4 inch lock nuts in each skid shoe and
save them for assembly to the shredder.
3. Raise the shredder as high as the hydraulic
lift will allow it while attached to tractor and
block it in this position with stands.
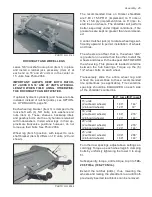
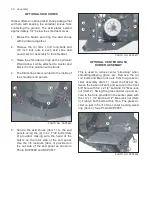
4. The Skid shoes are mounted to the inside of
the shredder end panels.
1
2
2
2
2
PHOTO NO. DCP0669
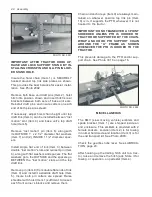
5. Secure the skid shoes (Item 1) to the end
panels using the (4) 3/4 x 1 3/4 bolts (Item
2) provided, making sure the head of the
bolt is on the rotor side of the end panel.
Use the 3/4 locknuts (Item 3) provided on
the out side of the end panel as shown in
Photo DCP0669 and DCP0677.
1
3
3
3
3
PHOTO NO. DCP0677
OPTIONAL CENTER GRASS
DIVIDER ASSEMBLY
This is used to reduce center “streaking” when
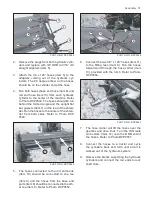
shredding/clipping grass, etc. Remove the (2)
1/2” bolts and Mac-lock nuts from the grass di-
vider assembly (Item 1). Insert the flat bar be
-
tween the base unit ears and secure in the front
5/8” hole with 1/2 x 2 1/4” bolt and 1/2” Mac-lock
nut (Item 2). Swing the grass divider up and se-
cure to the hole provided in the center plate with
the 1/2 x 1 1/2 bolt and 1/2” Mac-lock nut (Item
3). Tighten both bolts at this time. The grass di-
vider is just in front of the center bearing weed
ring (Item 4). See Photo DCP0695.
2
1
3
4
PHOTO NO. DCP0695


